Student User Guide
Link to IMS Platform https://internships.np.edu.sg.
Table of Contents
- Azure AD Login
- Access the job before registration
- Student Application Form (Profile Creation)
- Edit Student Profile
- Internship Program Approval
- Applying for Jobs
- Successful Shortlist and Selection of Timeslots
- Awaiting Interview Results and Action for Tentative Offer
- Student Dashboard
- Self-Sourced Jobs
- On-The-Job Training (OJT)
- Assessment
- Internship Visitation Logs
- Survey (Respondent)
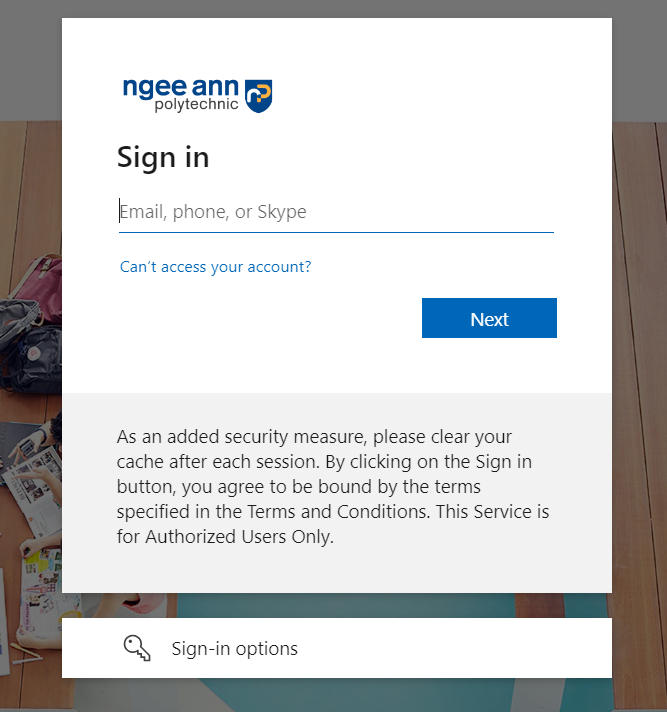
Azure AD Login
Step 1:
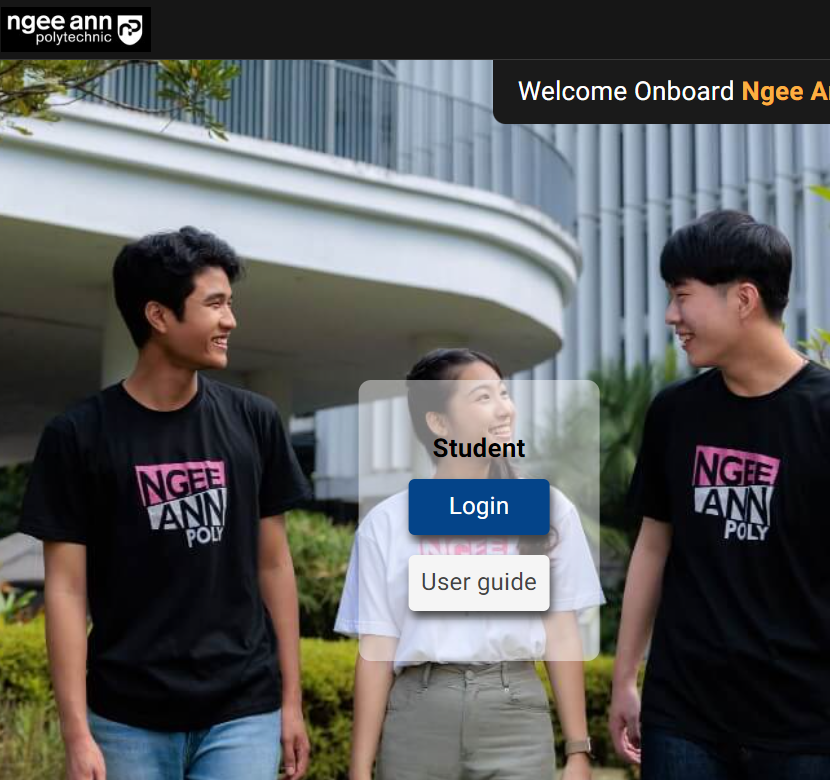
Enter the main platform https://internships.np.edu.sg/ and click on the student “Login” button.
Step 2:
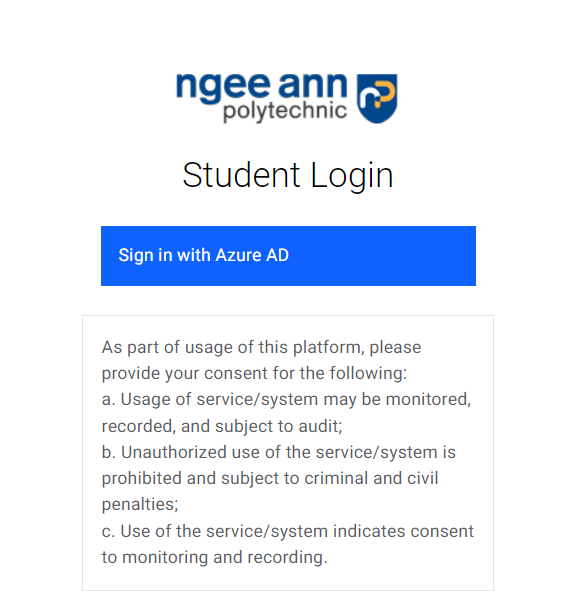
Click on the "Sign in with Azure AD" button.
Step 3:
Enter your NP student Email Address and Password.
Please do not share your account details with anyone as it can be used to log in to your account. Do not give it to anyone, even if they say they're from Ngee Ann Polytechnic!
Step 4:
You will then be automatically logged in.

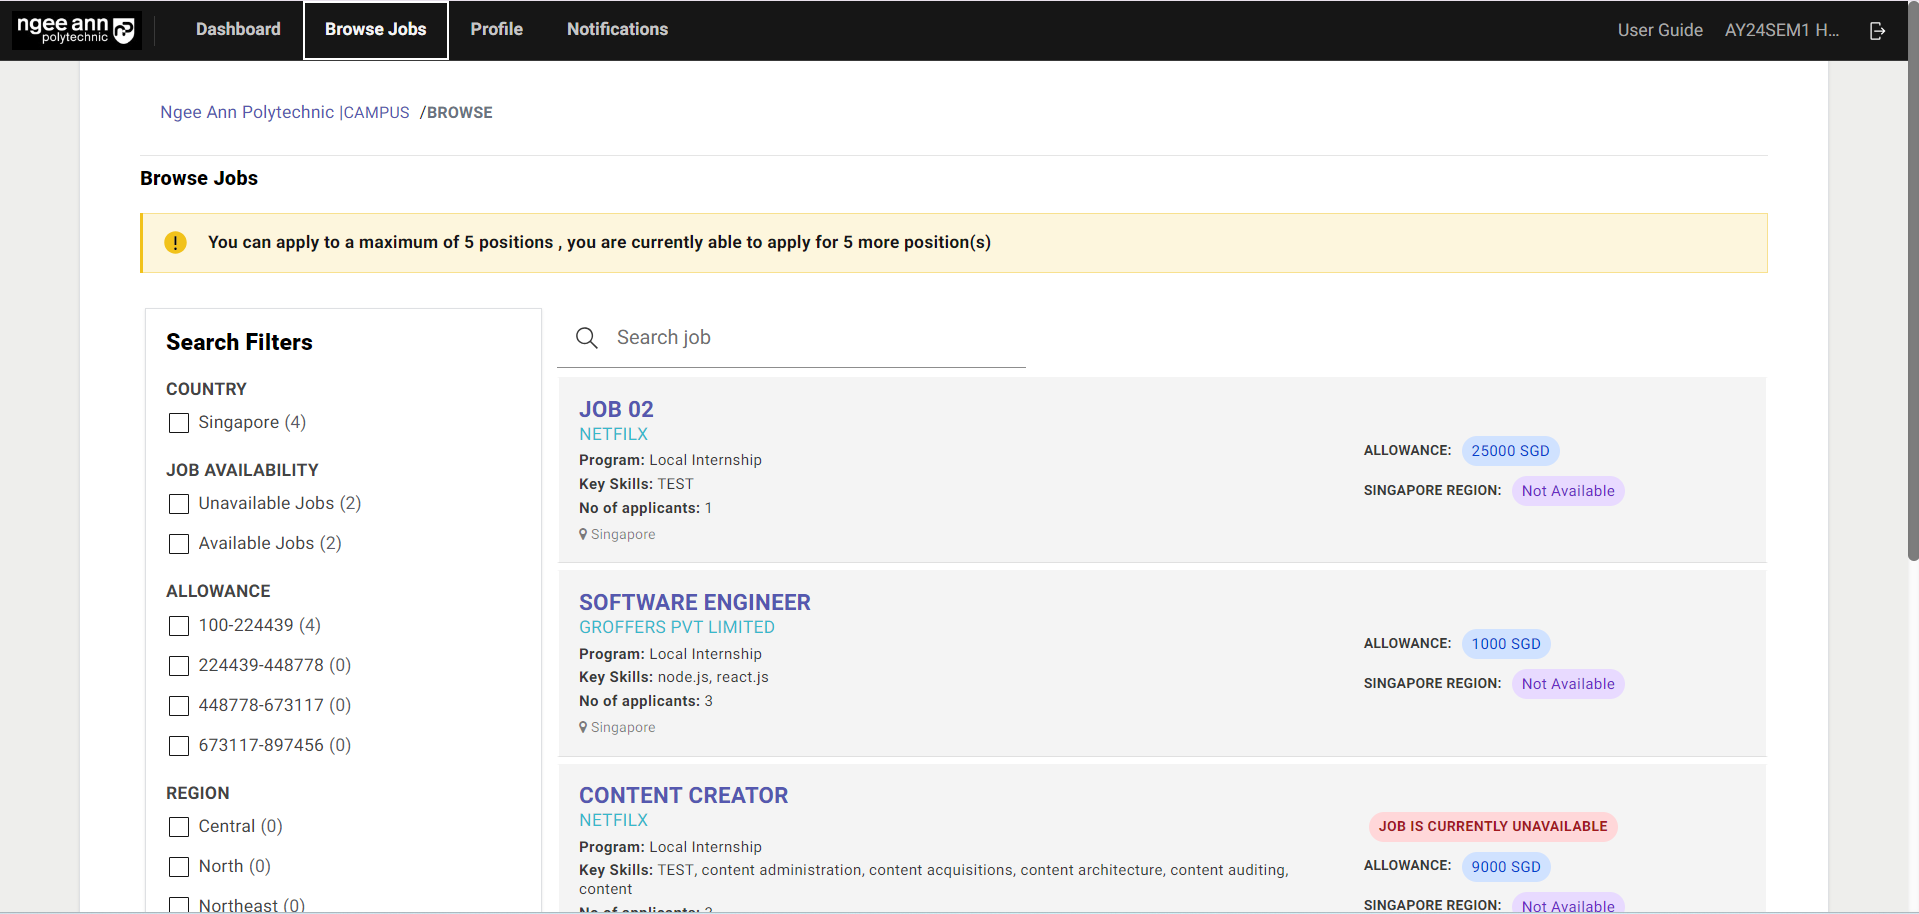
Access the job before registration
Step1:
Click on the “Browse Jobs” tab
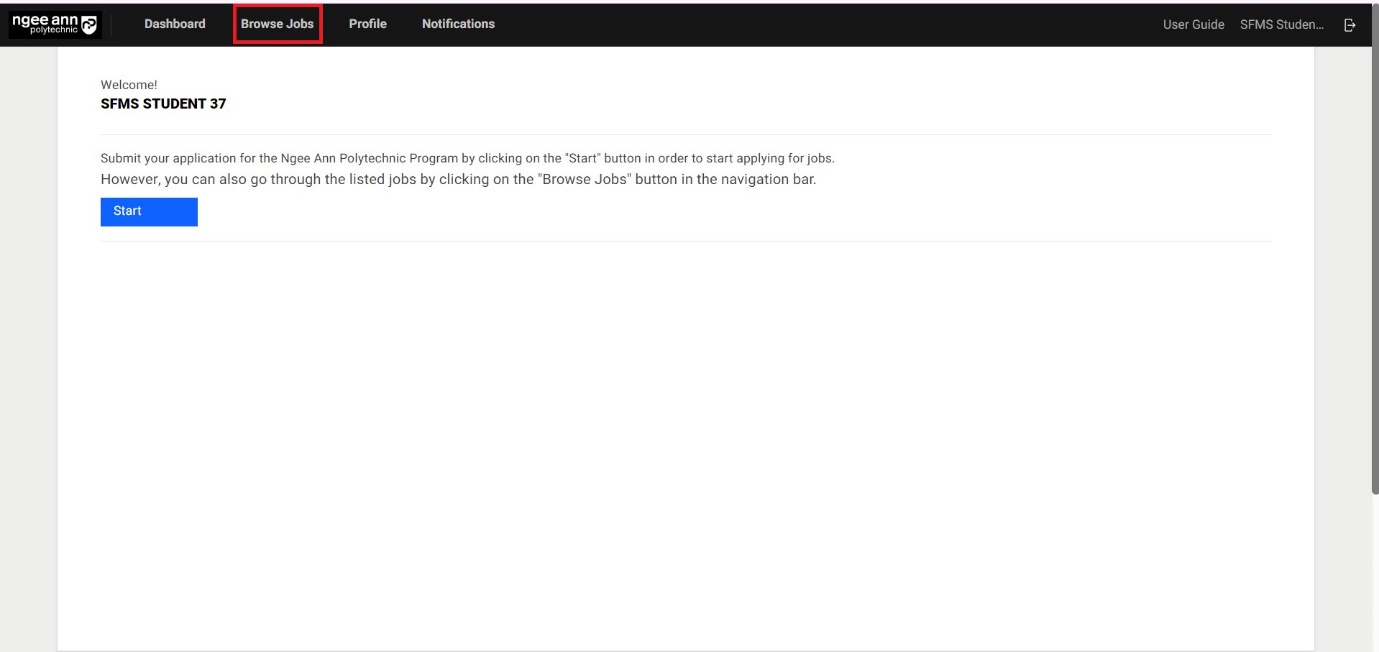
Step 2:
You will see a list of jobs with respect to the student's school and diploma course.
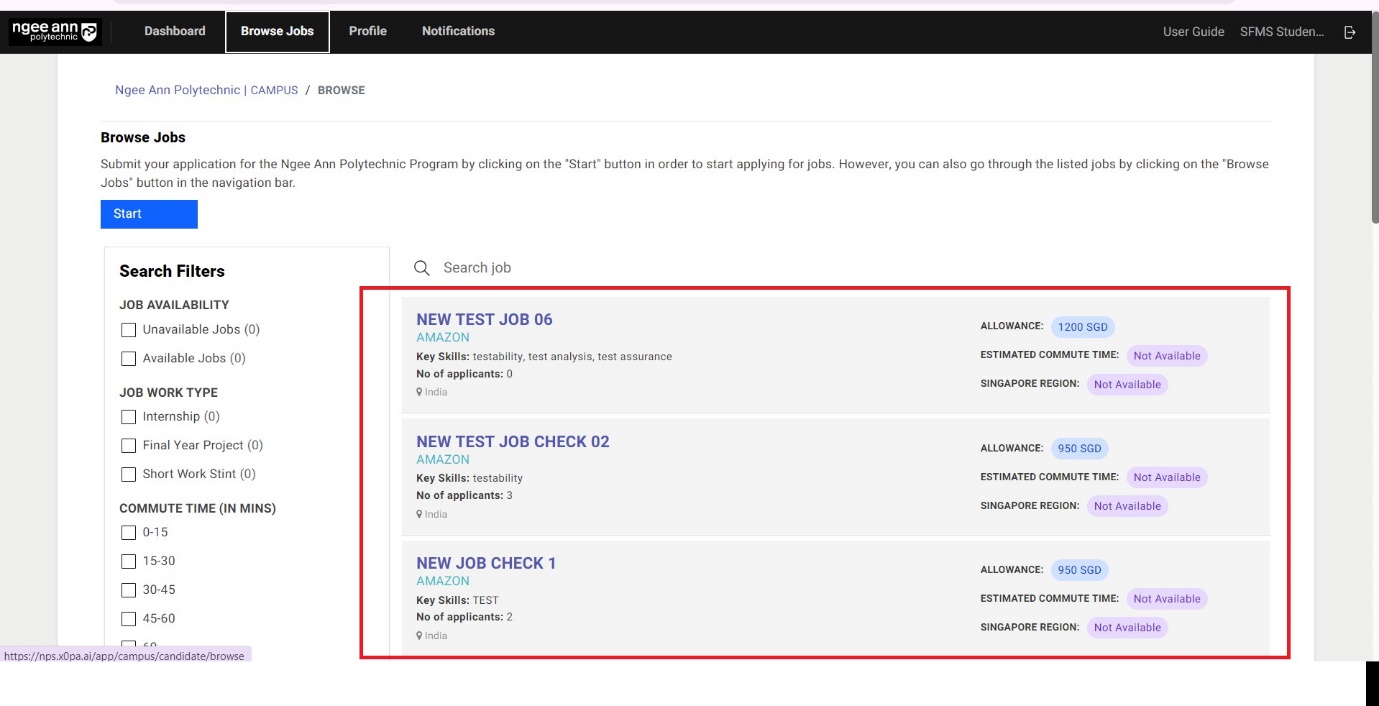
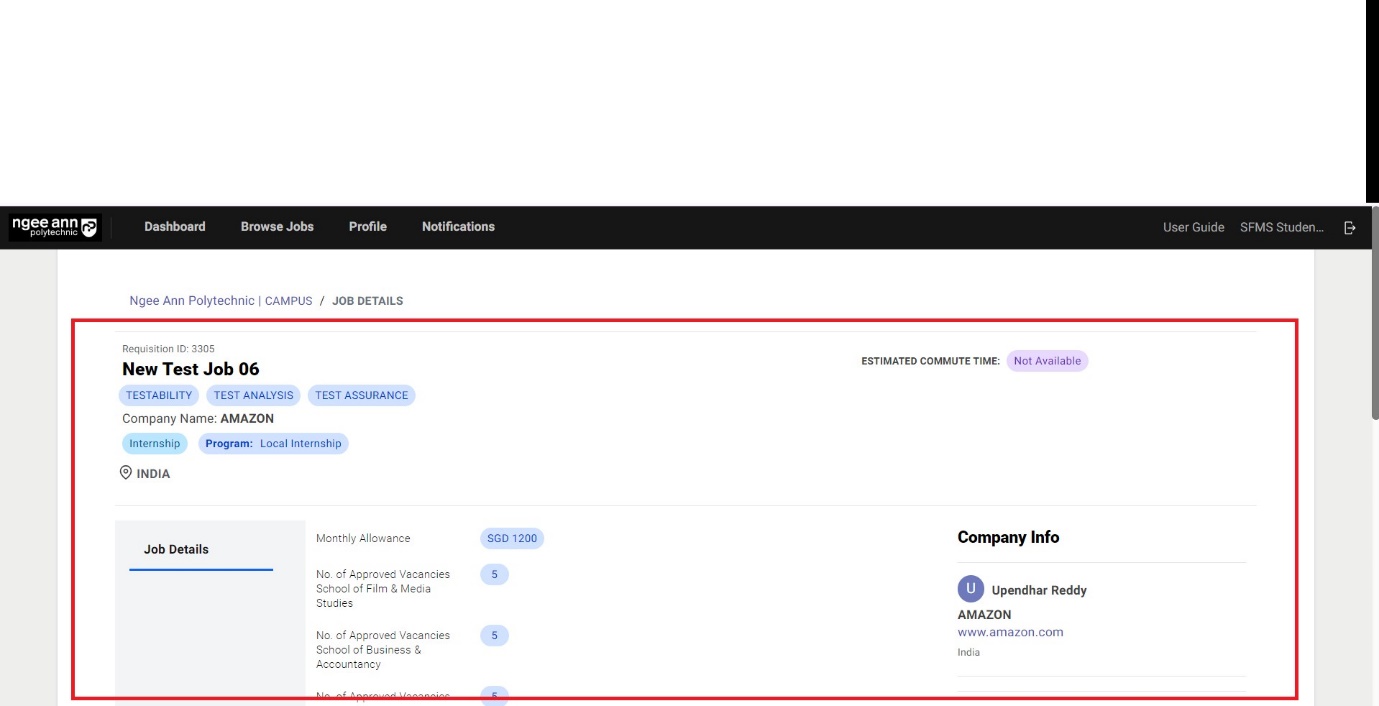
Step 3:
Clicking on the job name from the job card on the "Browse" page will take you to the "Job Details" page for that job. The "Apply for the Job" button will not appear until you have registered your student profile and selected an internship program.
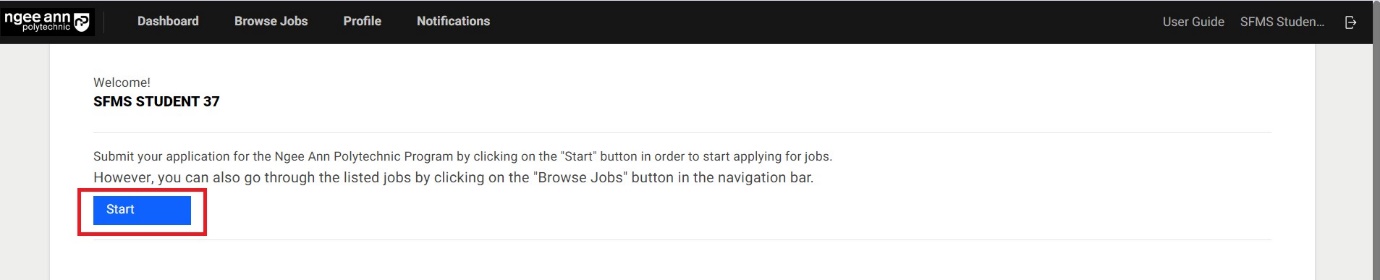
Student Application Form (Profile Creation)
Step 1:
Before applying for jobs, you will need to Create/Register your profile first. Click “Start” on the home page to begin.
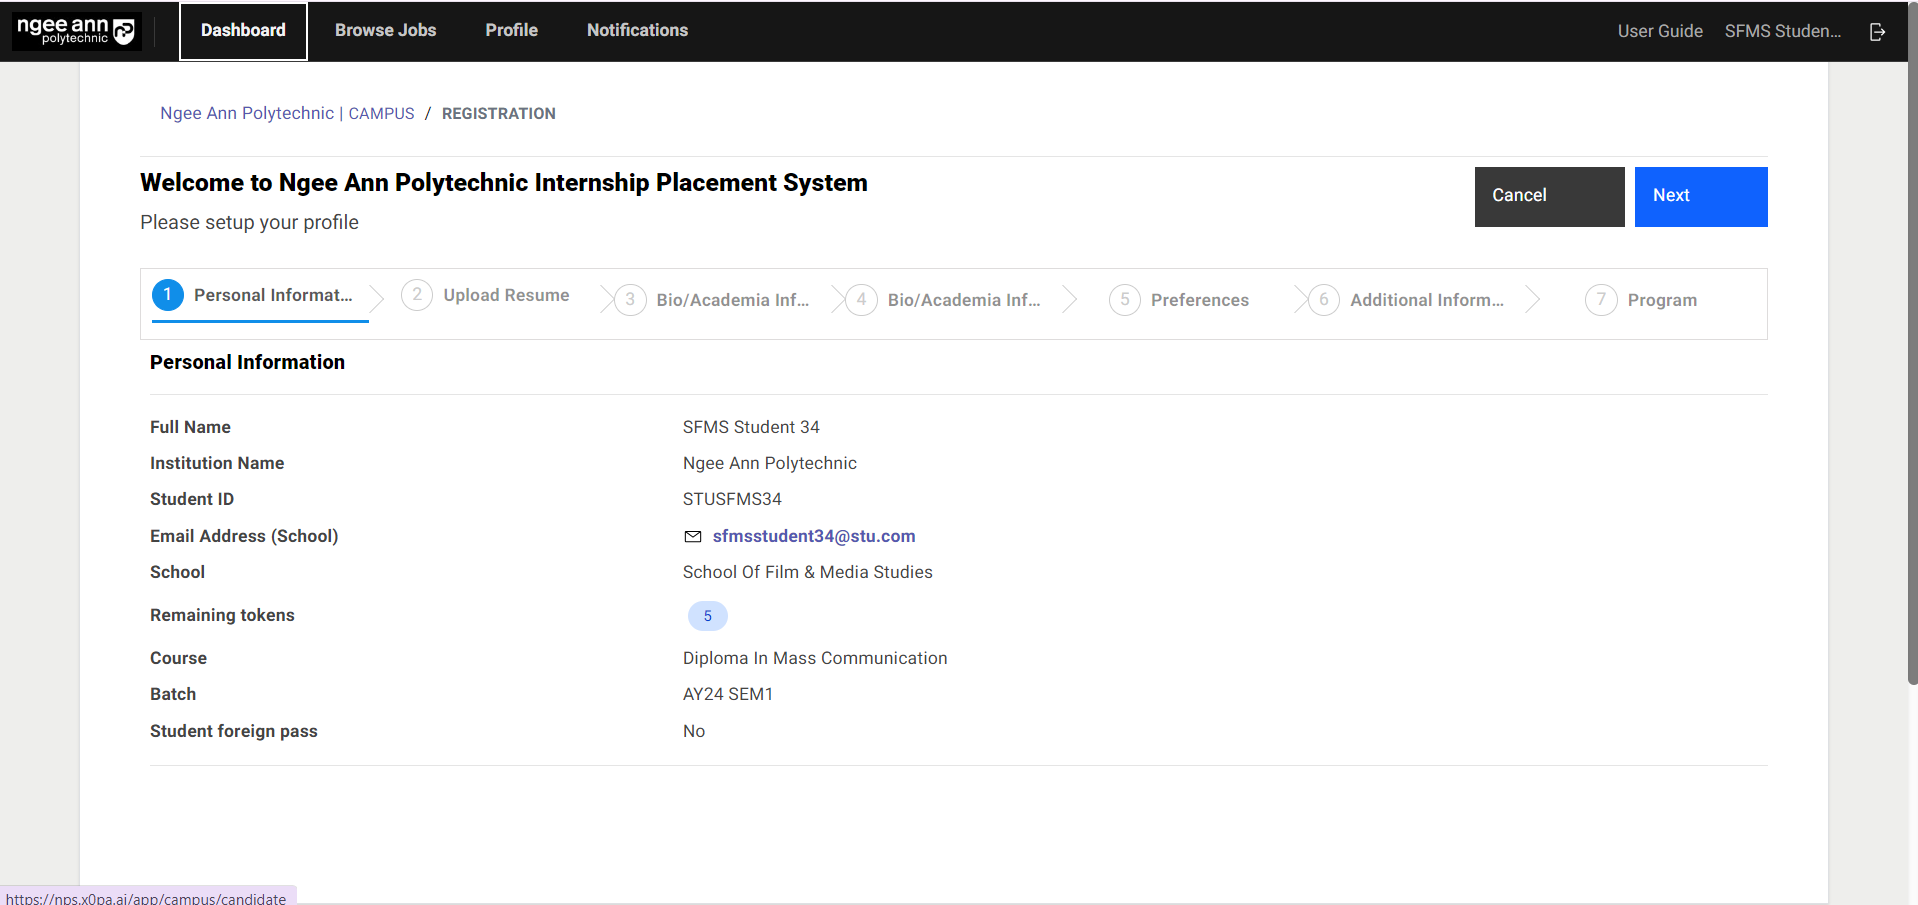
Step 2: Personal Information
Please verify your details here before clicking "Next" to continue.
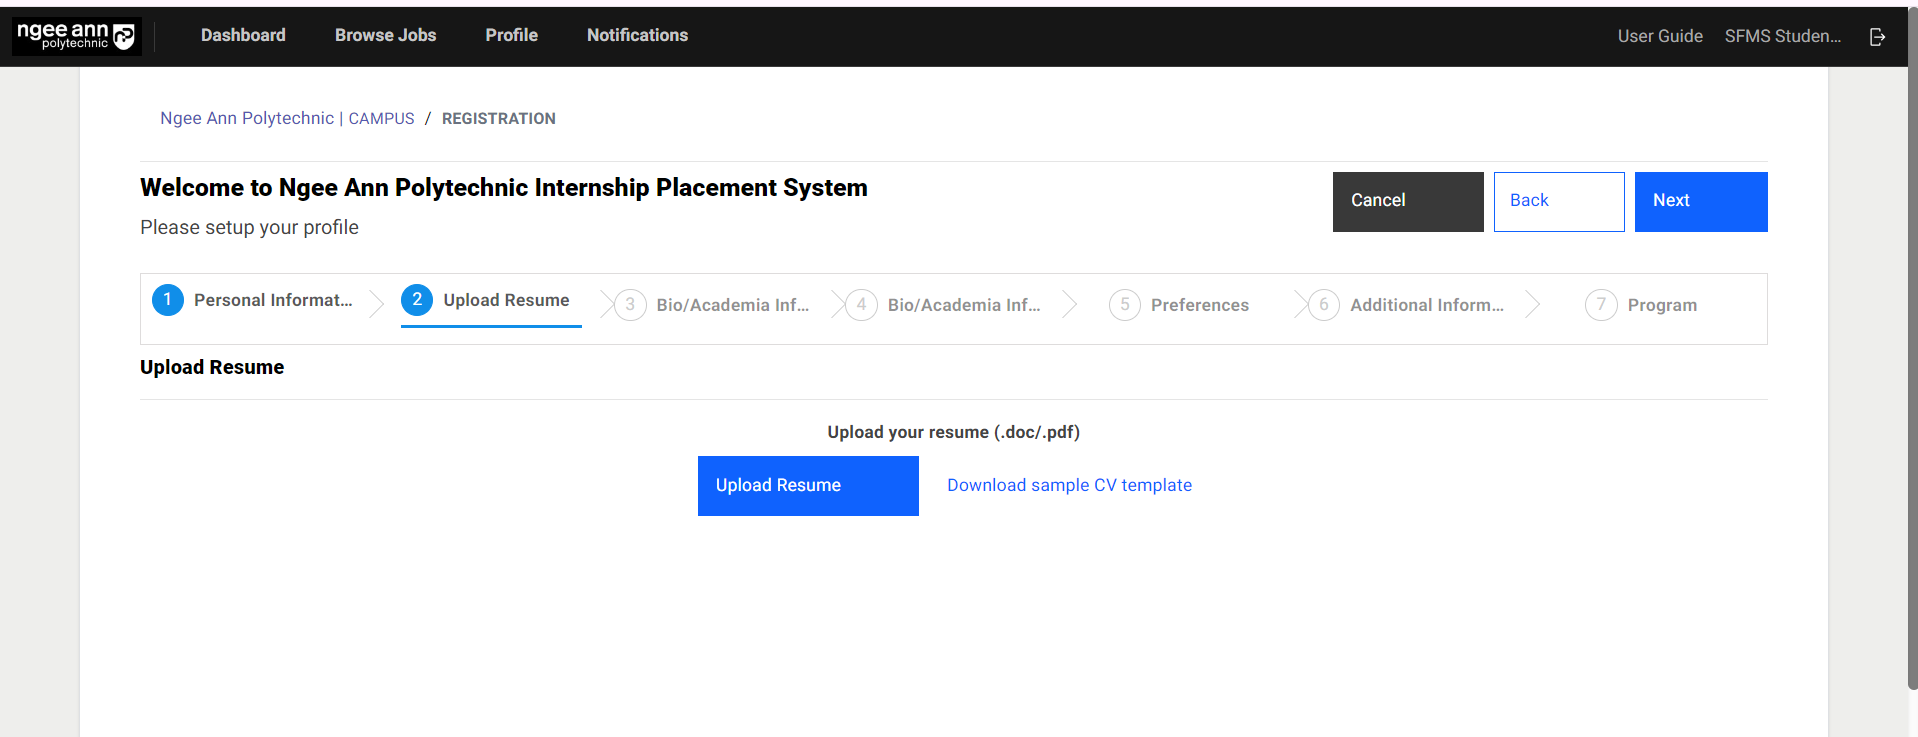
Step 3: Upload Resume
Click on "Upload Resume" to upload your resume. Click on "Download Sample CV Template" for a sample template. It is mandatory to upload your resume. The processing of the resume should take less than 3 minutes to complete. If you're facing issues here, refresh the page (using F5) to try again.
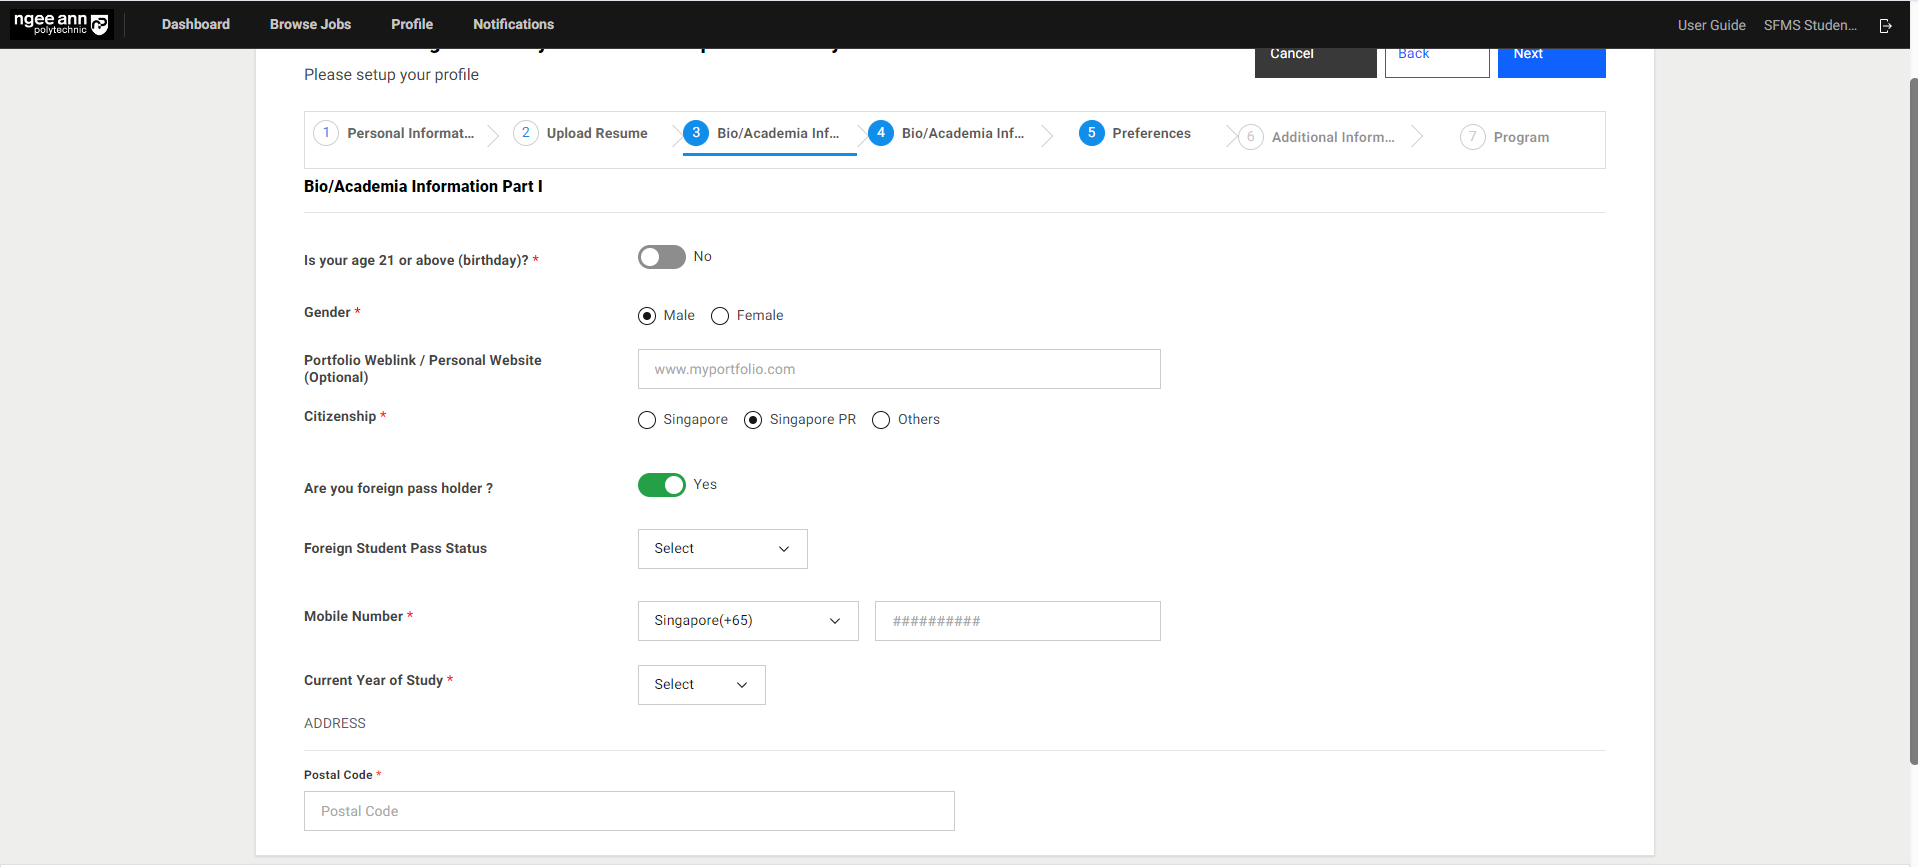
Step 4: Bio/Academia Information Part I
Fill in the respective details below.
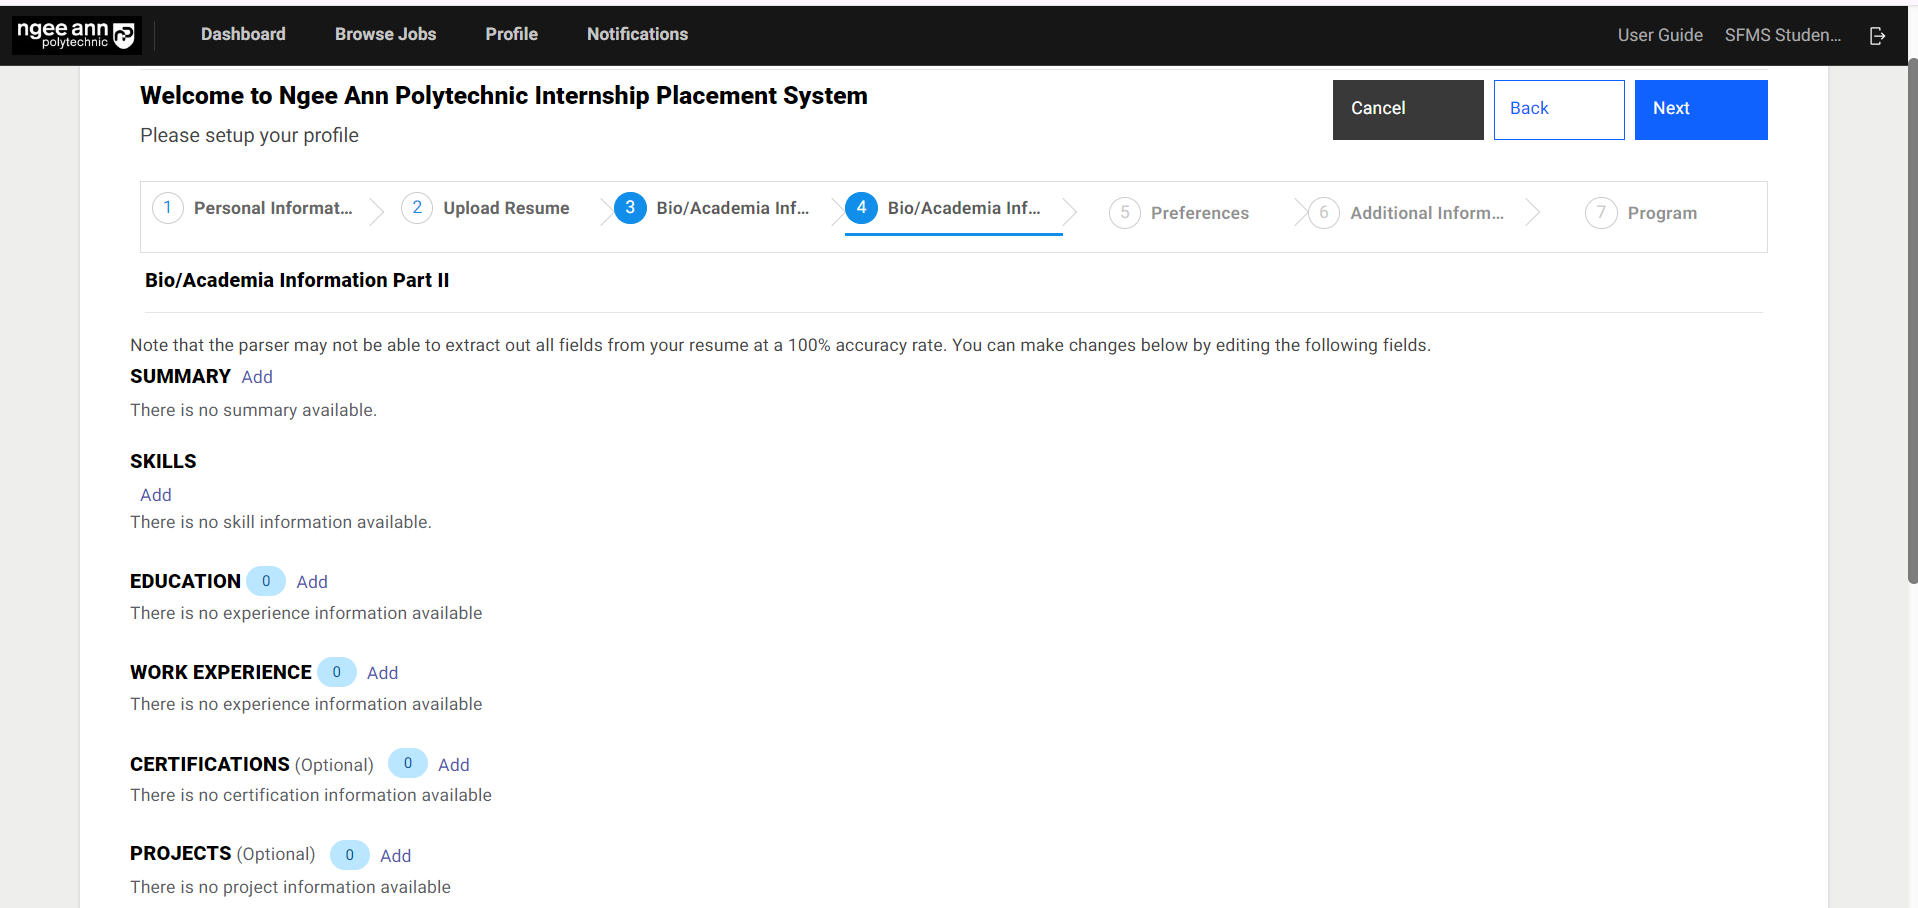
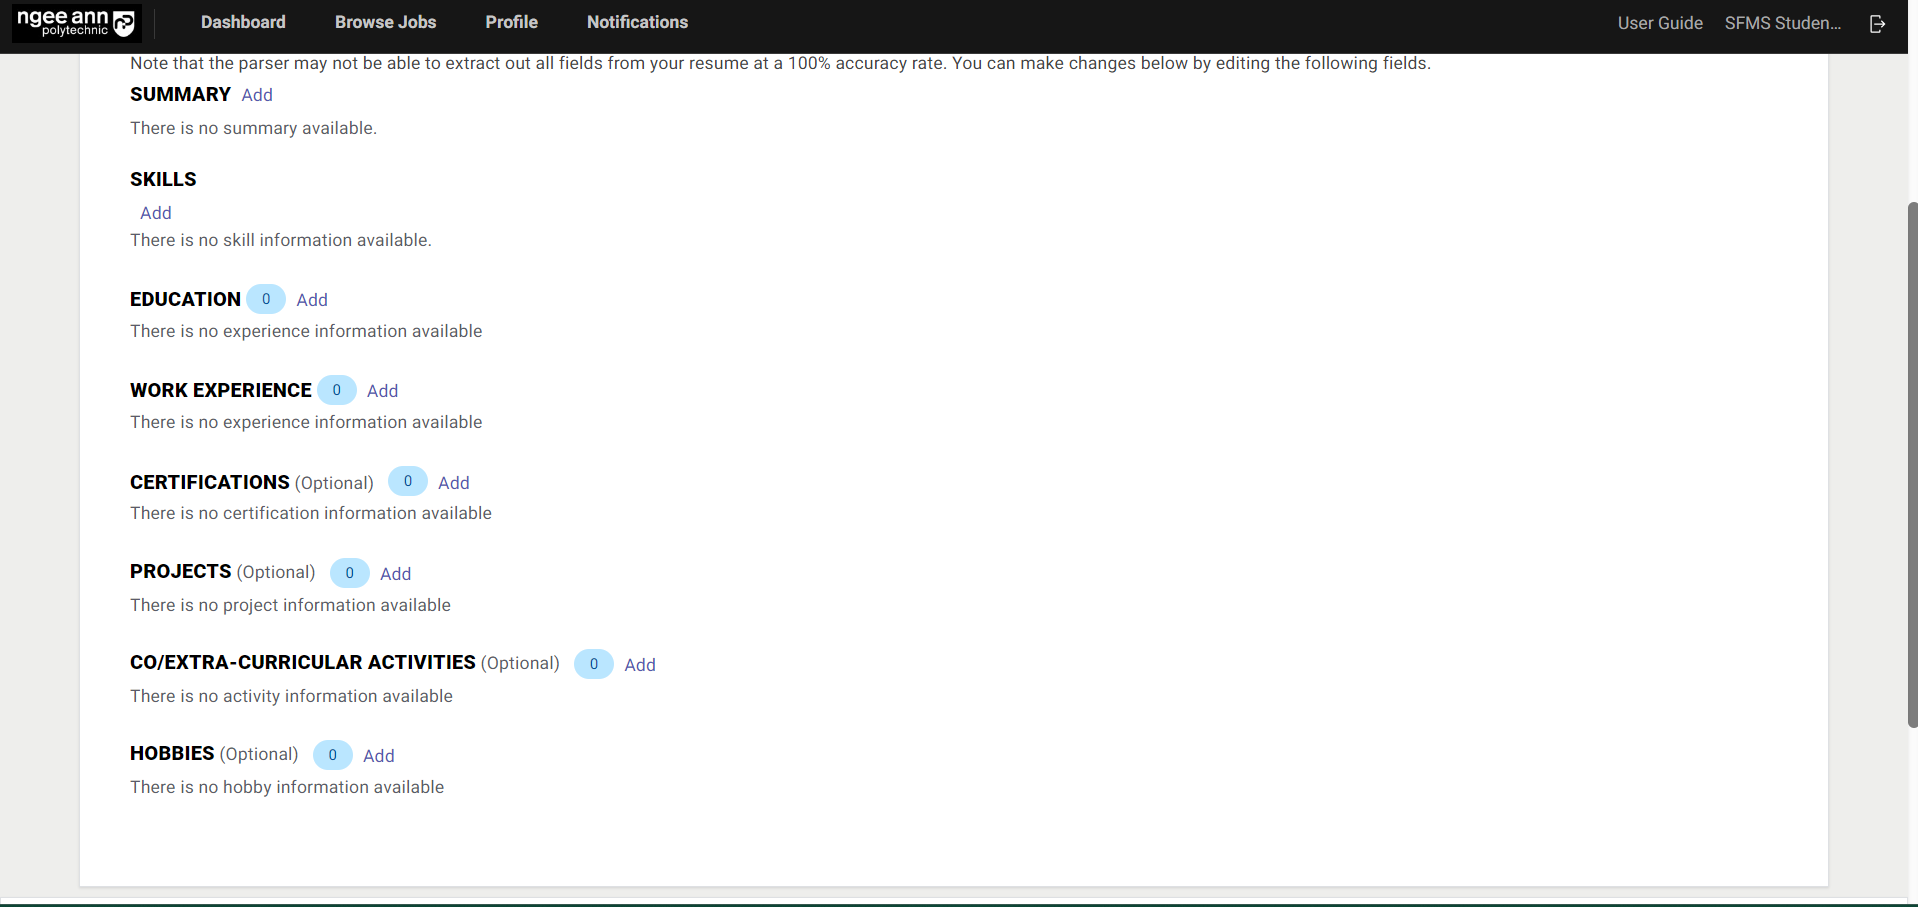
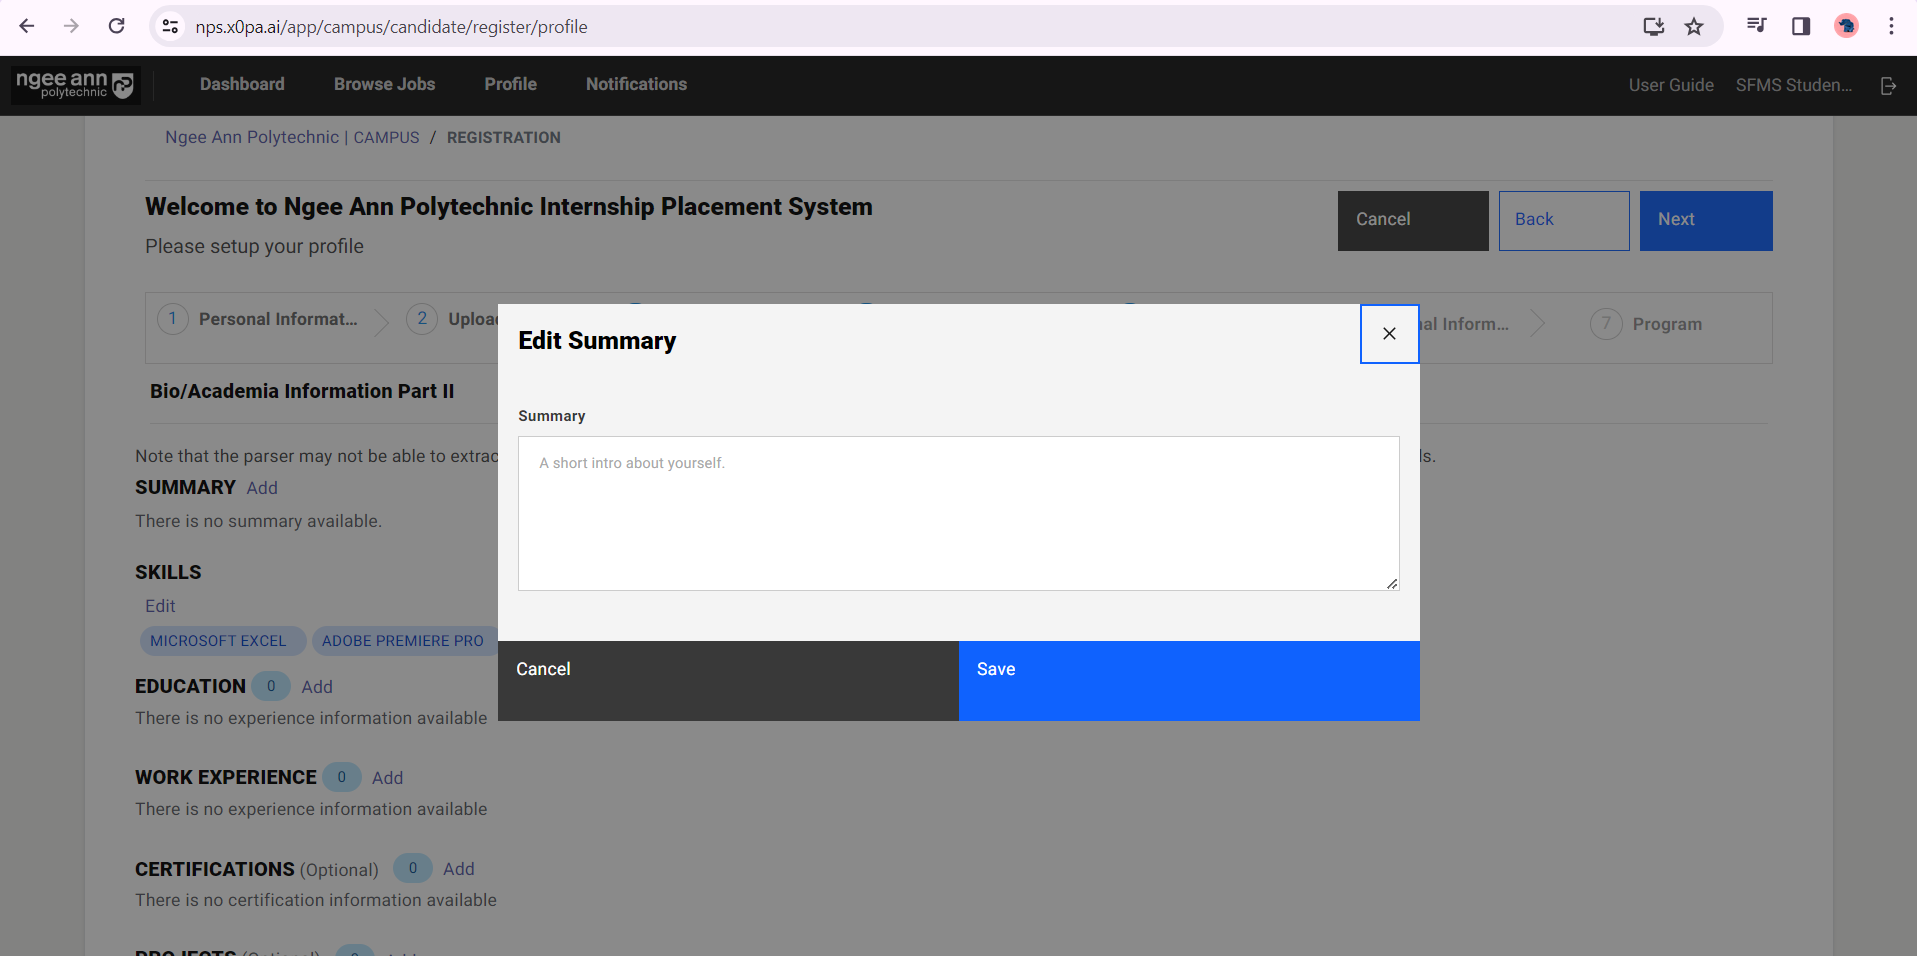
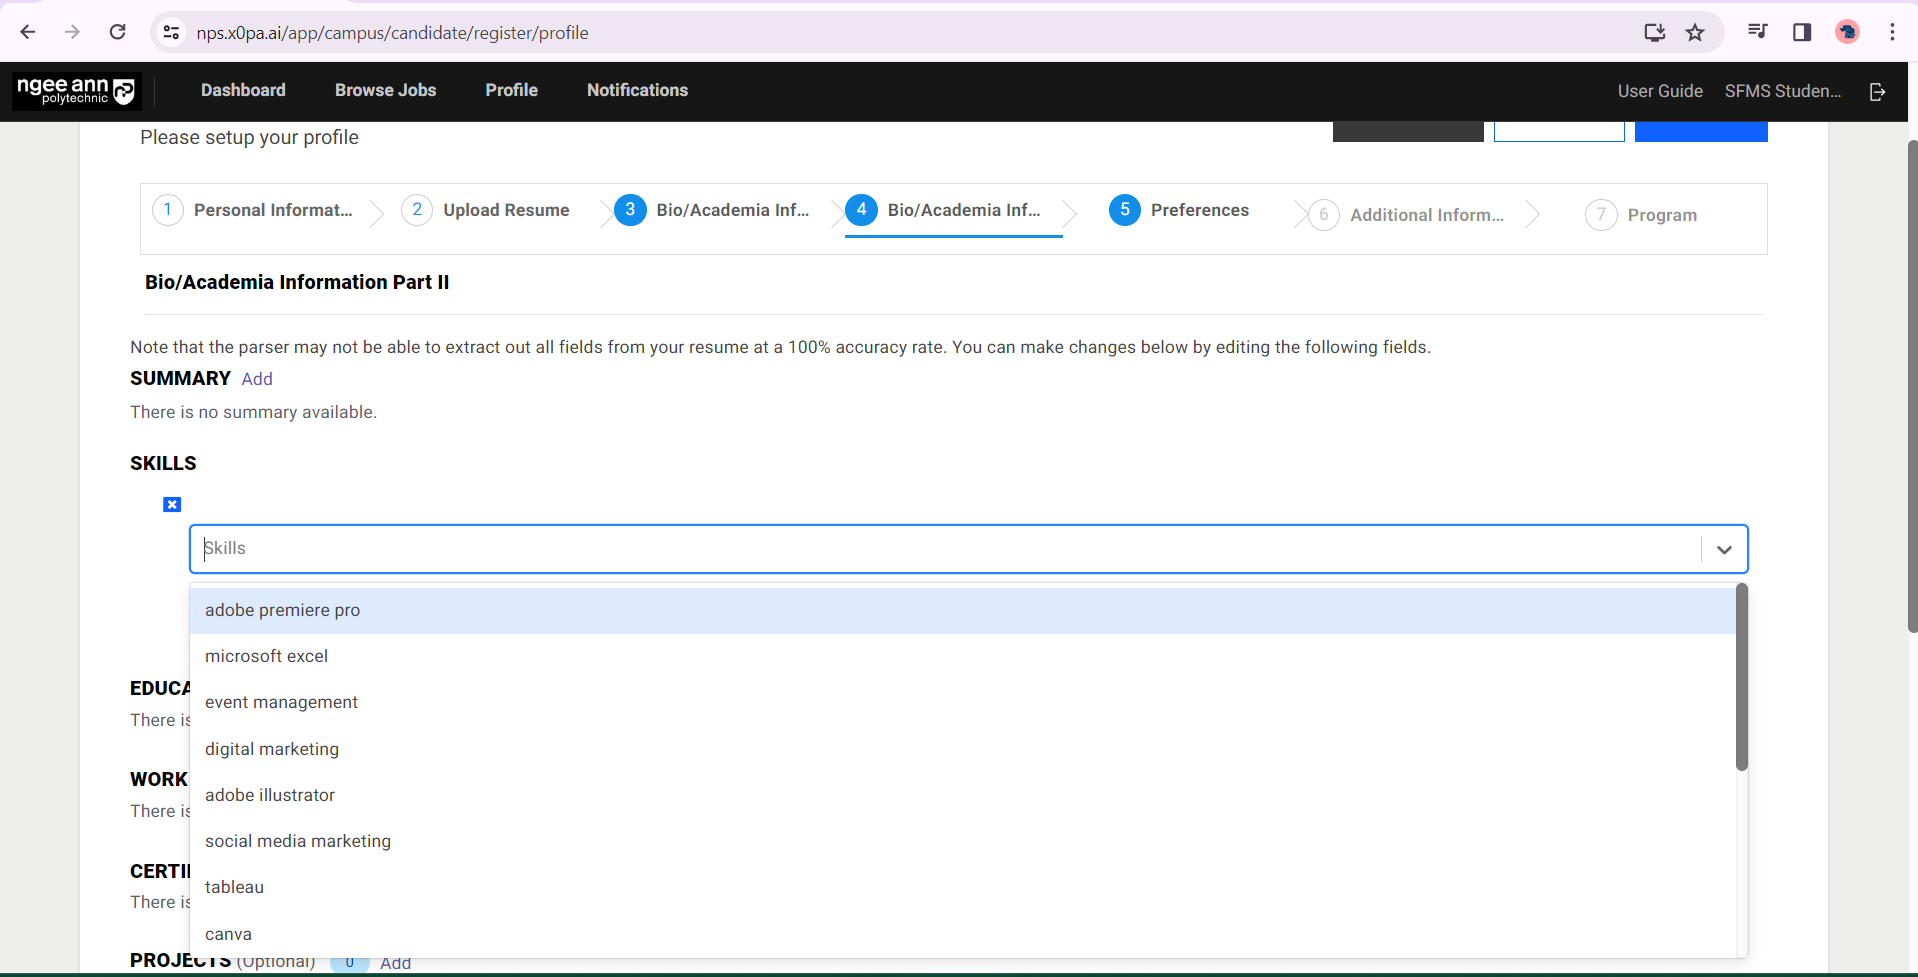
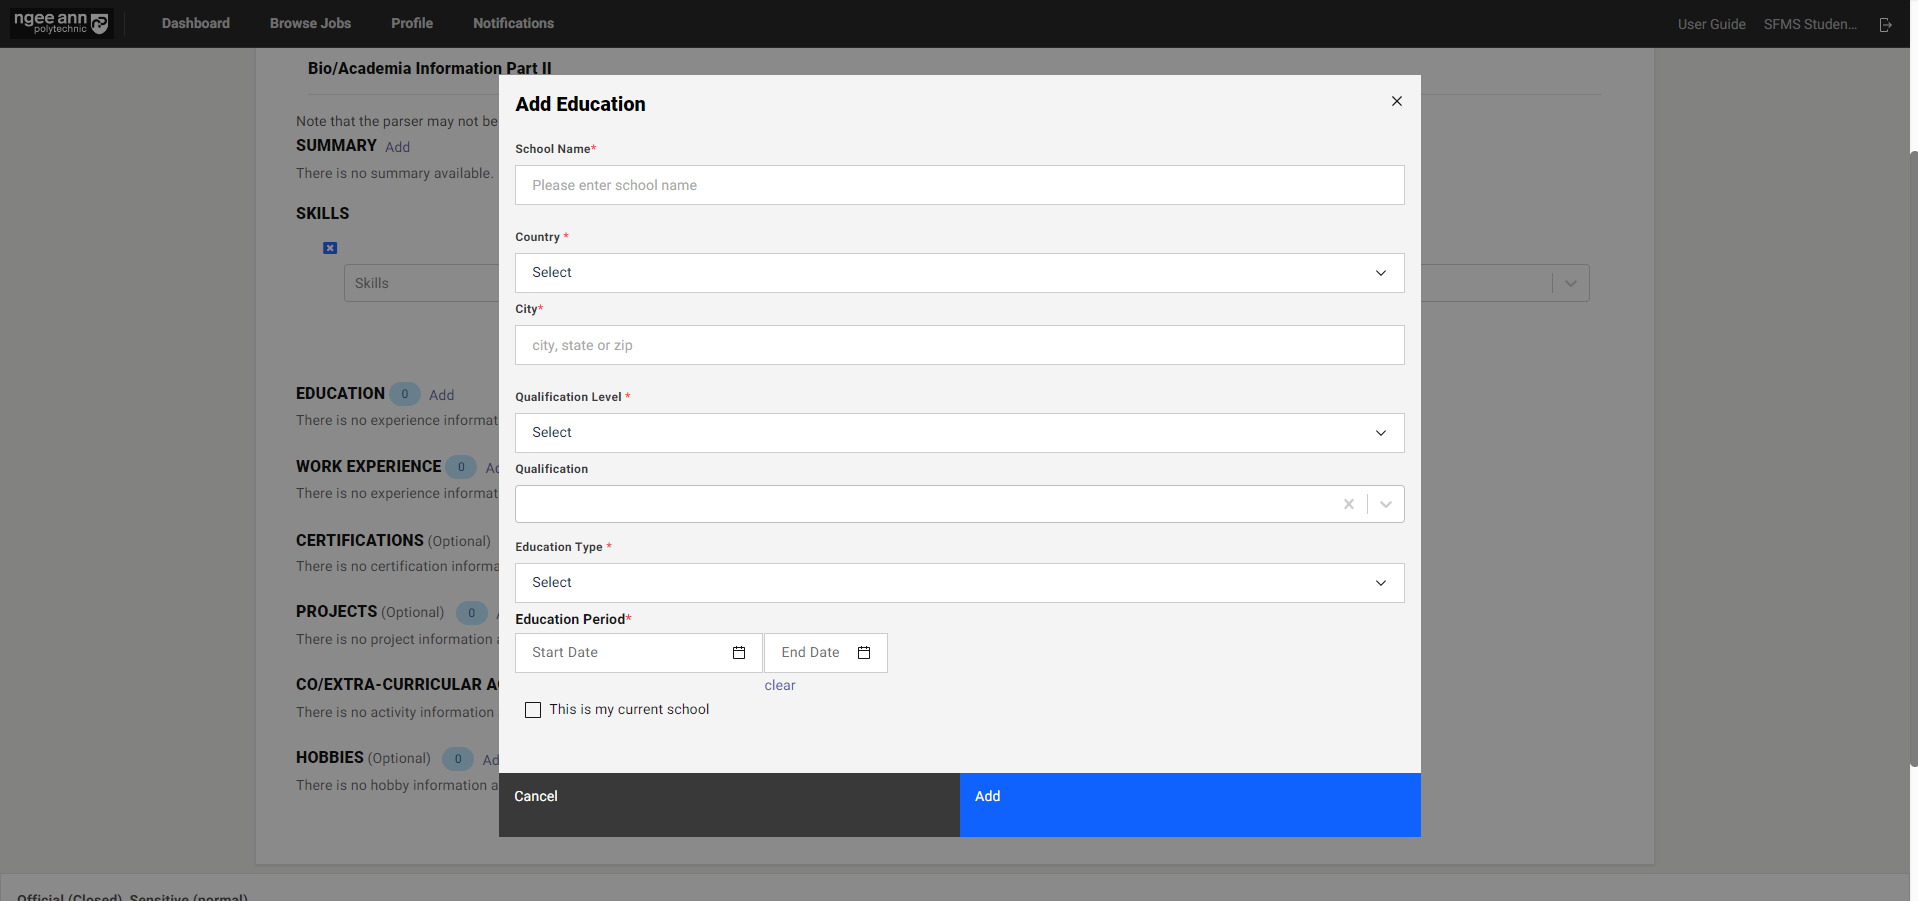
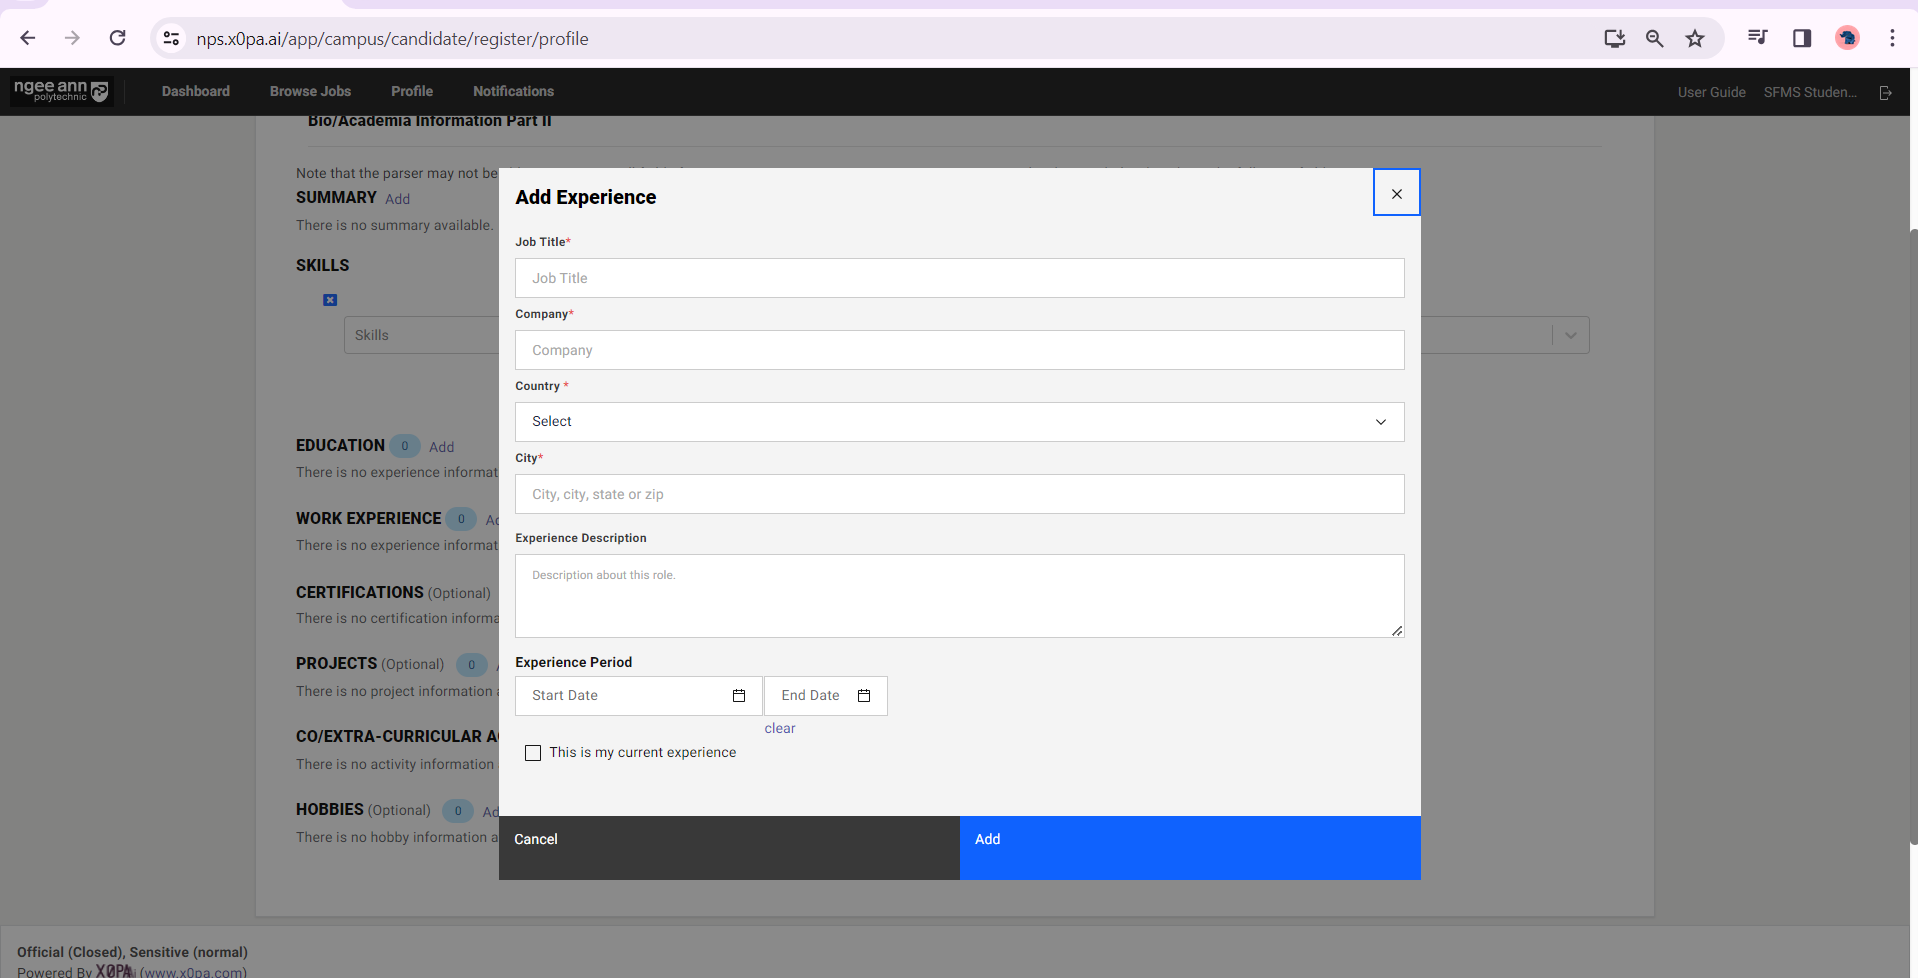
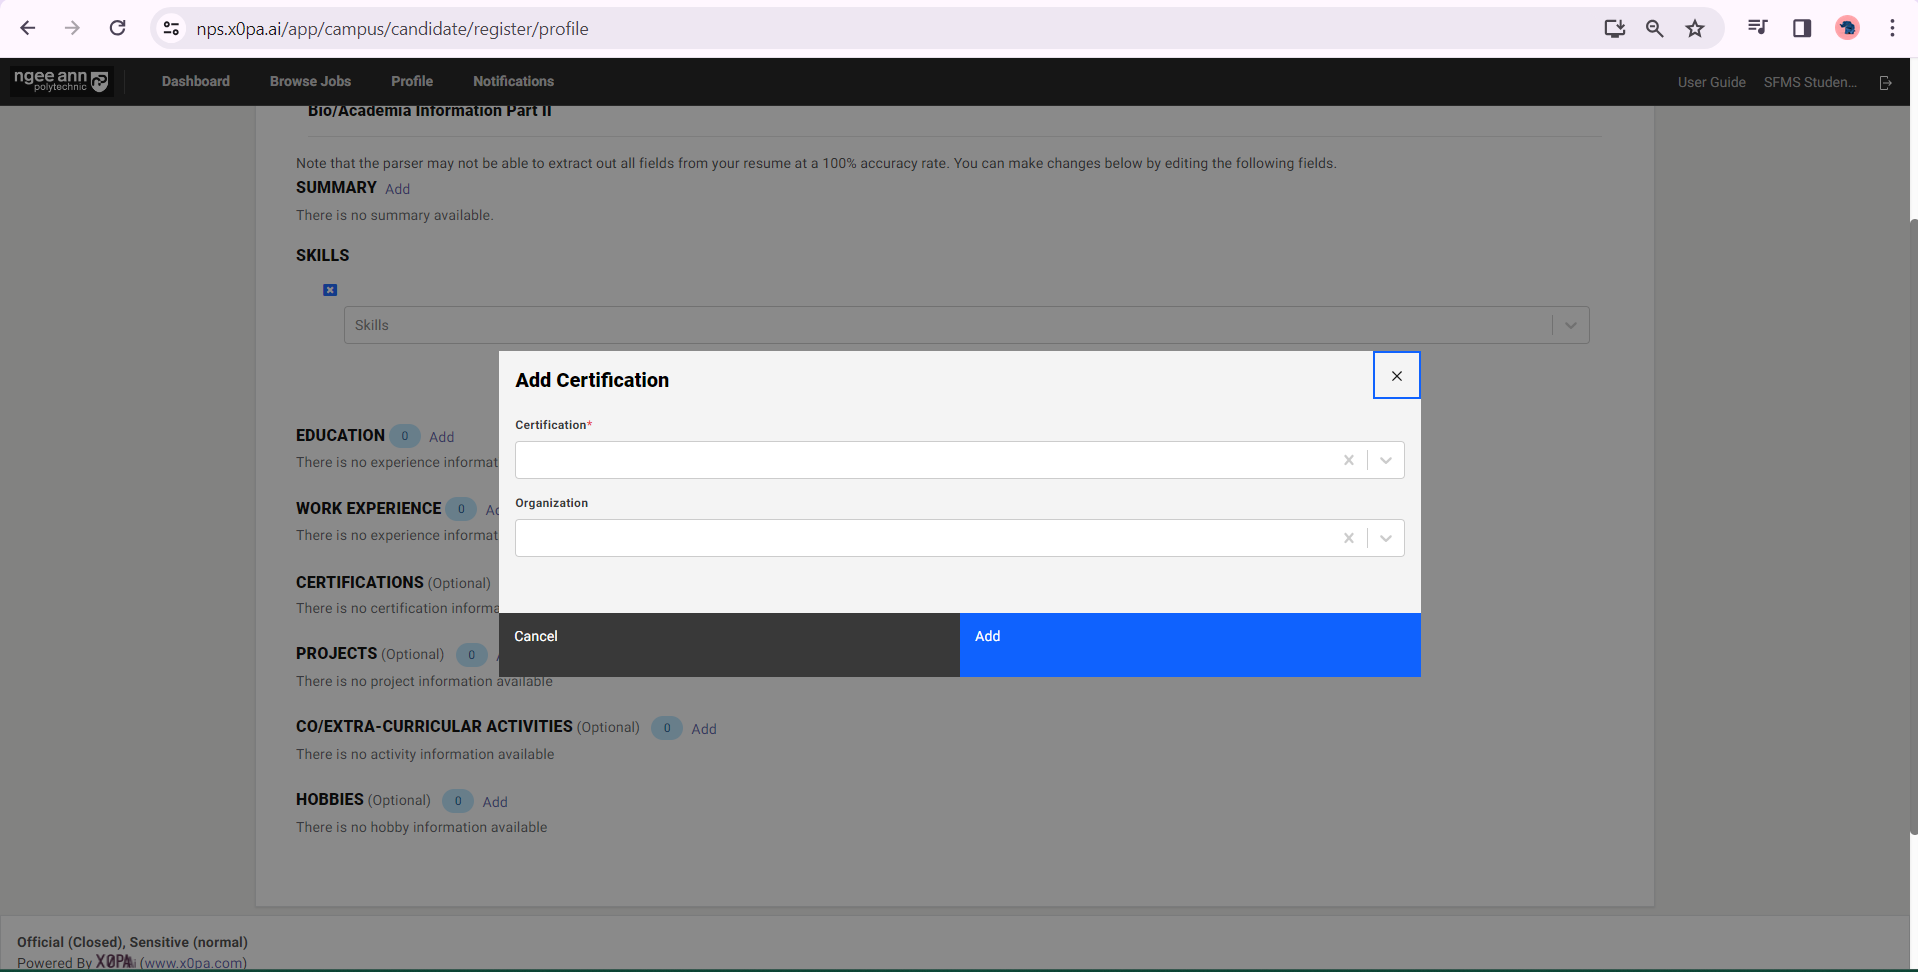
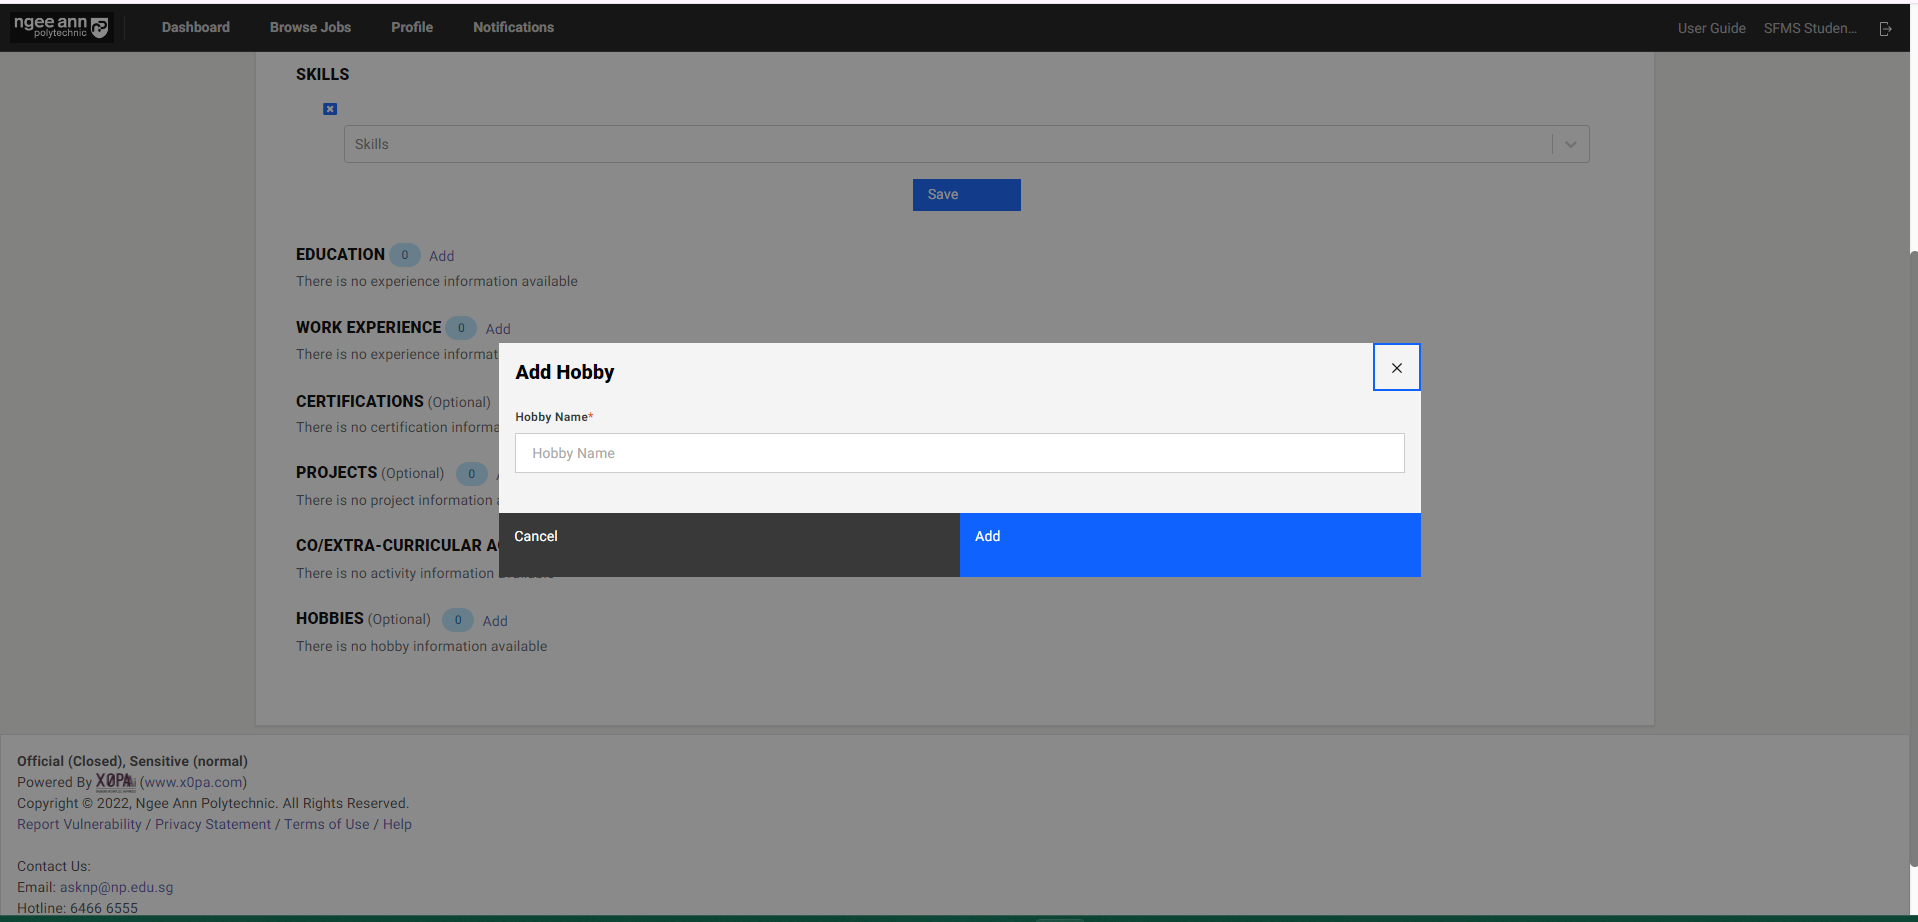
Step 5: Bio/Academia Information Part II
Click on the "Add" button to add details to the fields. And the "Edit" button to update the details once details are added or saved.

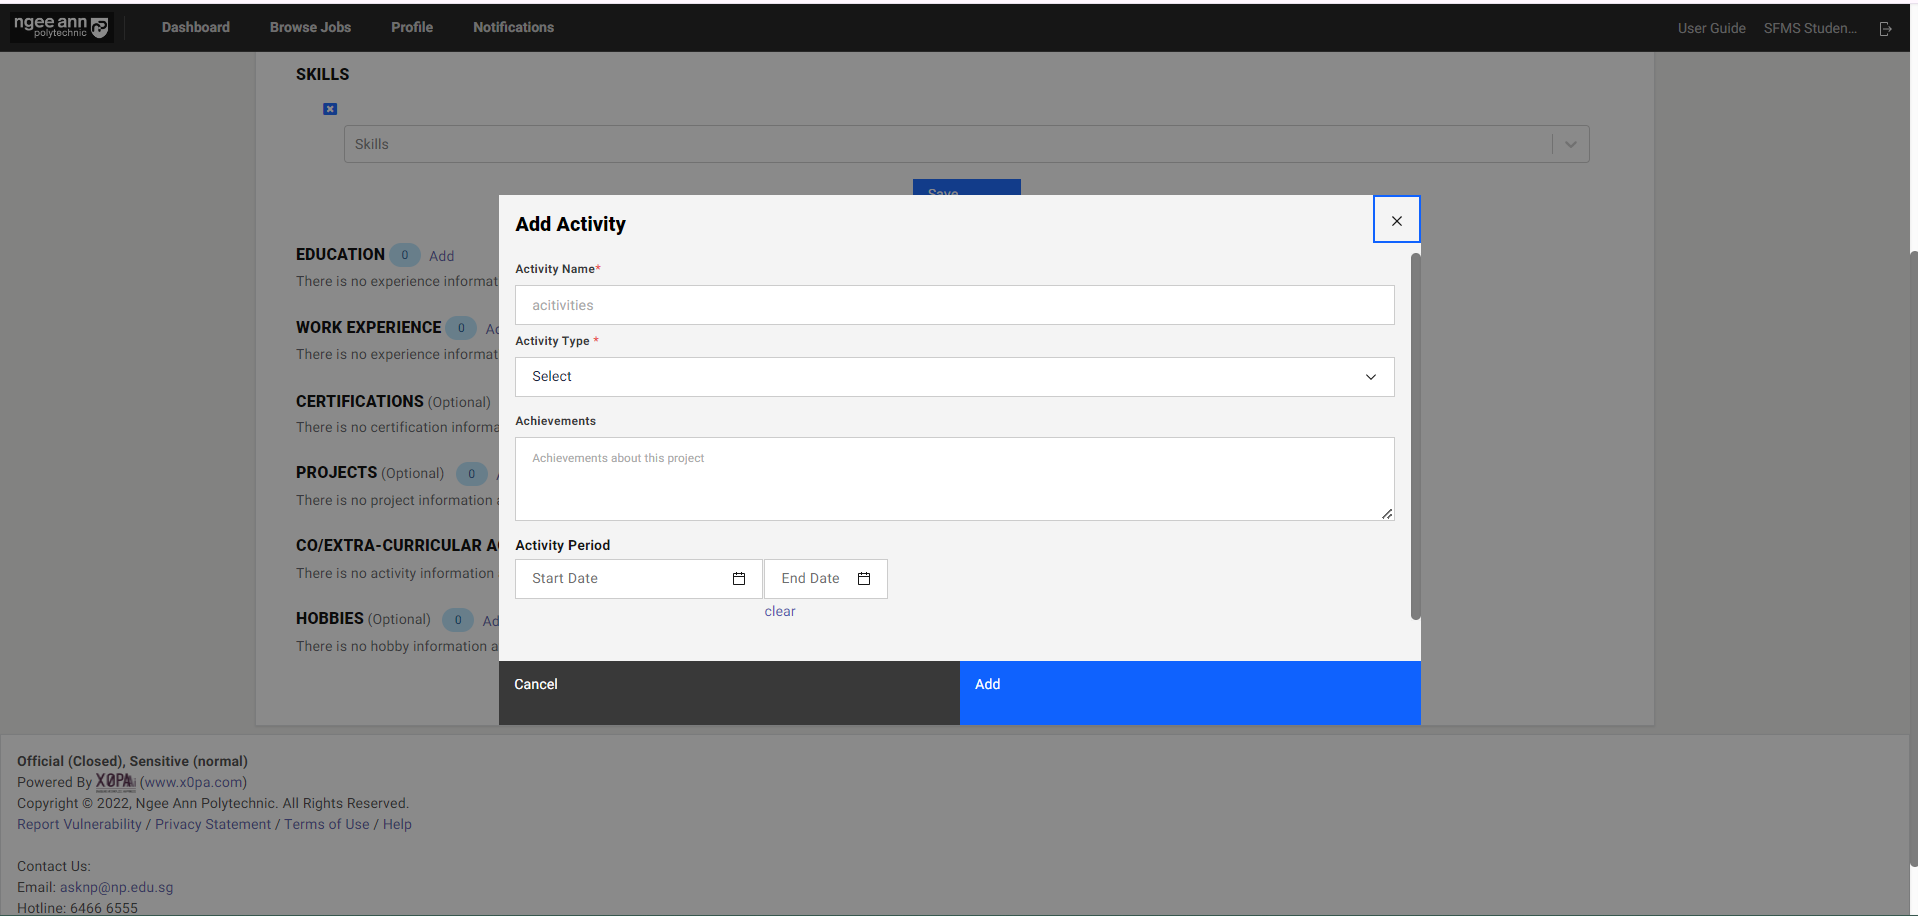
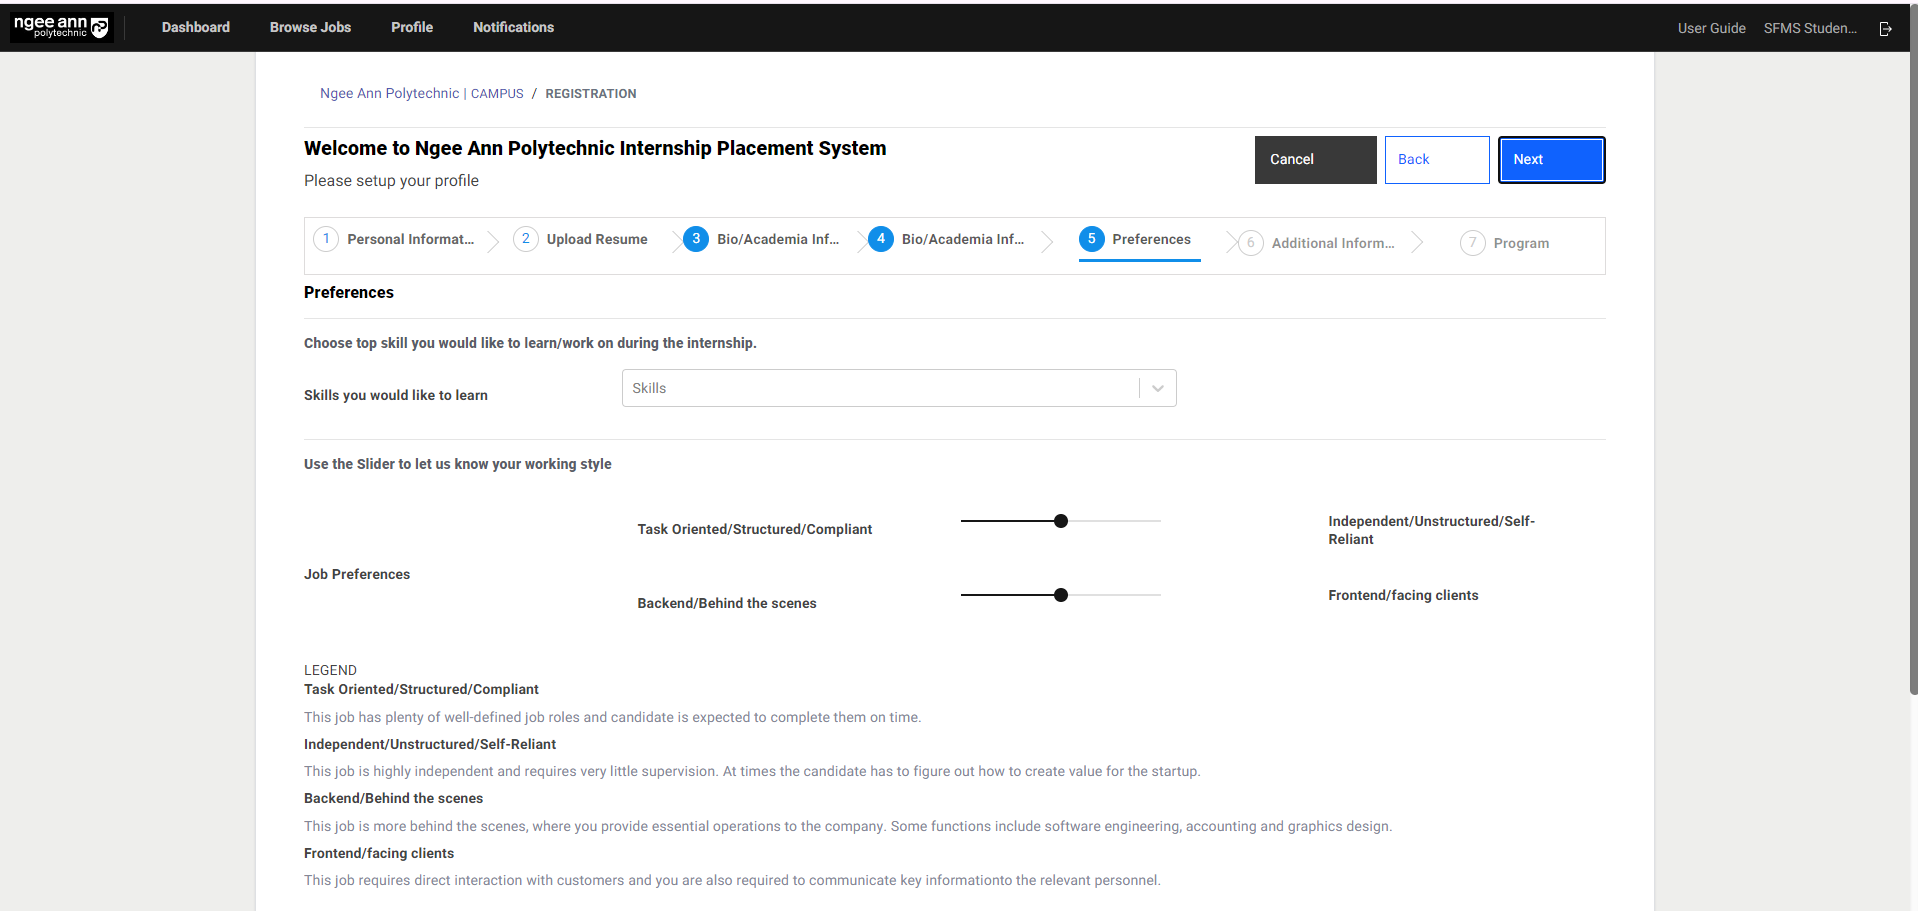
Step 6: Preferences
Fill in the respective details below.
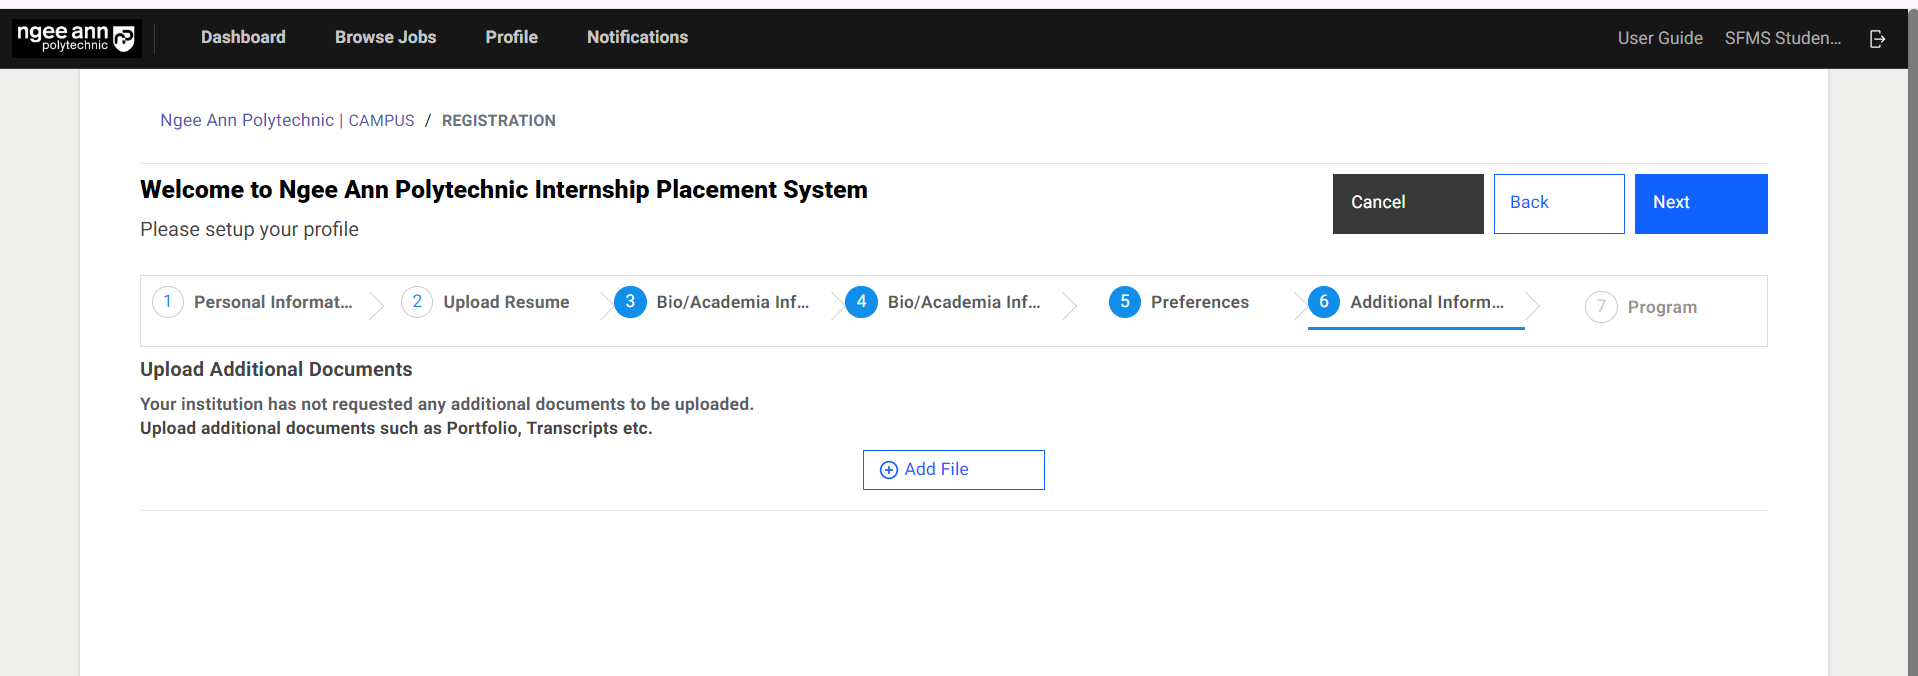
Step 7: Additional Information
You may upload additional relevant documents if required.
Step 8: Program
Select the internship program from the dropdown

Step 9:
Click on the “Submit” button to complete the registration and a success screen will be shown once registration is completed successfully

Edit Student Profile
Step 1:
Click on the “Profile” tab
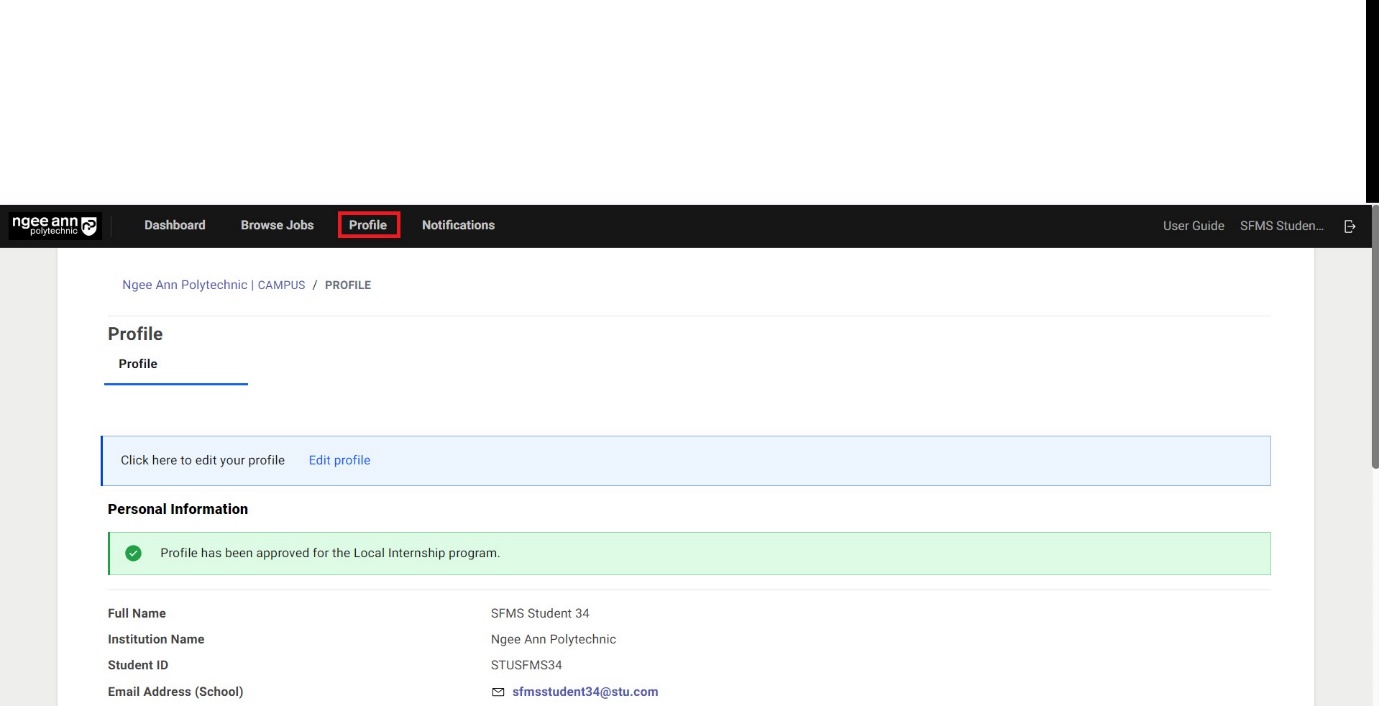
Step 2:
To edit a student's profile, click on the “Edit Profile” button and again navigate to the registration page, where you can edit or update details in the fields.
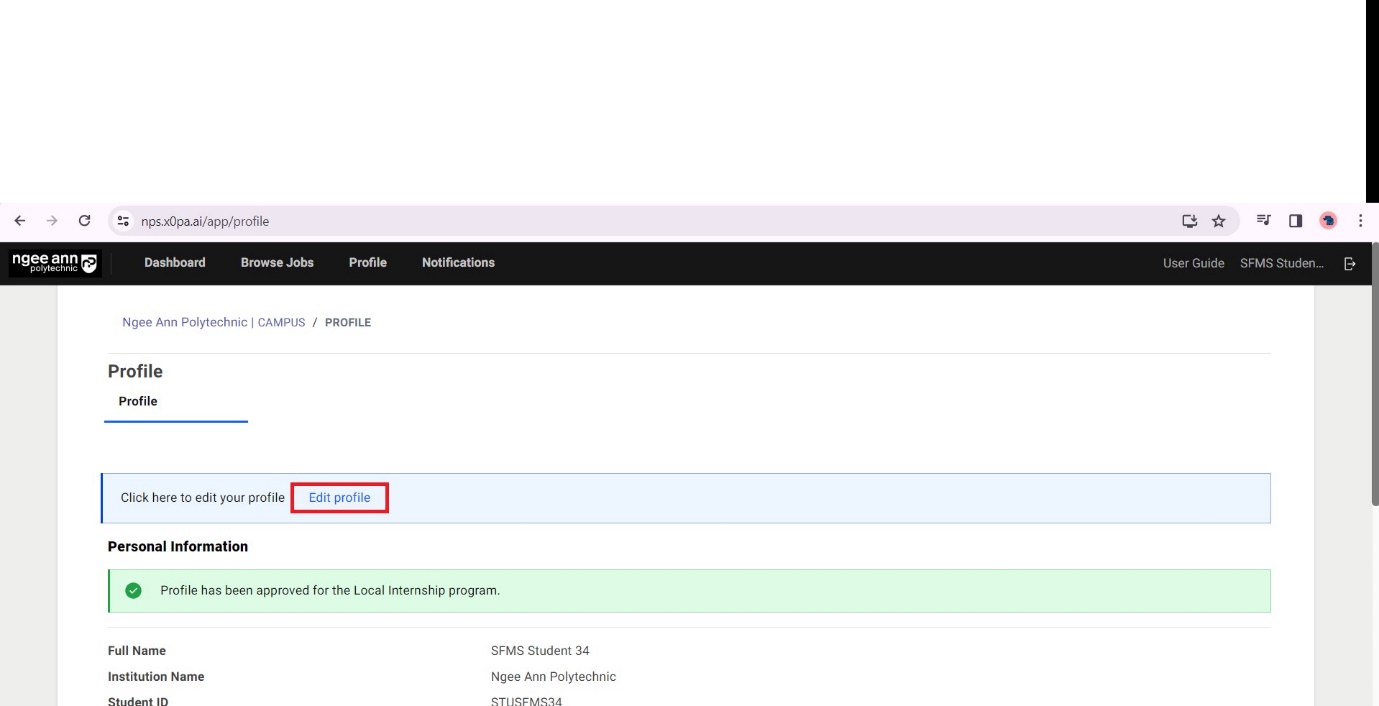
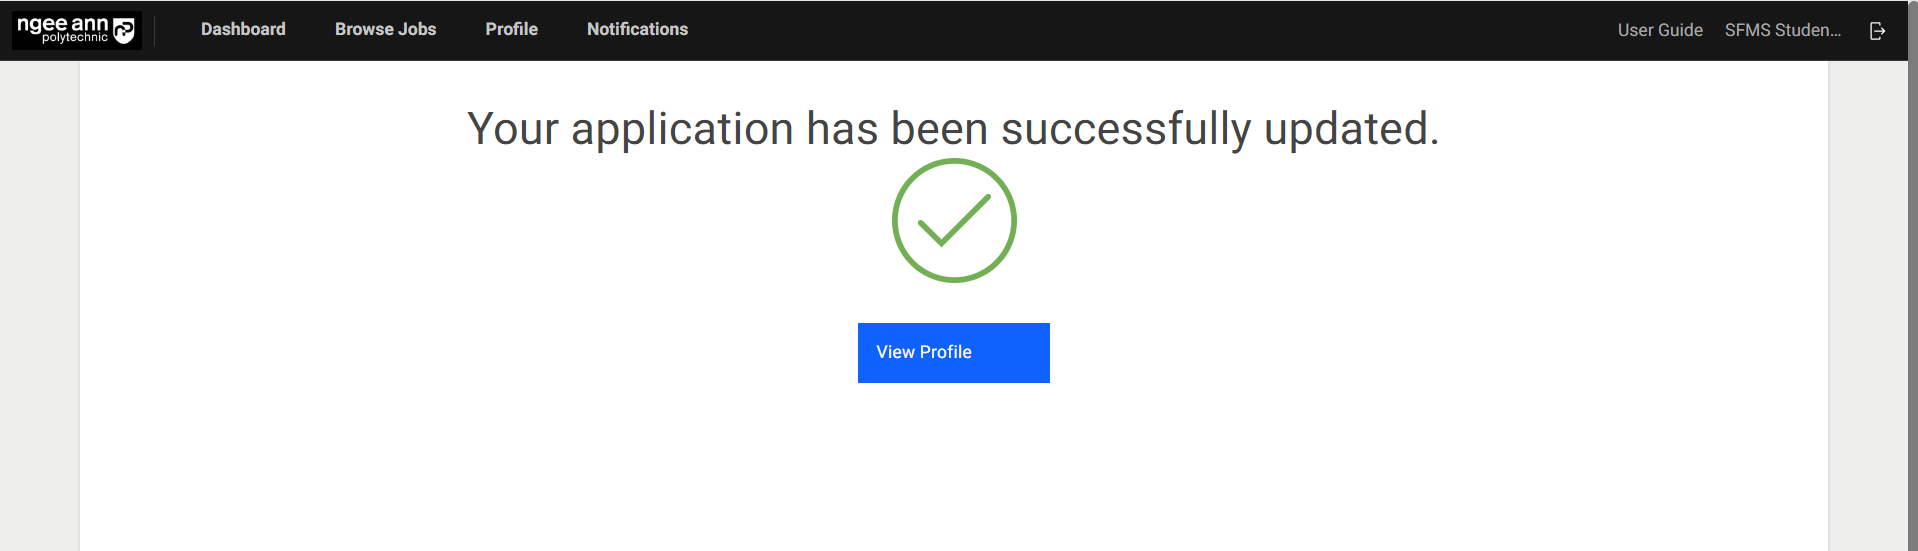
Step 3:
Once details are entered into the fields, click on the “Submit” button to complete the registration, and a success screen will be shown once registration is completed successfully.
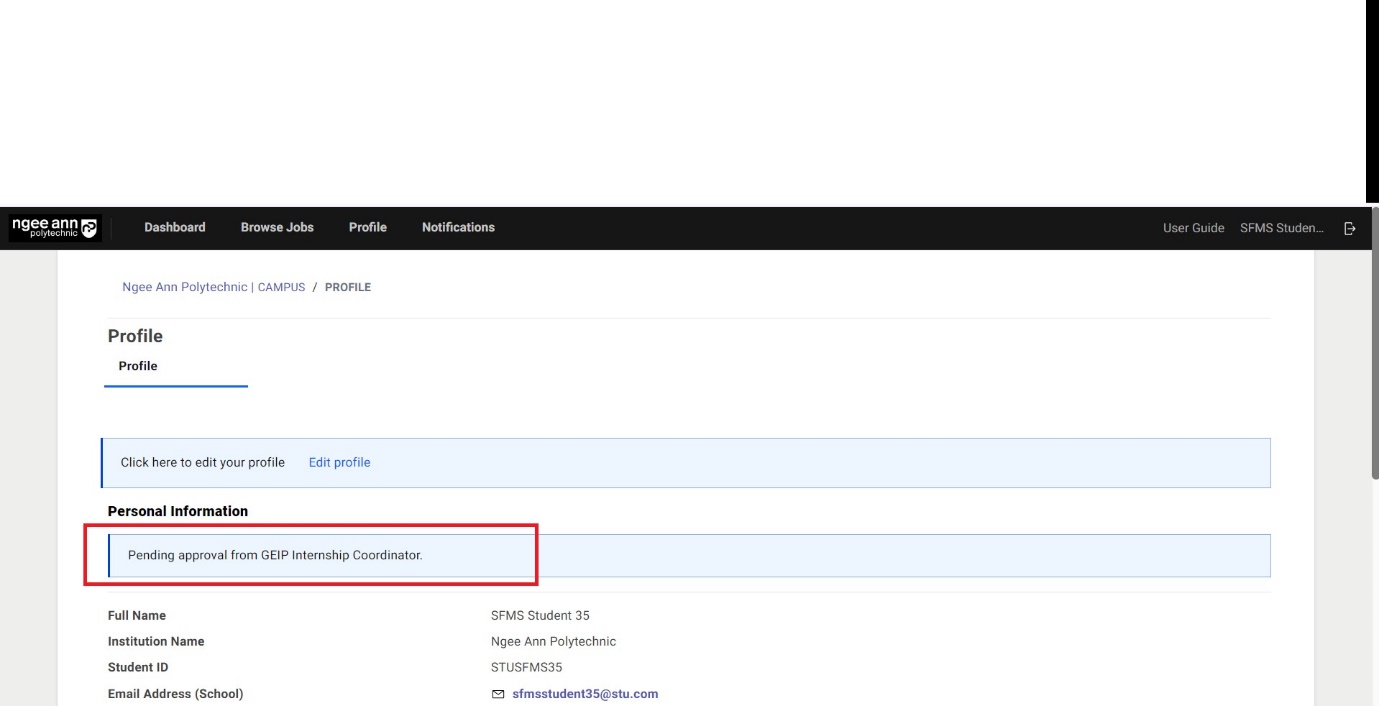
Internship Program Approval
Step 1:
Once students have registered for the program of their choice, their profile is pending approval by the corresponding internship program administrator. Respective program administrators need to approve student profiles, and no approval is necessary for the "Local Internship Program," as students are automatically approved.
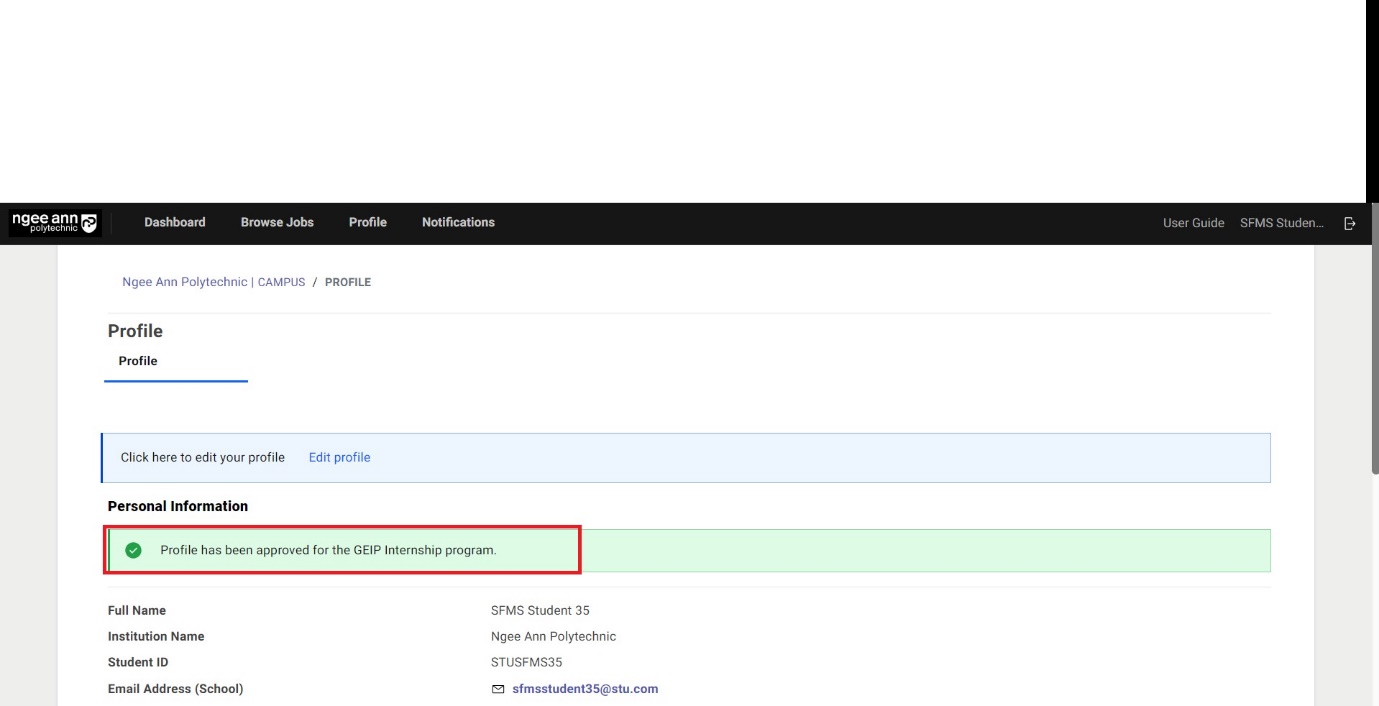
Step 2:
Once the student profile has been approved by the respective program administrators, a "Profile is approved for the X program" success message will be shown and a notification sent to the student.
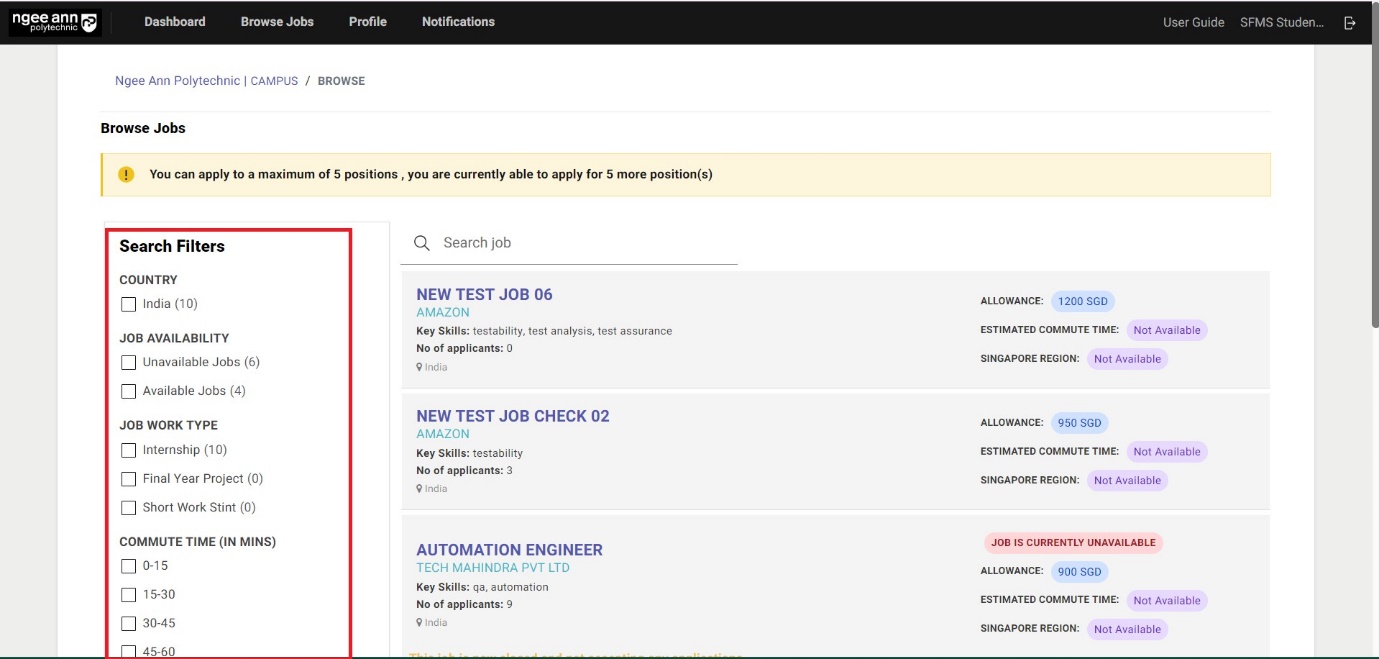
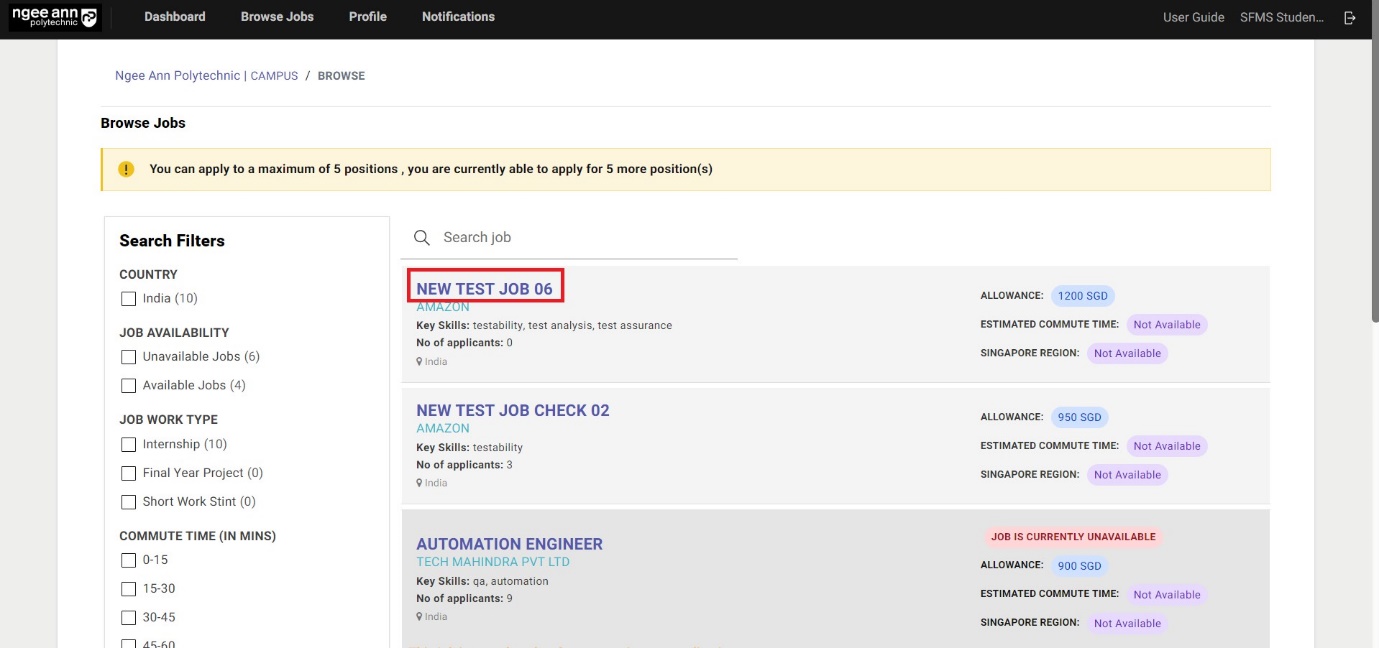
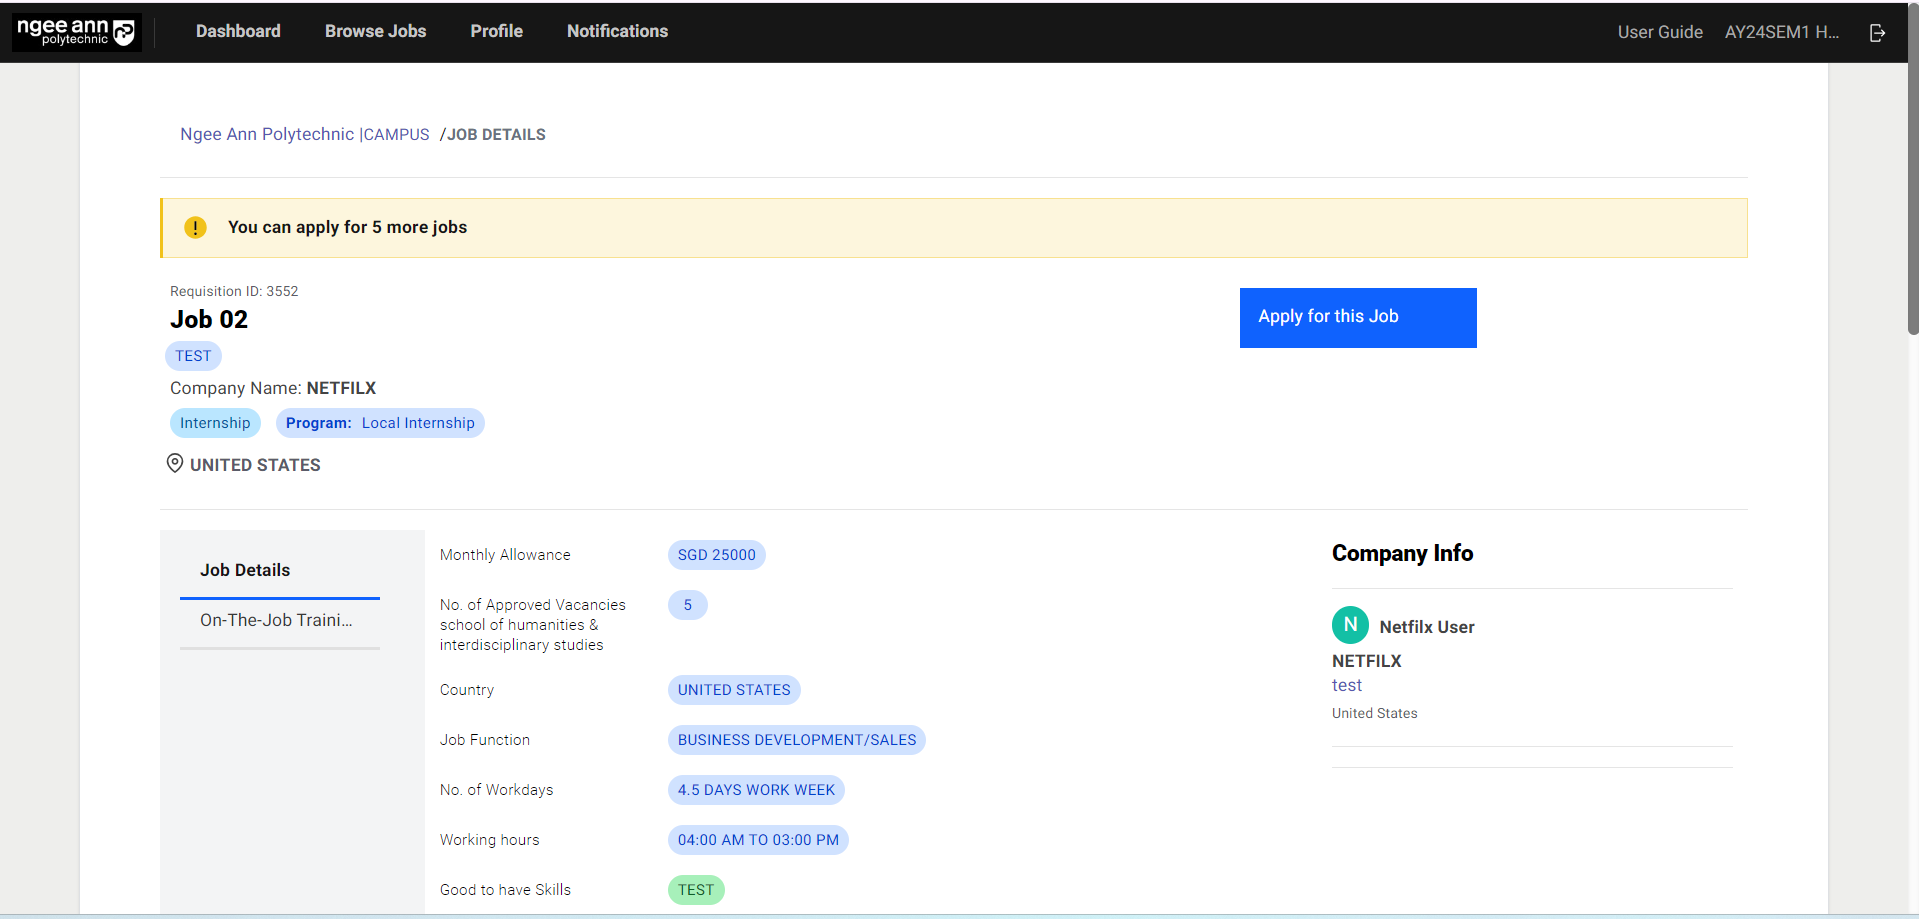
Applying for Jobs
Step 1:
After completing the profile, click "Browse Jobs" from the top bar.

Step 2:
You can only apply to a limited number of internship jobs, depending on your school, diploma course, and approved internship program configuration.
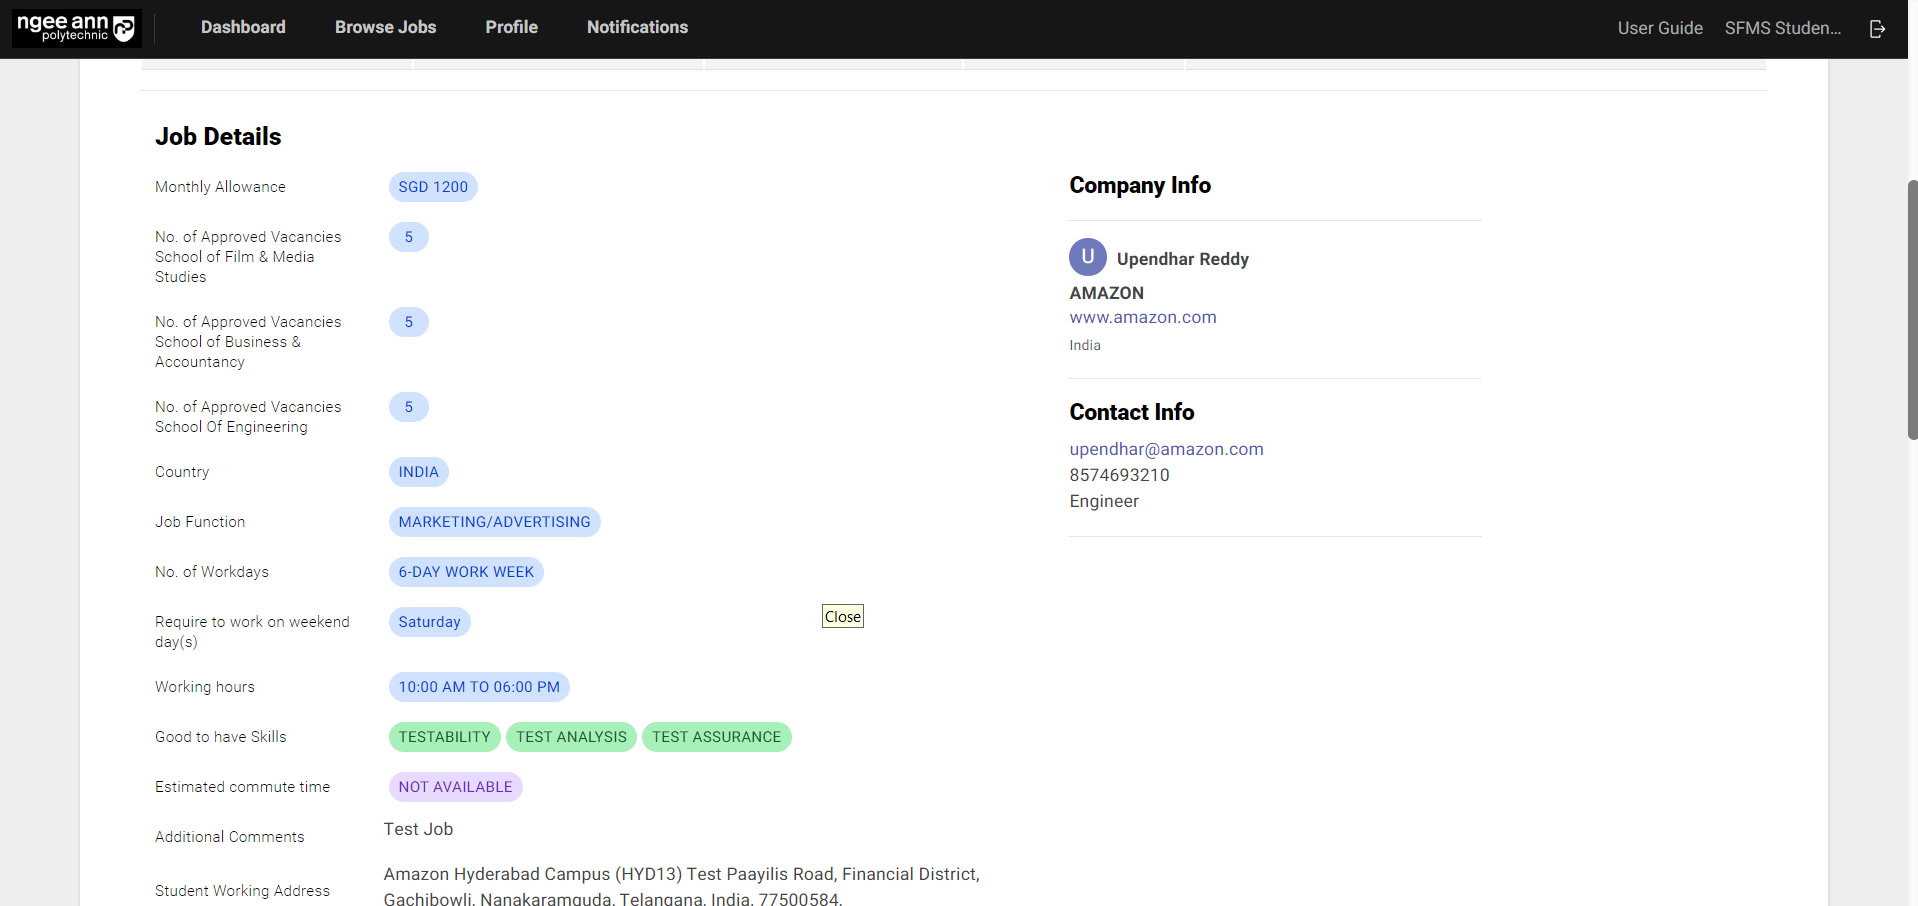
Every job tab contains basic information on the job, including commute time and monthly allowance. Commute time is defined as the estimated time taken from your home address to the office address. For more information, including the job description and the full training plans for the job, or to apply for the job, click on the job title.
You may also search for a particular job using the search feature.
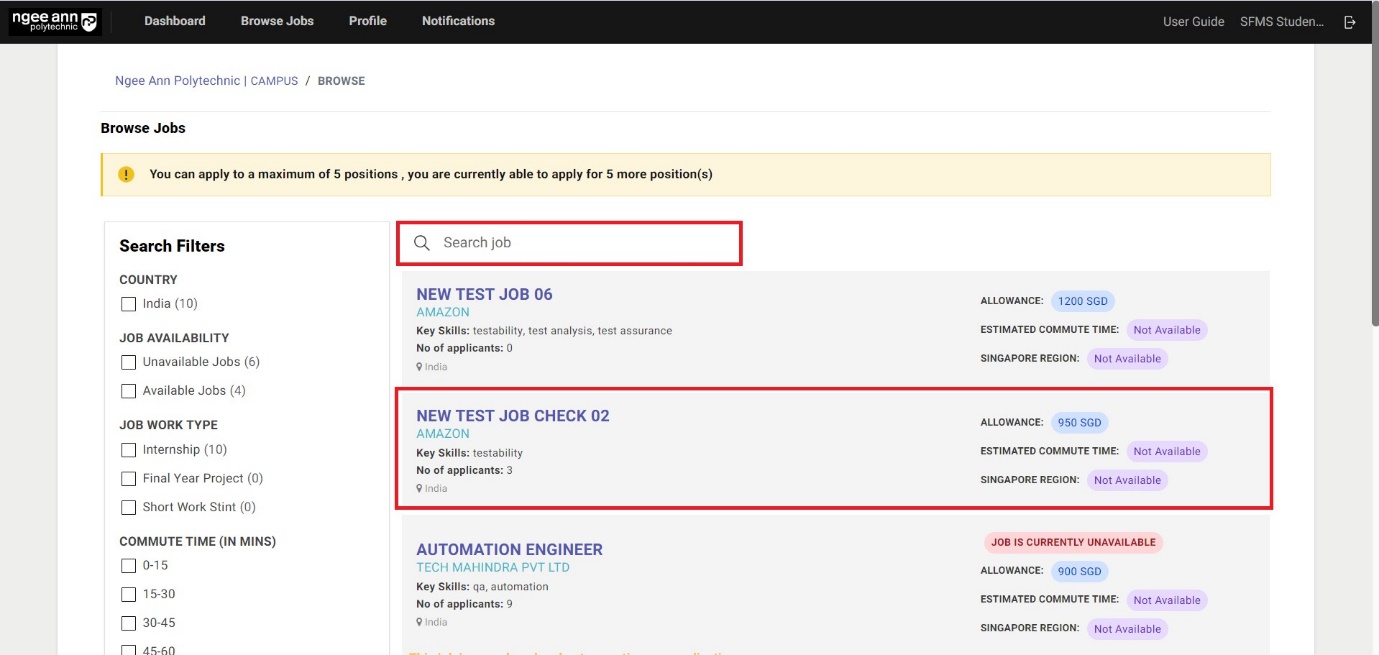

Step 3:
Use the "Search Filters" to narrow your options.
Step 4:
Clicking on the job name from the job card on the "Browse" page will take you to the "Job Details" page for that job.
Step 5:
Apply for a position by clicking "Apply for this job." The company will receive your application and contact you if you are successfully shortlisted.
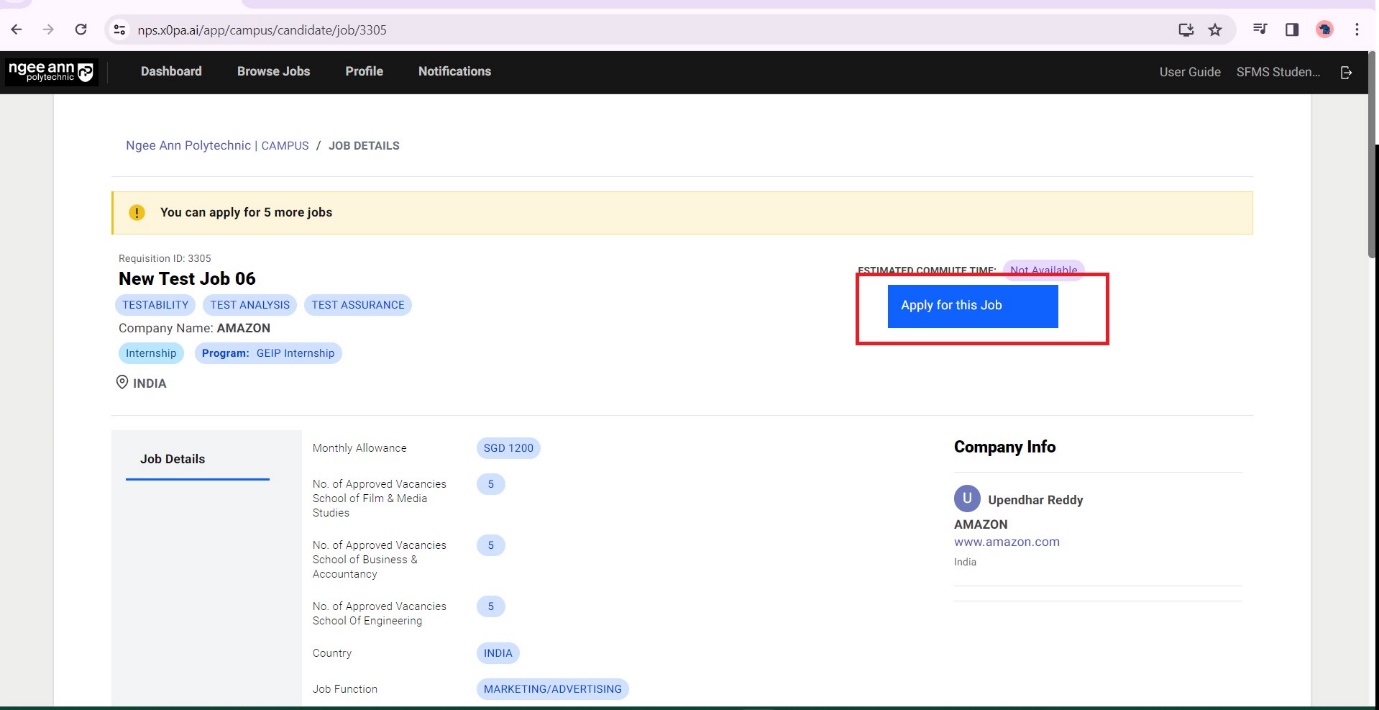
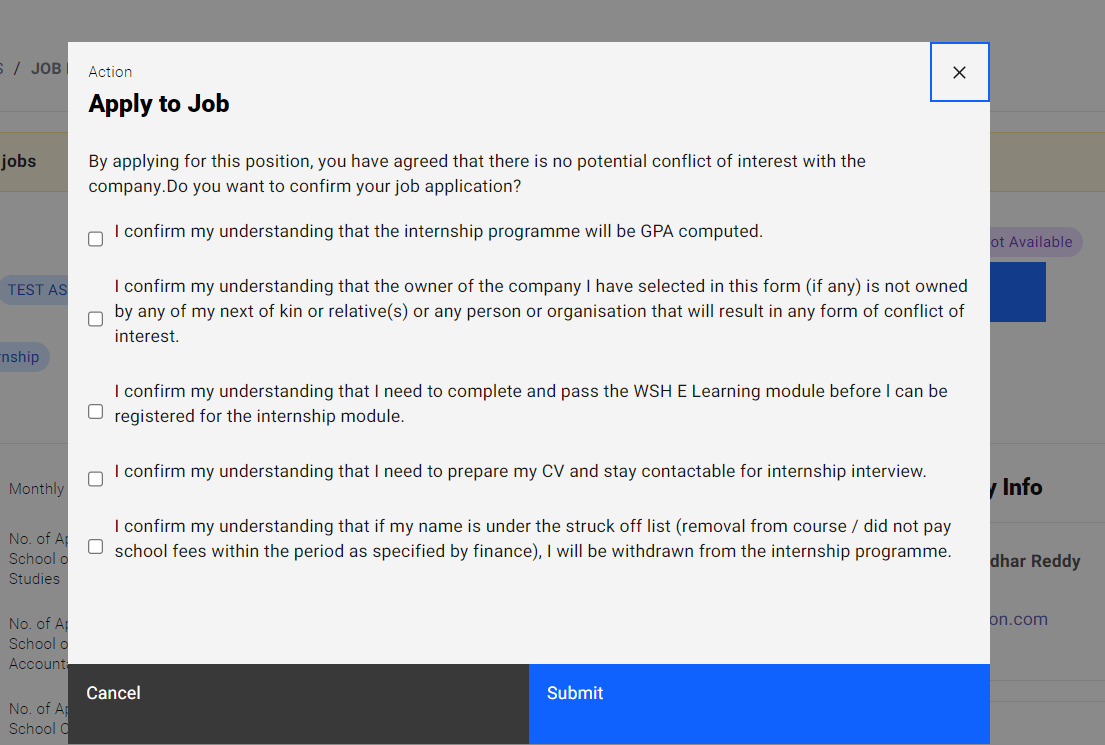
Step 6:
The “Applied” string will be shown once the student applied for the job
Step 7:
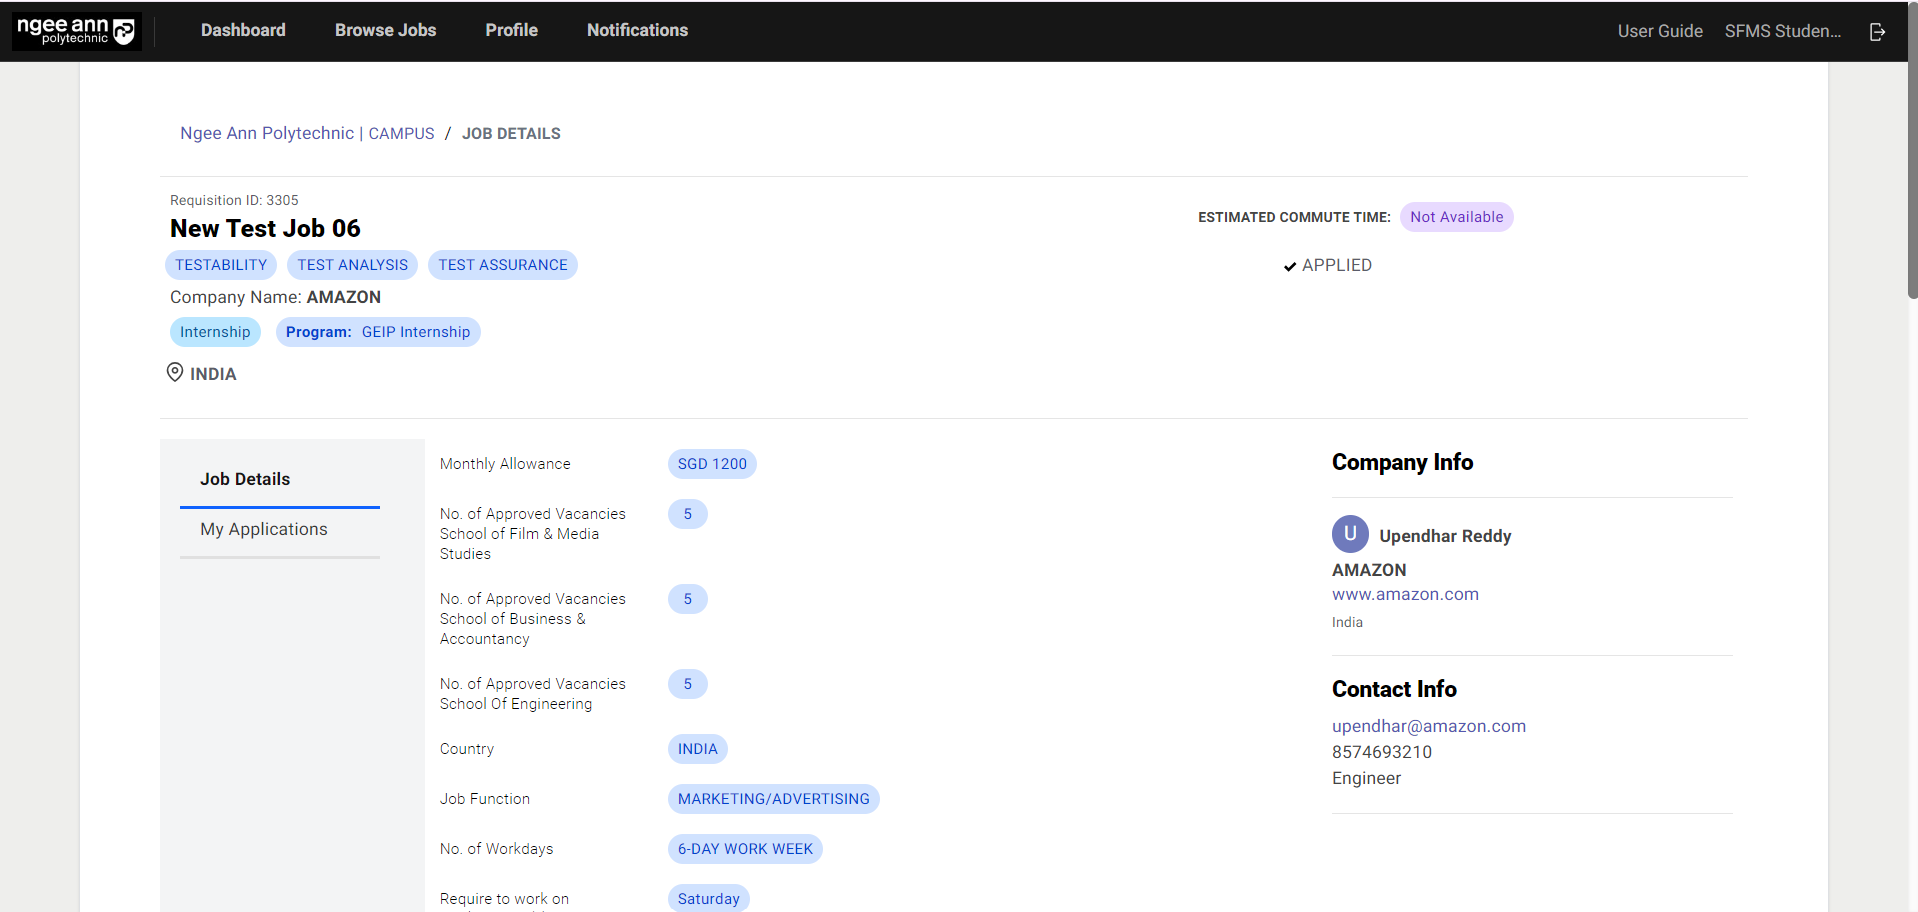
You may check your dashboard for any updates in the application.
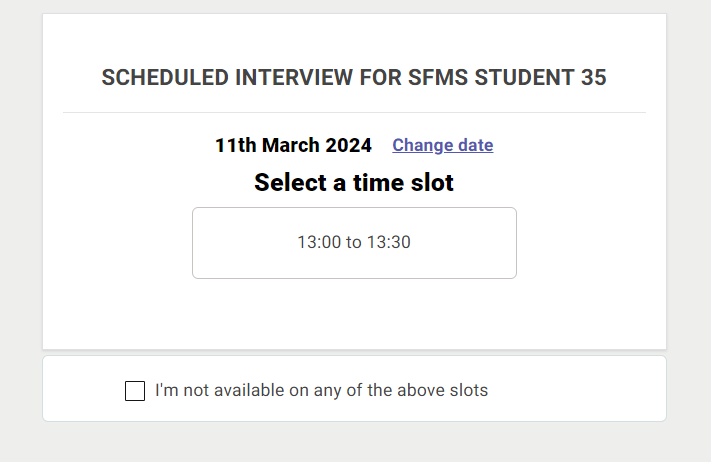
Successful Shortlist and Selection of Timeslots
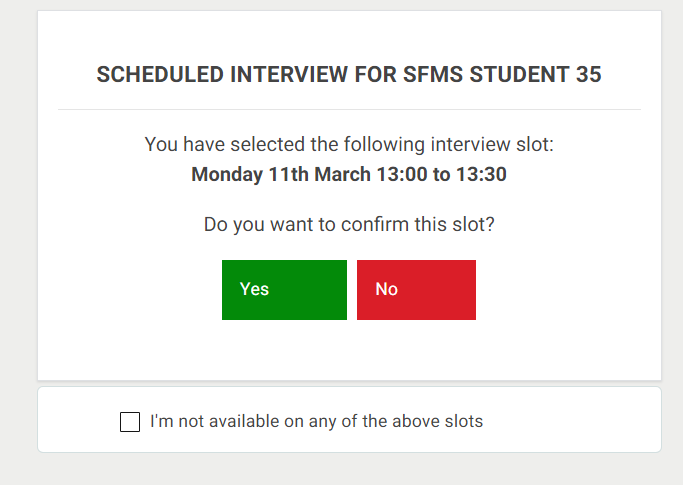
Step 1: Approve Interview Timeslot
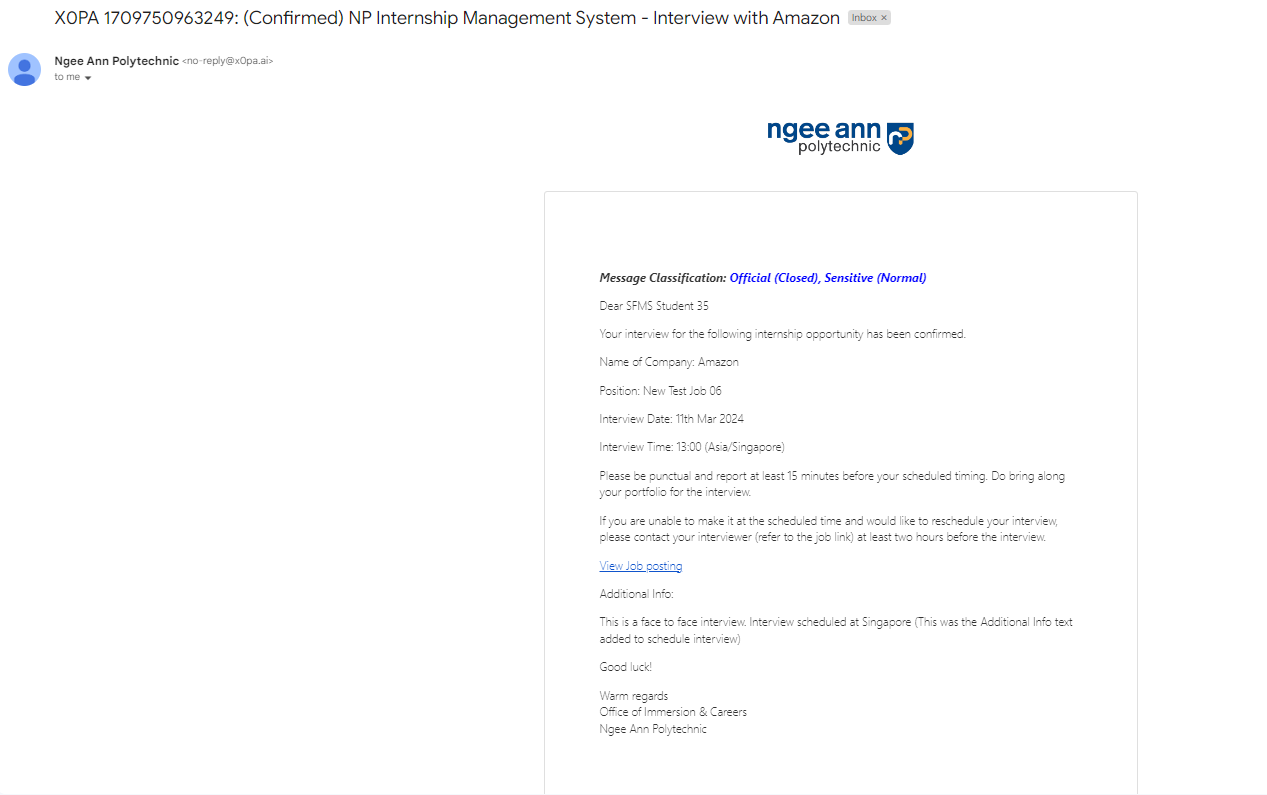
After the company has reviewed your profile and shortlisted you, you will receive an email to select the time slots. Click on "Schedule an Interview" to select the time slots.
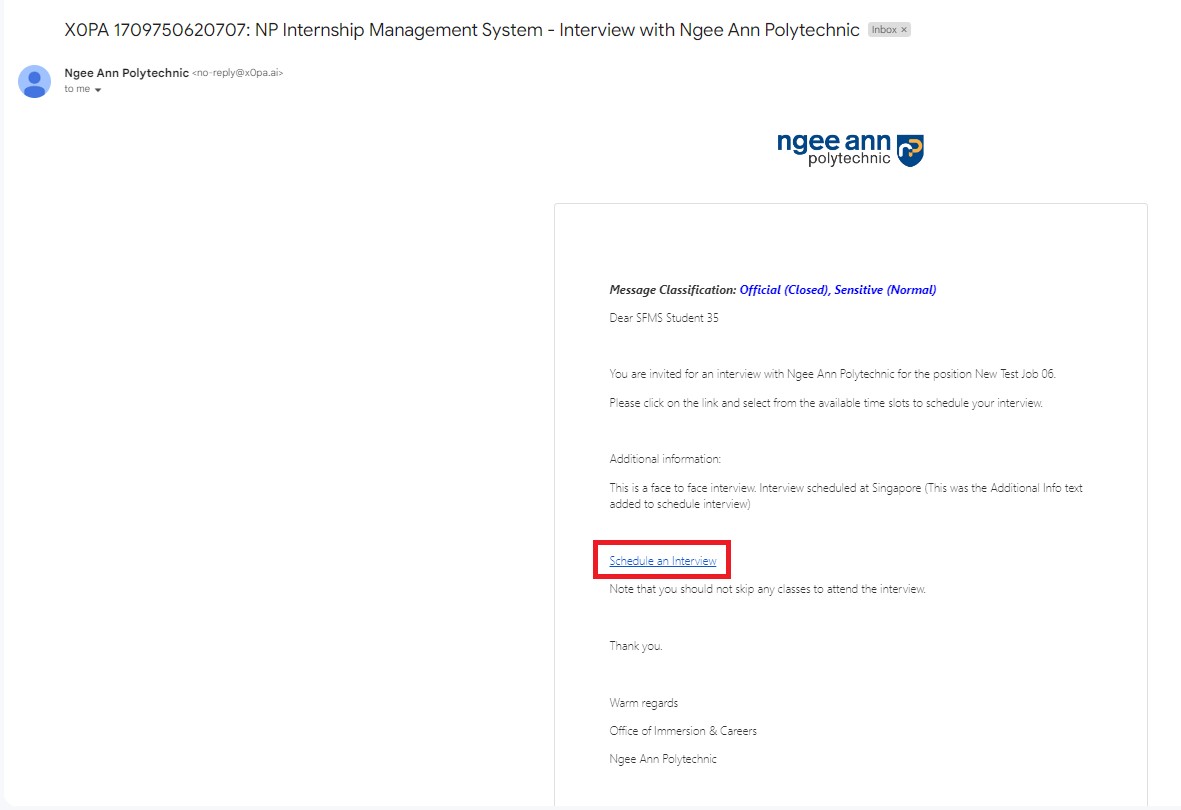
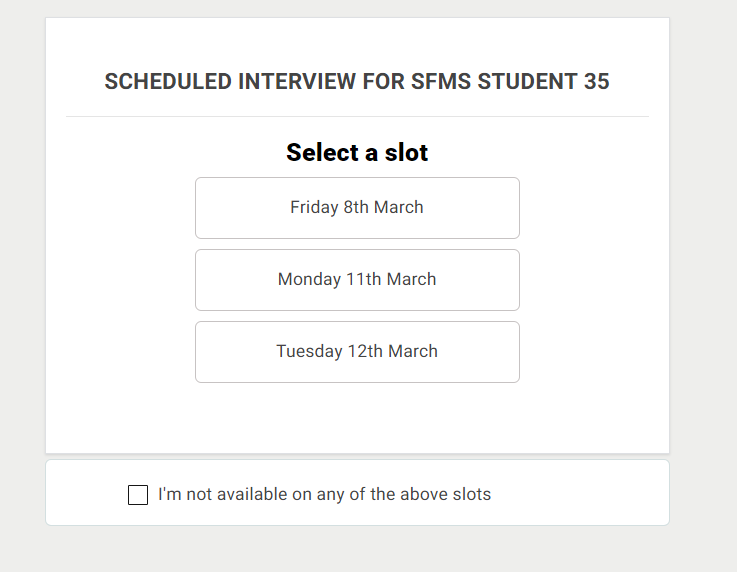
Students can also approve the company's requested interview slots by clicking on “Job Name” from the “Interviews” table under the Dashboard page.
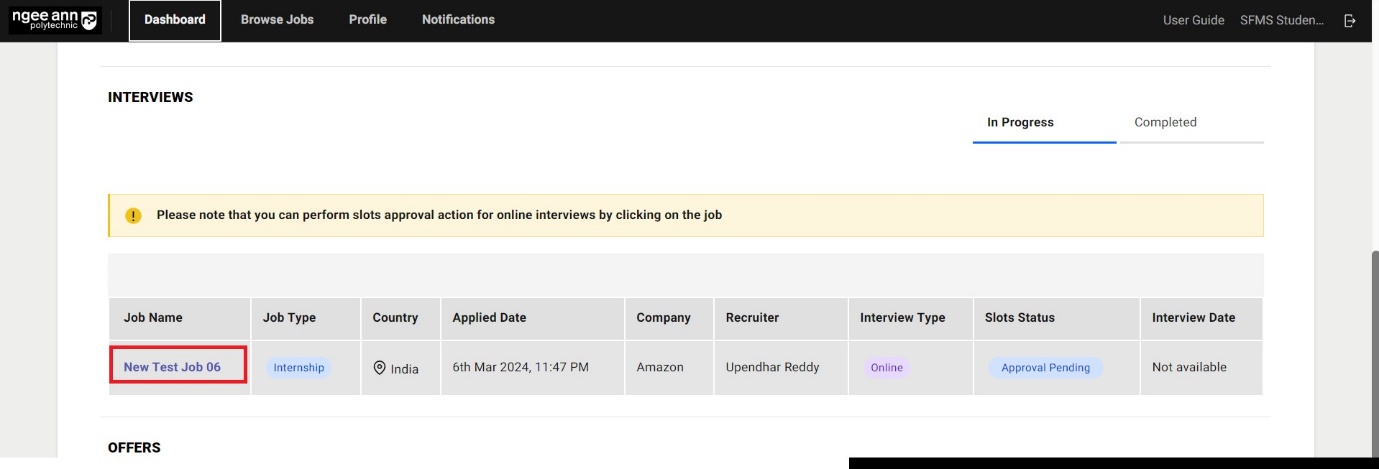
Step 2:
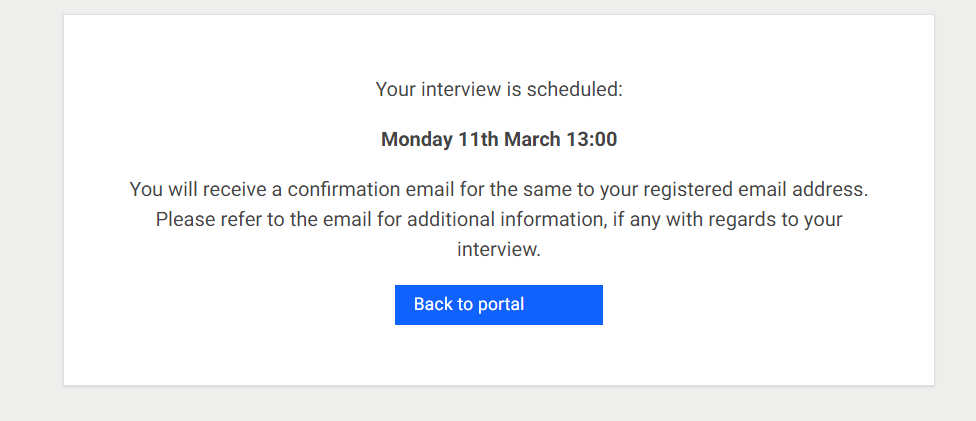
You will then receive an email with the confirmed time slot. Please read the email carefully and take note of any additional information.
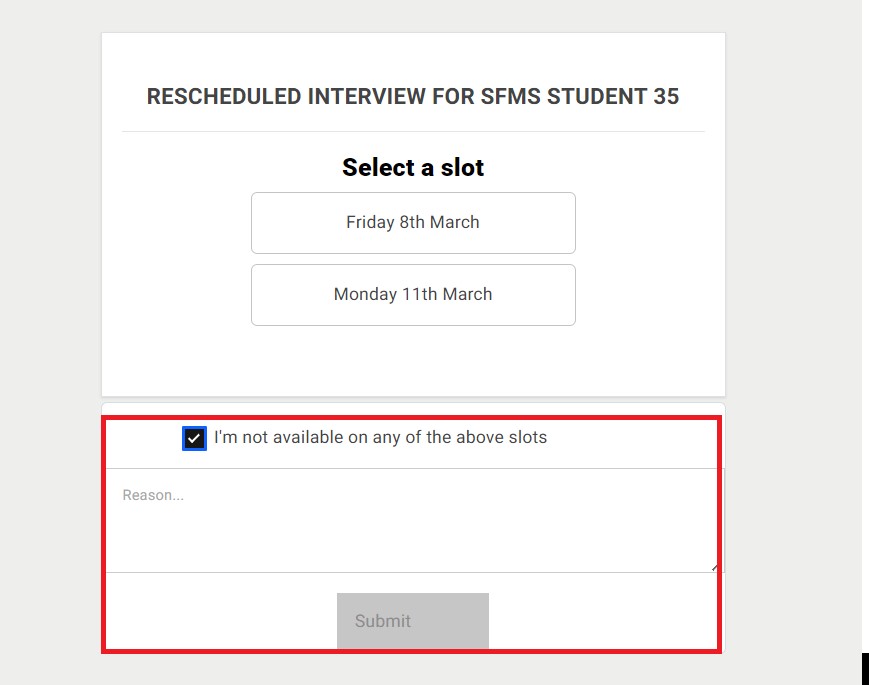
Step 3: Request for New Interview Timeslots
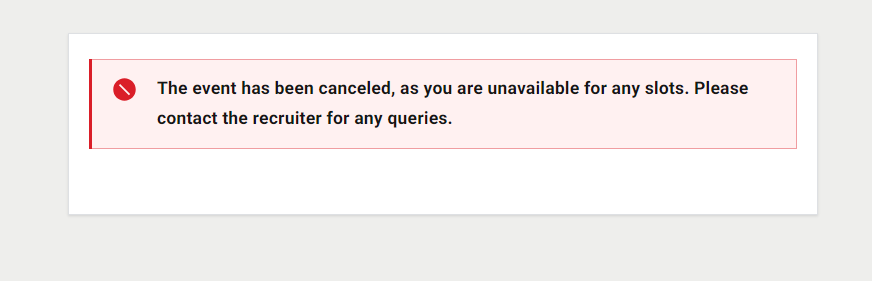
You will not be able to change the time slot on the platform. You can request new interview timeslots by selecting "I'm not available in any of the above slots. Add a reason and submit.
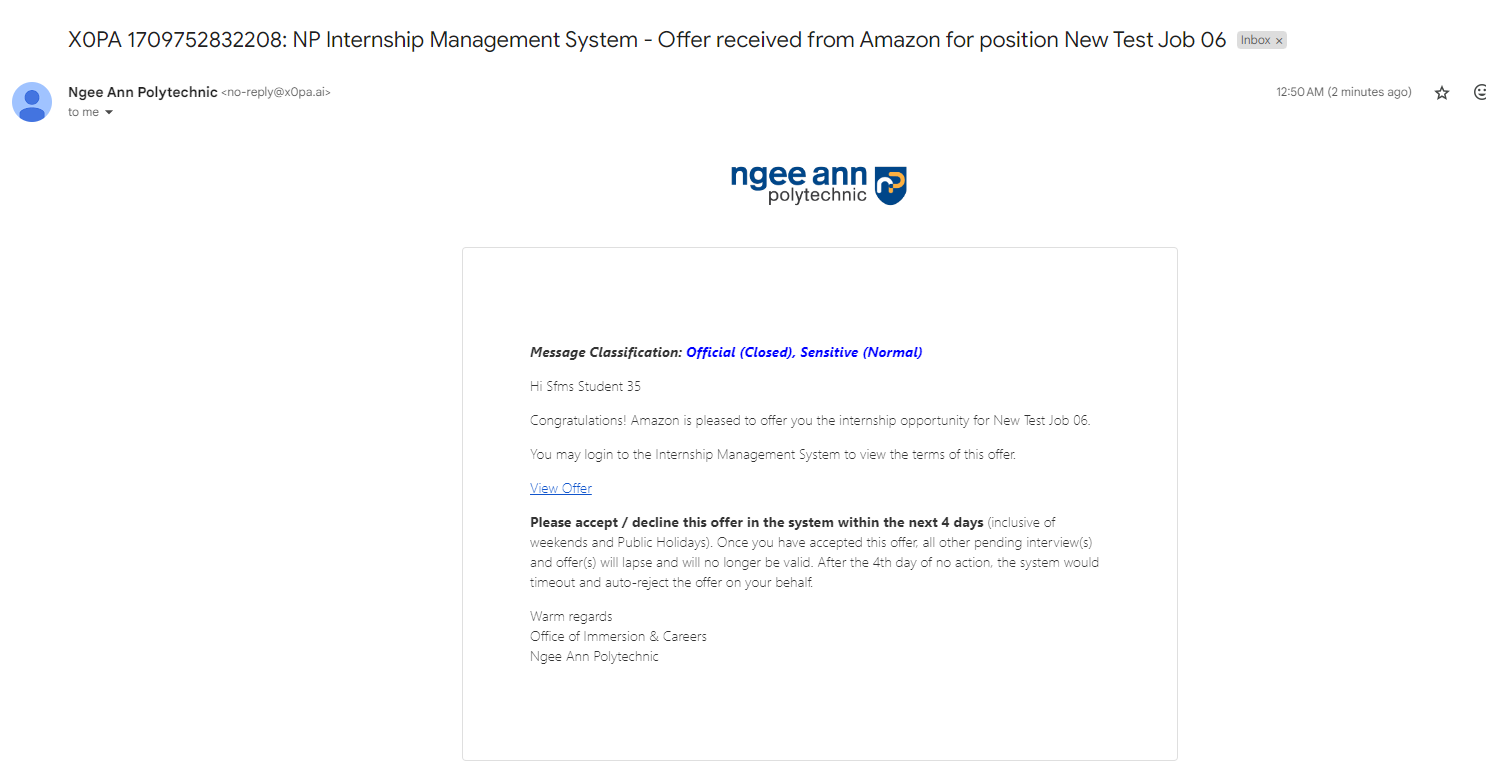
Awaiting Interview Results and Action for Tentative Offer
Step 1:
SECURING A PLACEMENT IN THE COMPANY
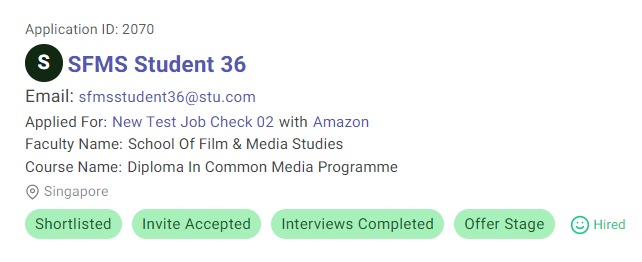
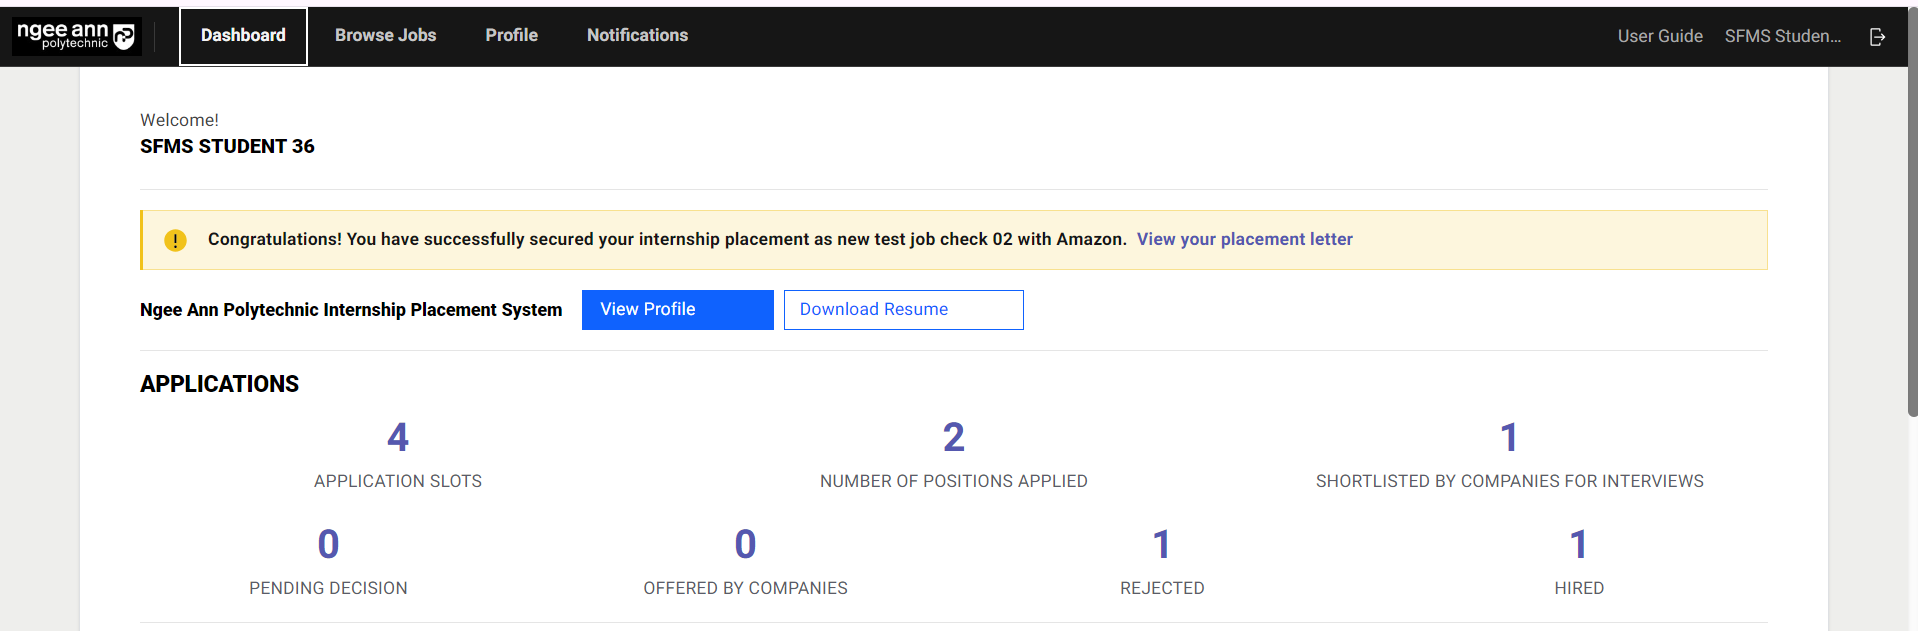
Congratulations! You have now received a job offer. You should receive an email with the job offer.
However, this does not mean that you have secured the internship. If another student has accepted the job offer before you and there are not enough vacancies, you may not get the internship.
You will need to accept the job offer on the platform.
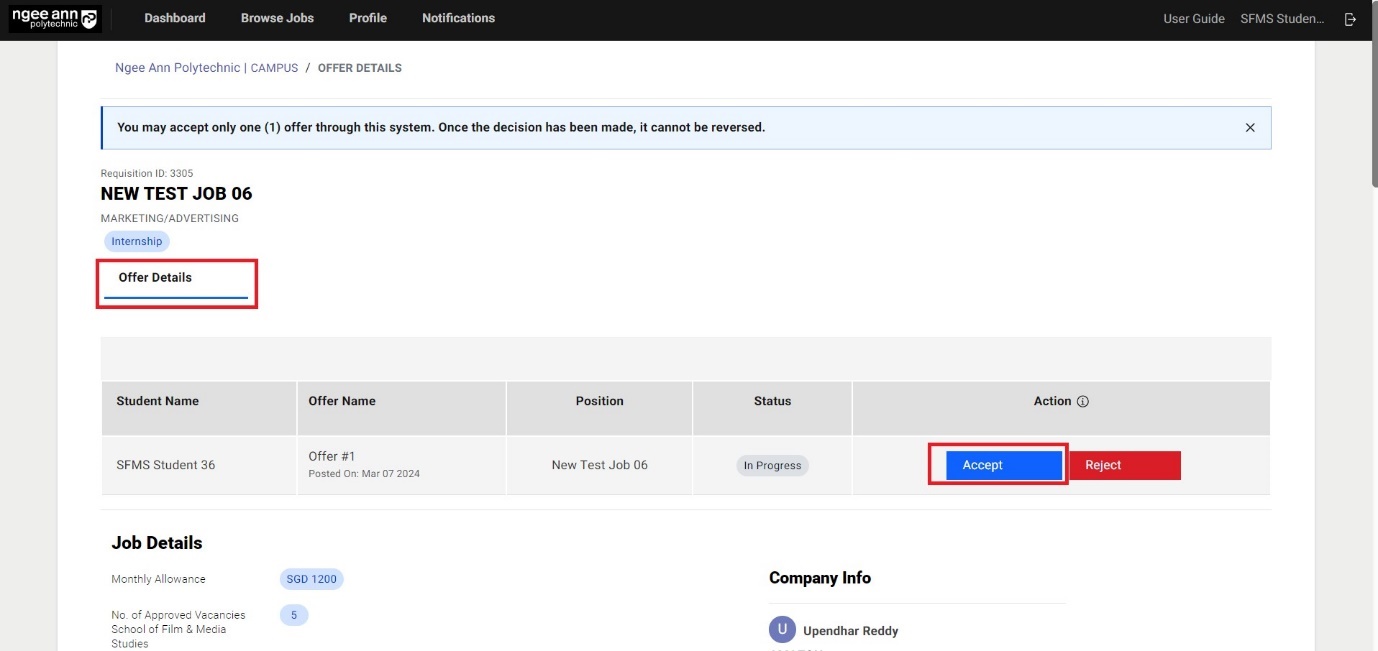
Step 2:
When you receive a job offer, the number will be reflected under "OFFERED BY COMPANIES". There will also be a message box (in yellow) to prompt you to accept the job offer. Click on them as indicated by the red box.
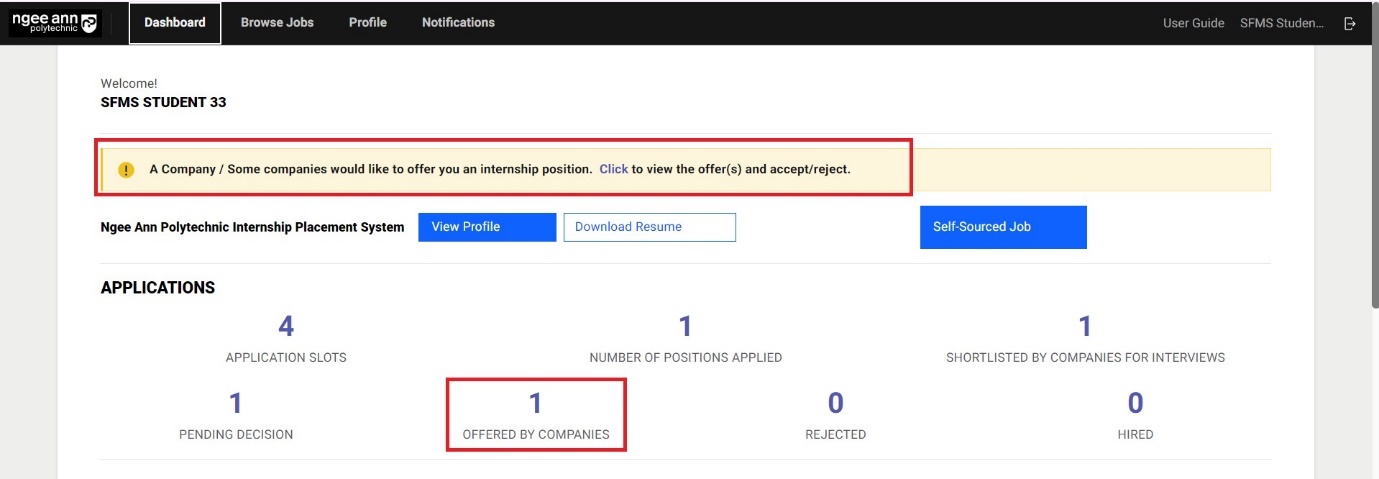
Click on the respective job titles as indicated by the red box.
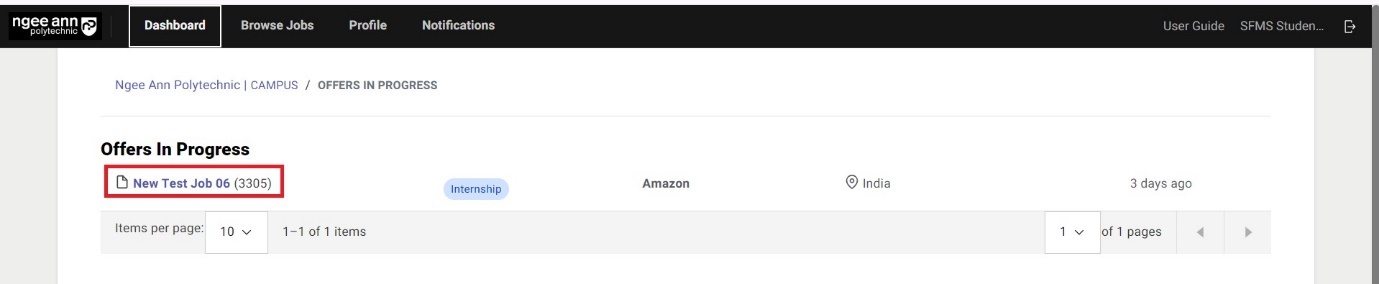
Step 3:
Click on the respective job titles as indicated by the red box to navigate to the "Offer Details" page.
Step 4:
REVIEW JOB DETAILS
Review the details of the job position. Once you have reviewed it, click on "Accept Offer" as indicated by the red box.
Accepting an offer
It is important to note that you can only accept one offer, and this must be done via the system. NP will not recognize any offer and/or acceptance that are done offline.
You will not be able to make any changes after this.
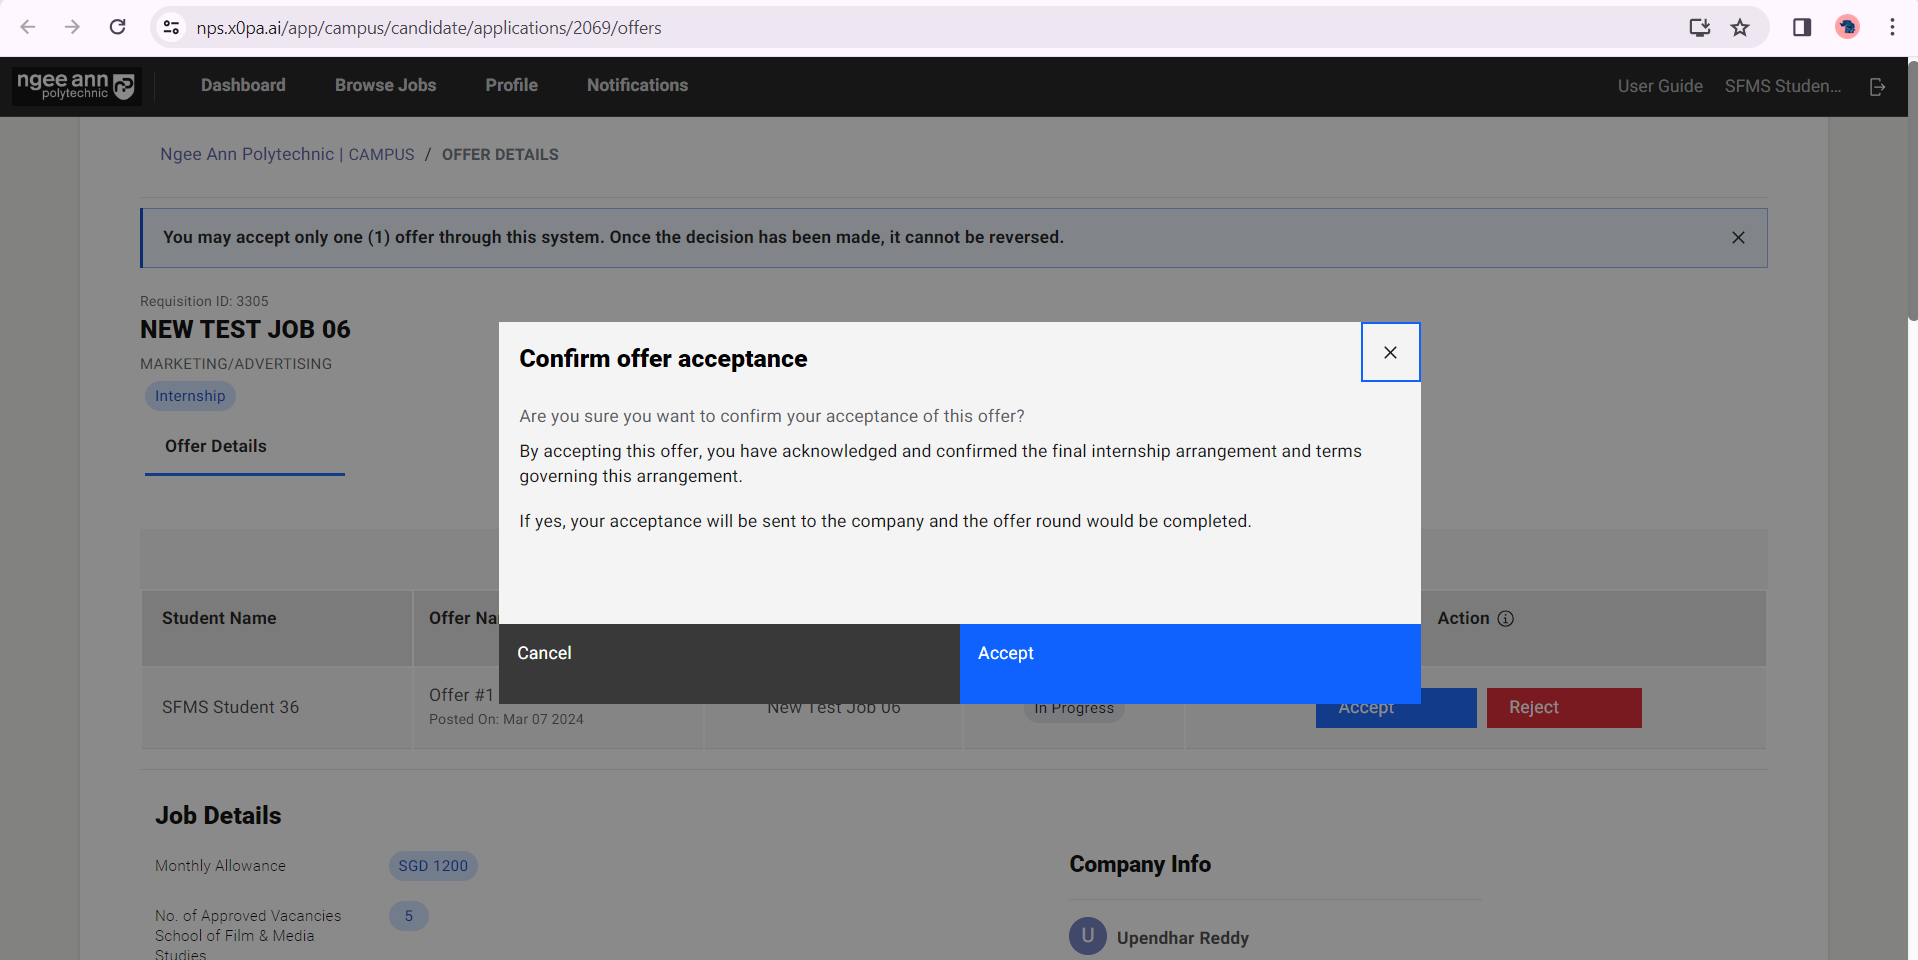
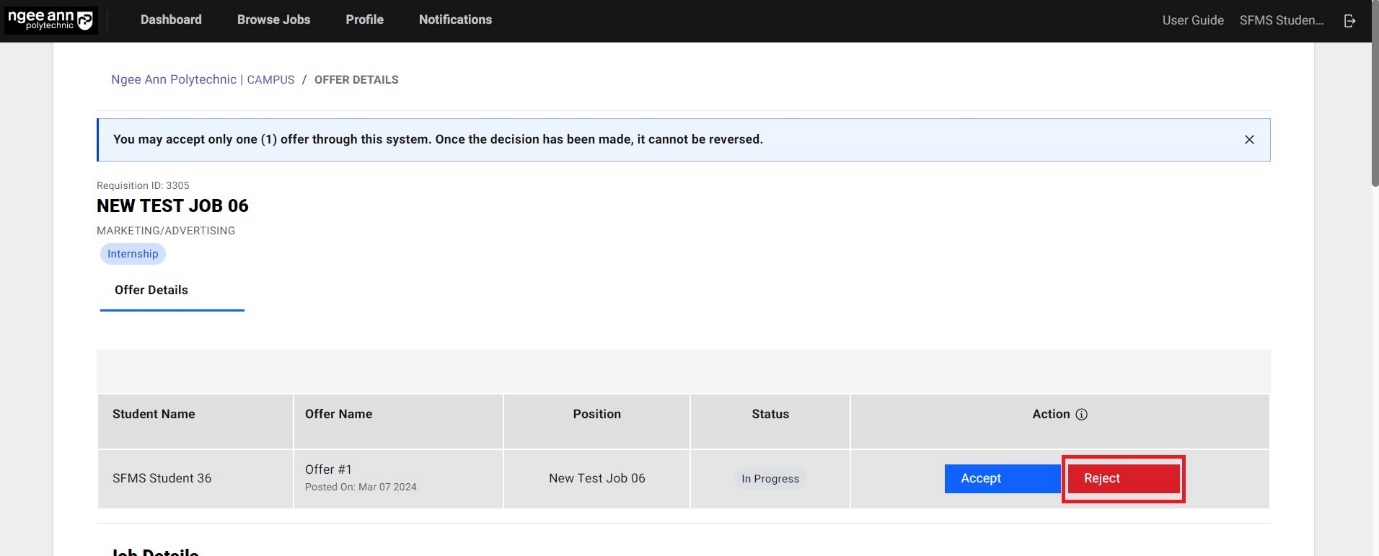
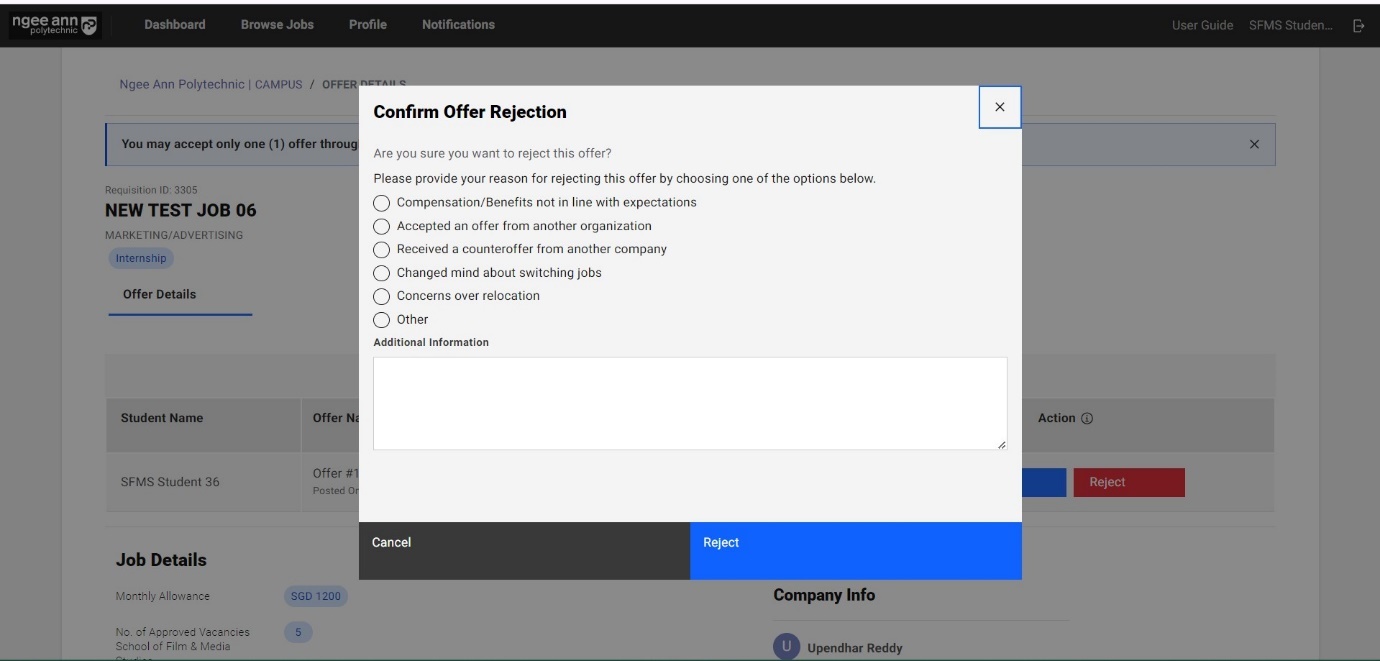
Step 5:
Rejecting an offer
By clicking on the "Reject" button, you can reject the job offer. You will not be able to make any changes after this.
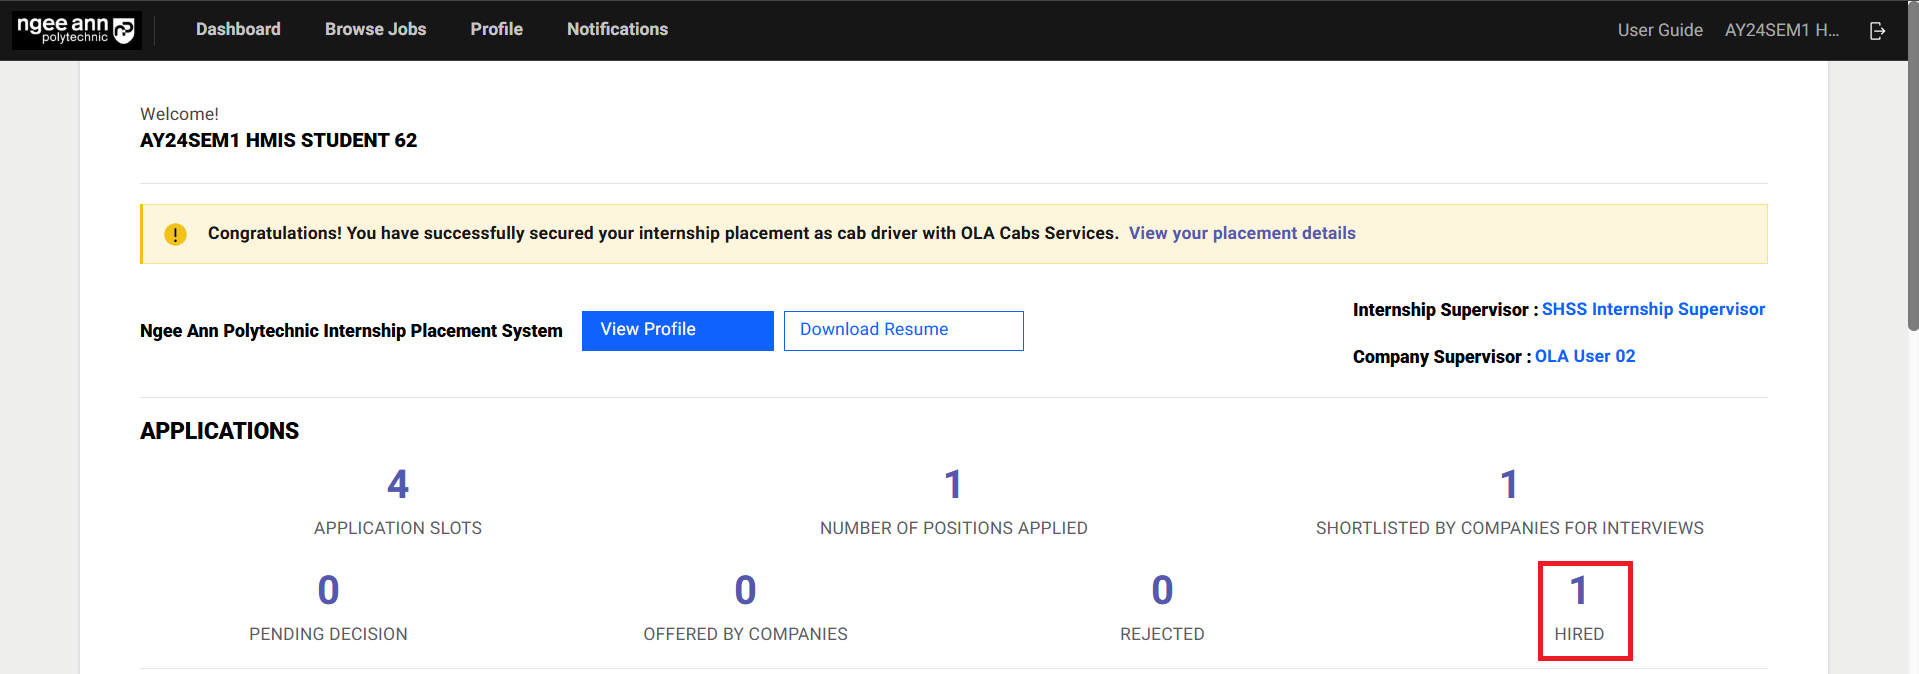
Student Dashboard
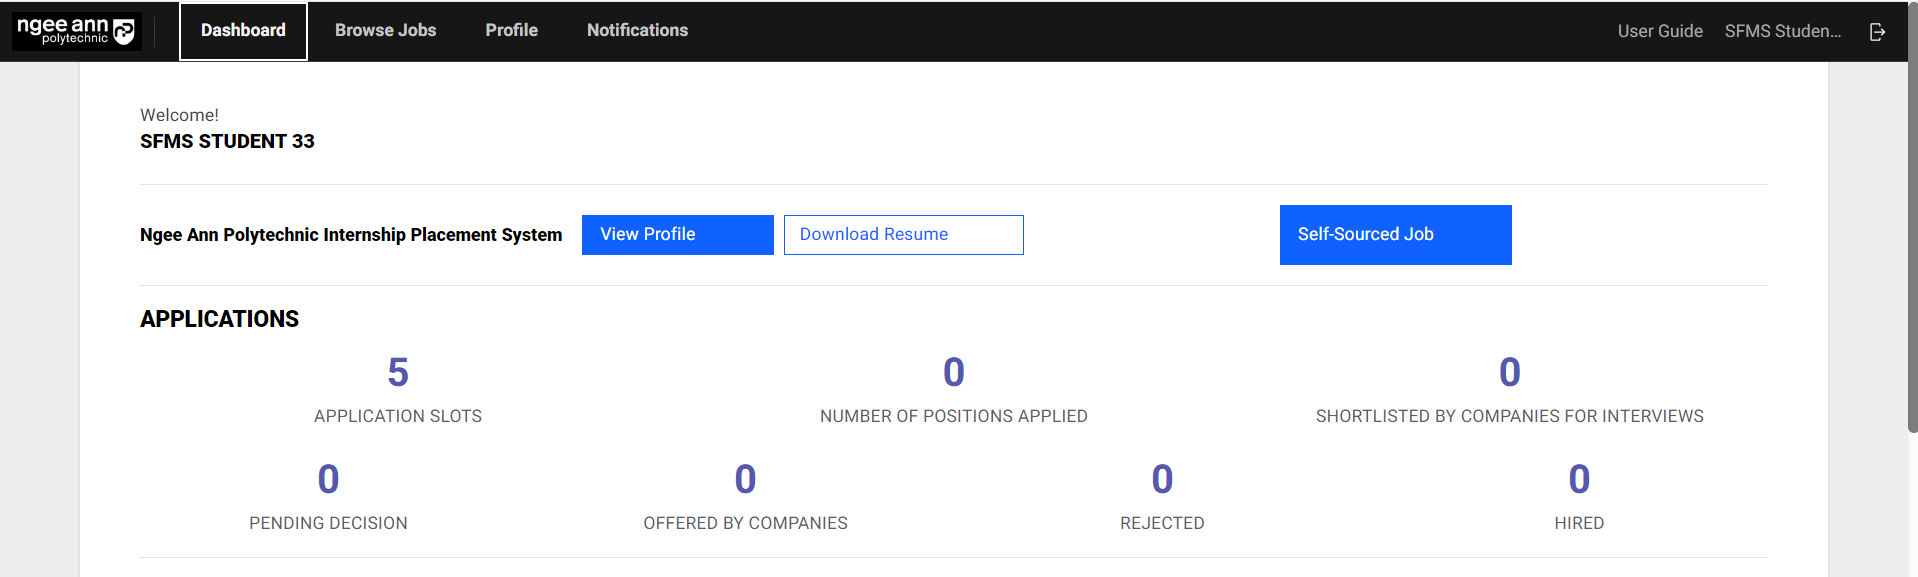
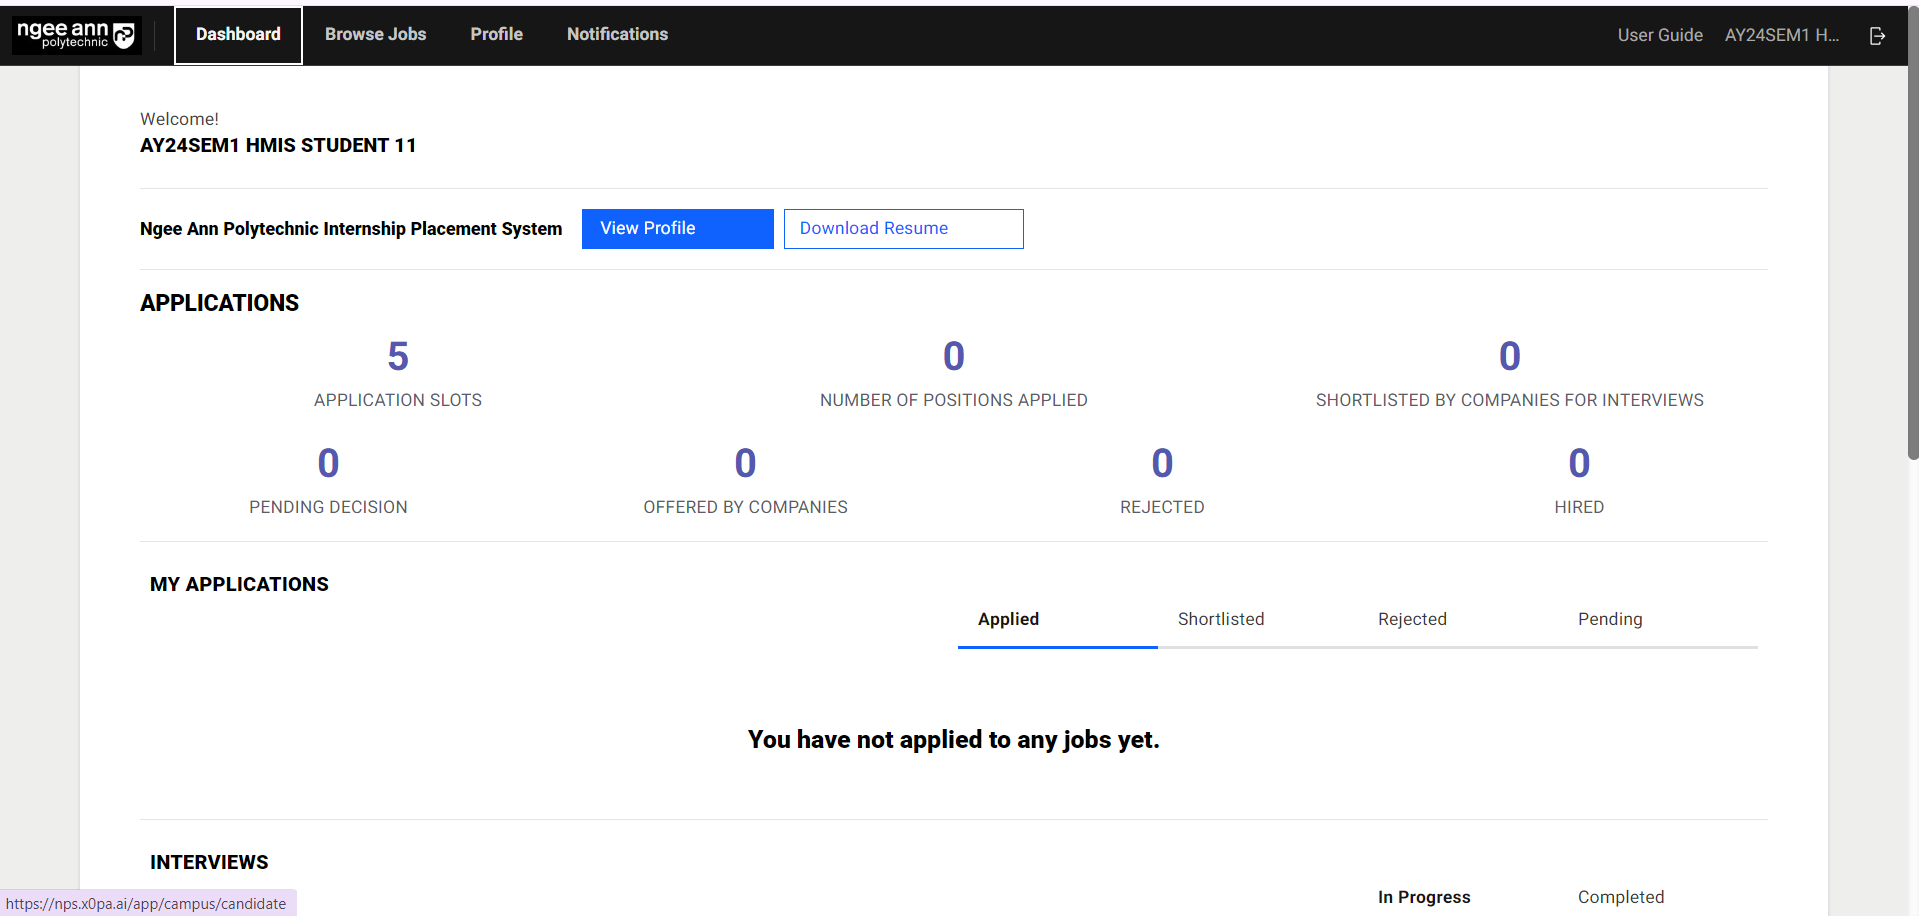
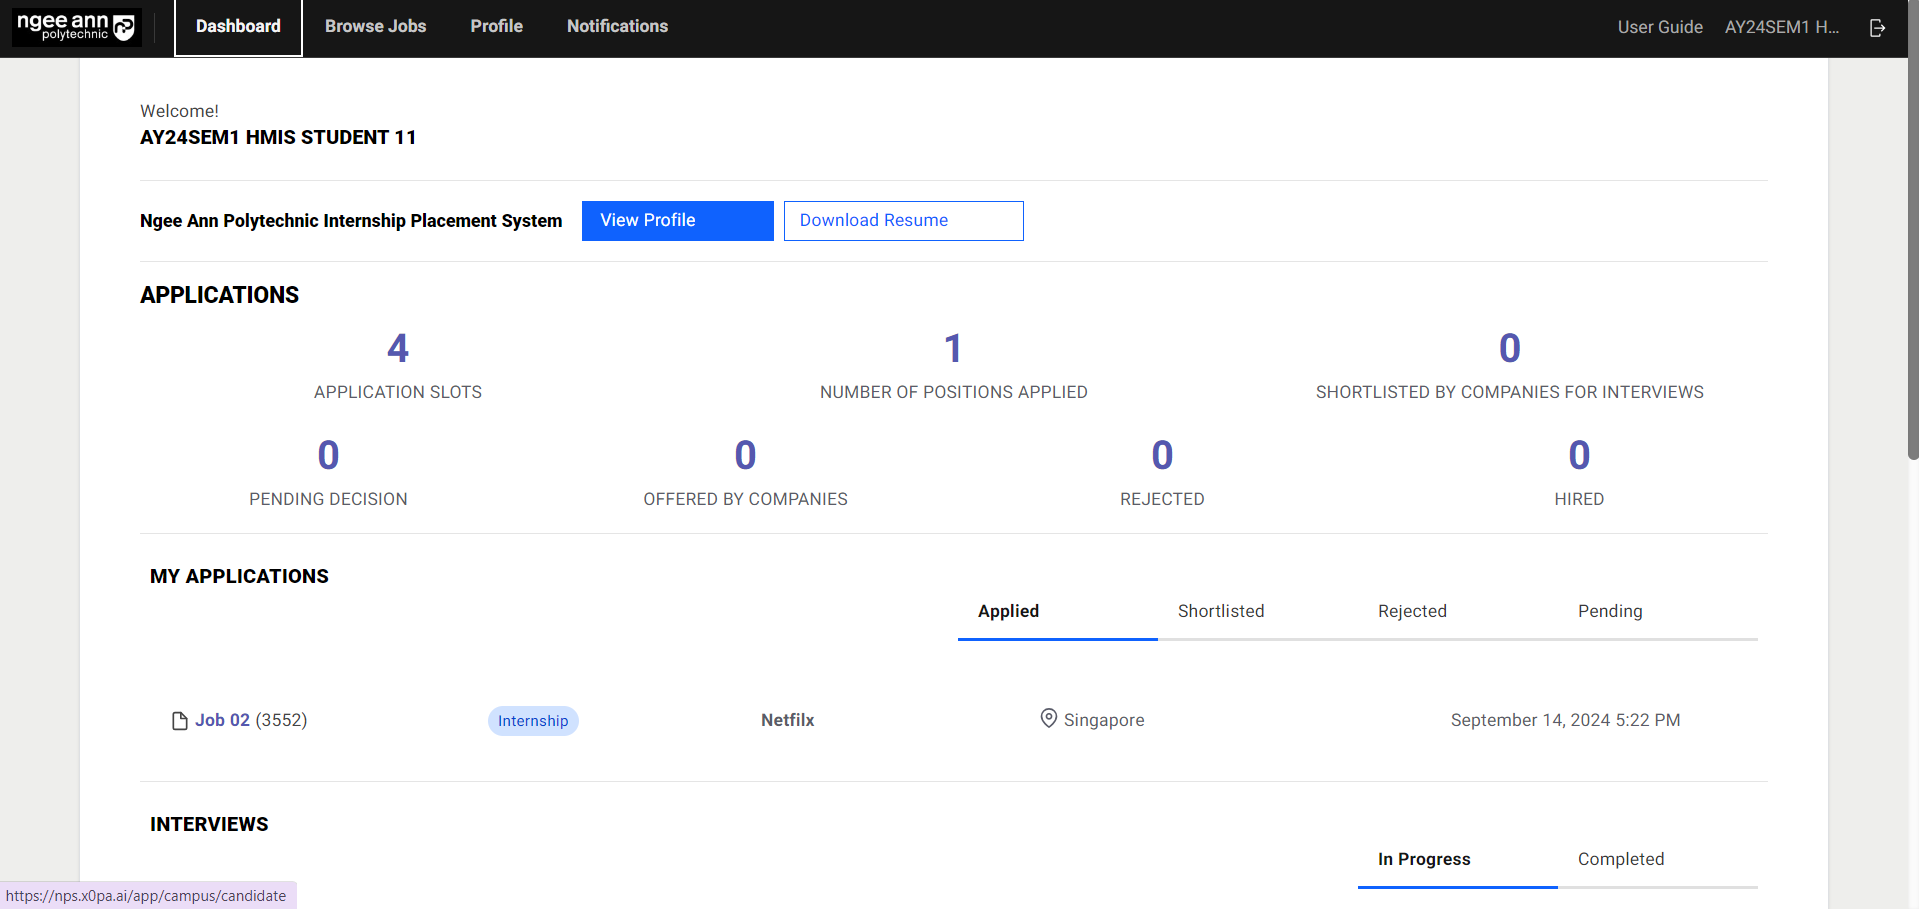
Step 1: Applications
Before getting access to the dashboard, you will be required to create or register a profile first.
| Column Name | Description |
|---|---|
| Application Slots | The number of remaining positions for which you can apply. |
| Number of Positions Applied | The number of positions you have applied for so far. This includes rejected positions. |
| Shortlisted by Companies for Interviews | The number of positions for which you have been shortlisted by a company. |
| Pending Decision | The number of positions where you have been interviewed by a company and a decision is ongoing. |
| Offered By Companies | The number of positions where you have been given a placement (offer letter) by the companies |
| Rejected | The number of positions where the application process has finished. This can happen for various reasons. The employer may have rejected the application, or the application may have been auto-rejected if the job is already full. |
| Hired | The number of roles you have been selected for or hired for by the company |
Step 2: My Applications
Applied: You will see all the job details that you have applied for so far. This includes rejected positions.
Shortlisted: You will see all of the job details for which you have already been shortlisted.
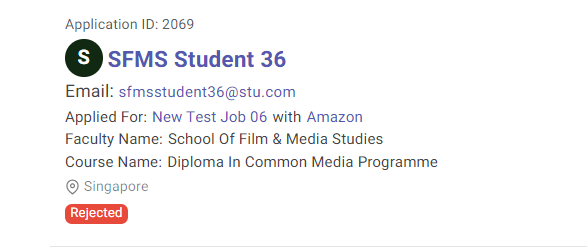
Rejected: You will see all of the job details for which you have been rejected, i.e., the employer may have rejected the application or the application may have been auto-rejected if the job is already full.
Hired: You will see all of the job details for which you have been hired by the company.

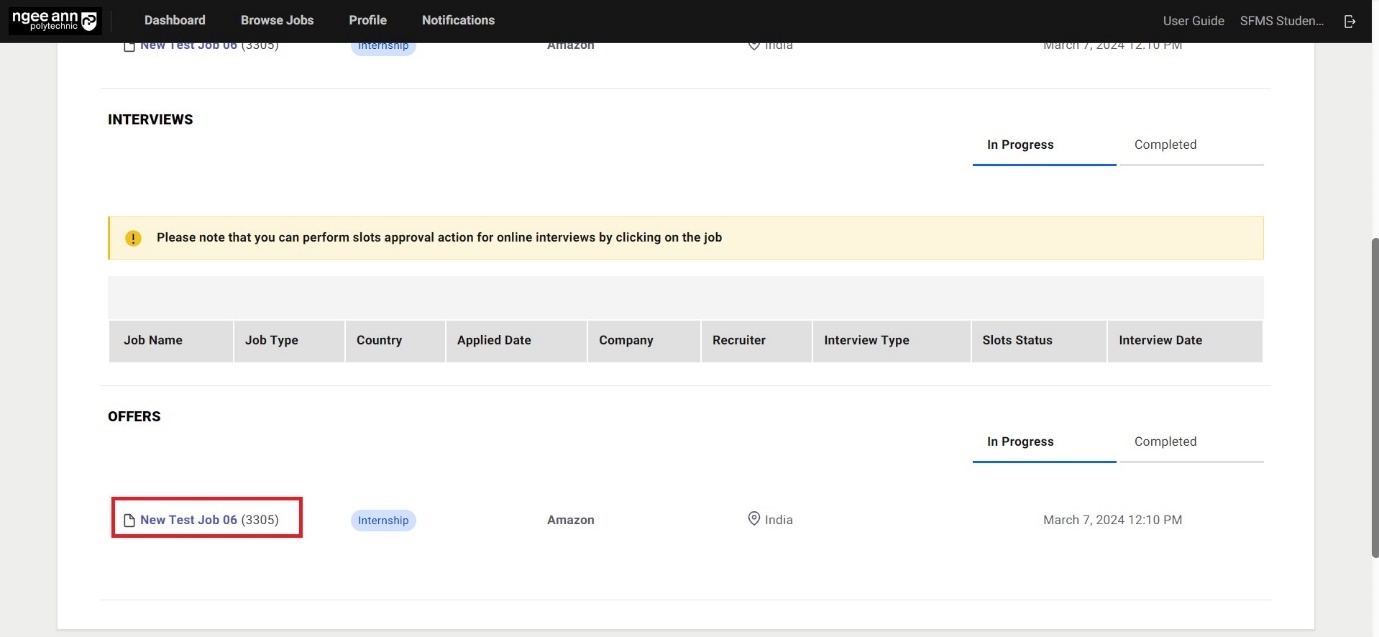
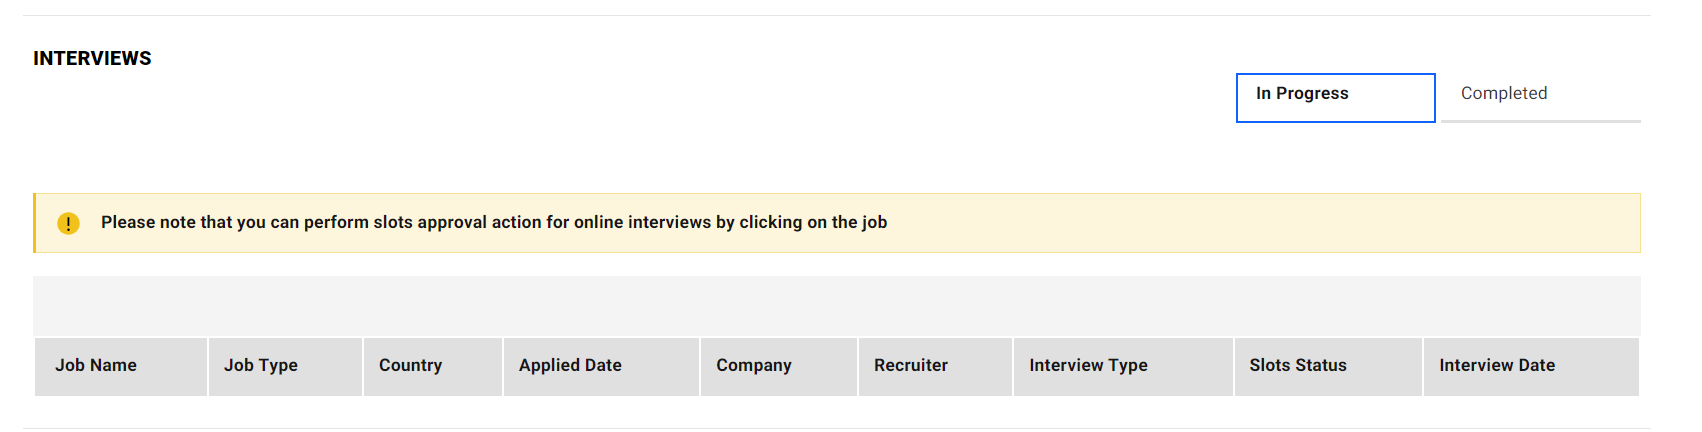
Step 3: Interviews
You will see all the job details for interview-scheduled or rescheduled slots by the companies.
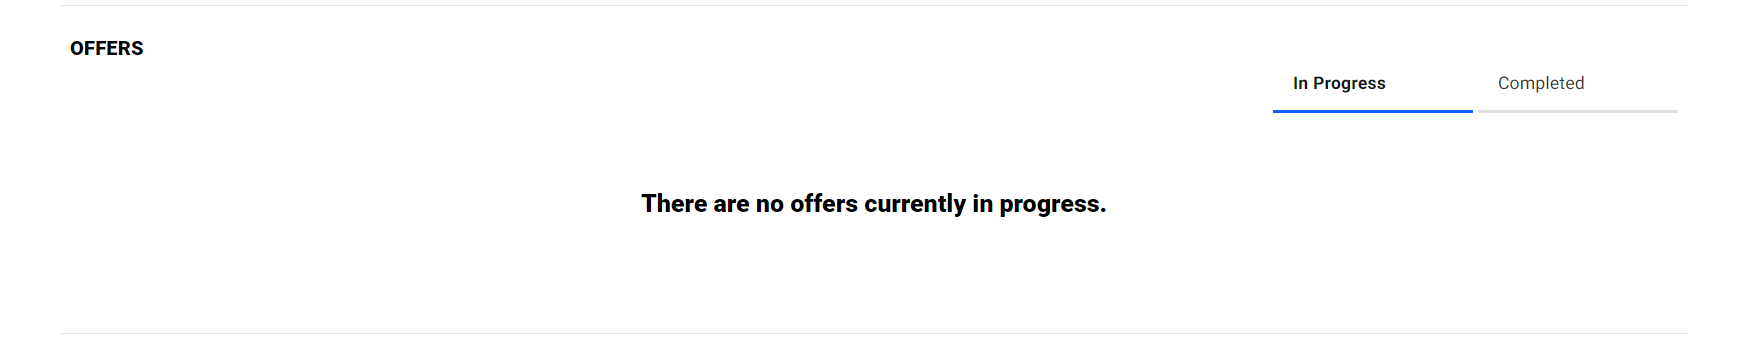
Step 4: Offers
When you receive a job offer, the job details will appear in the "Offers" section.
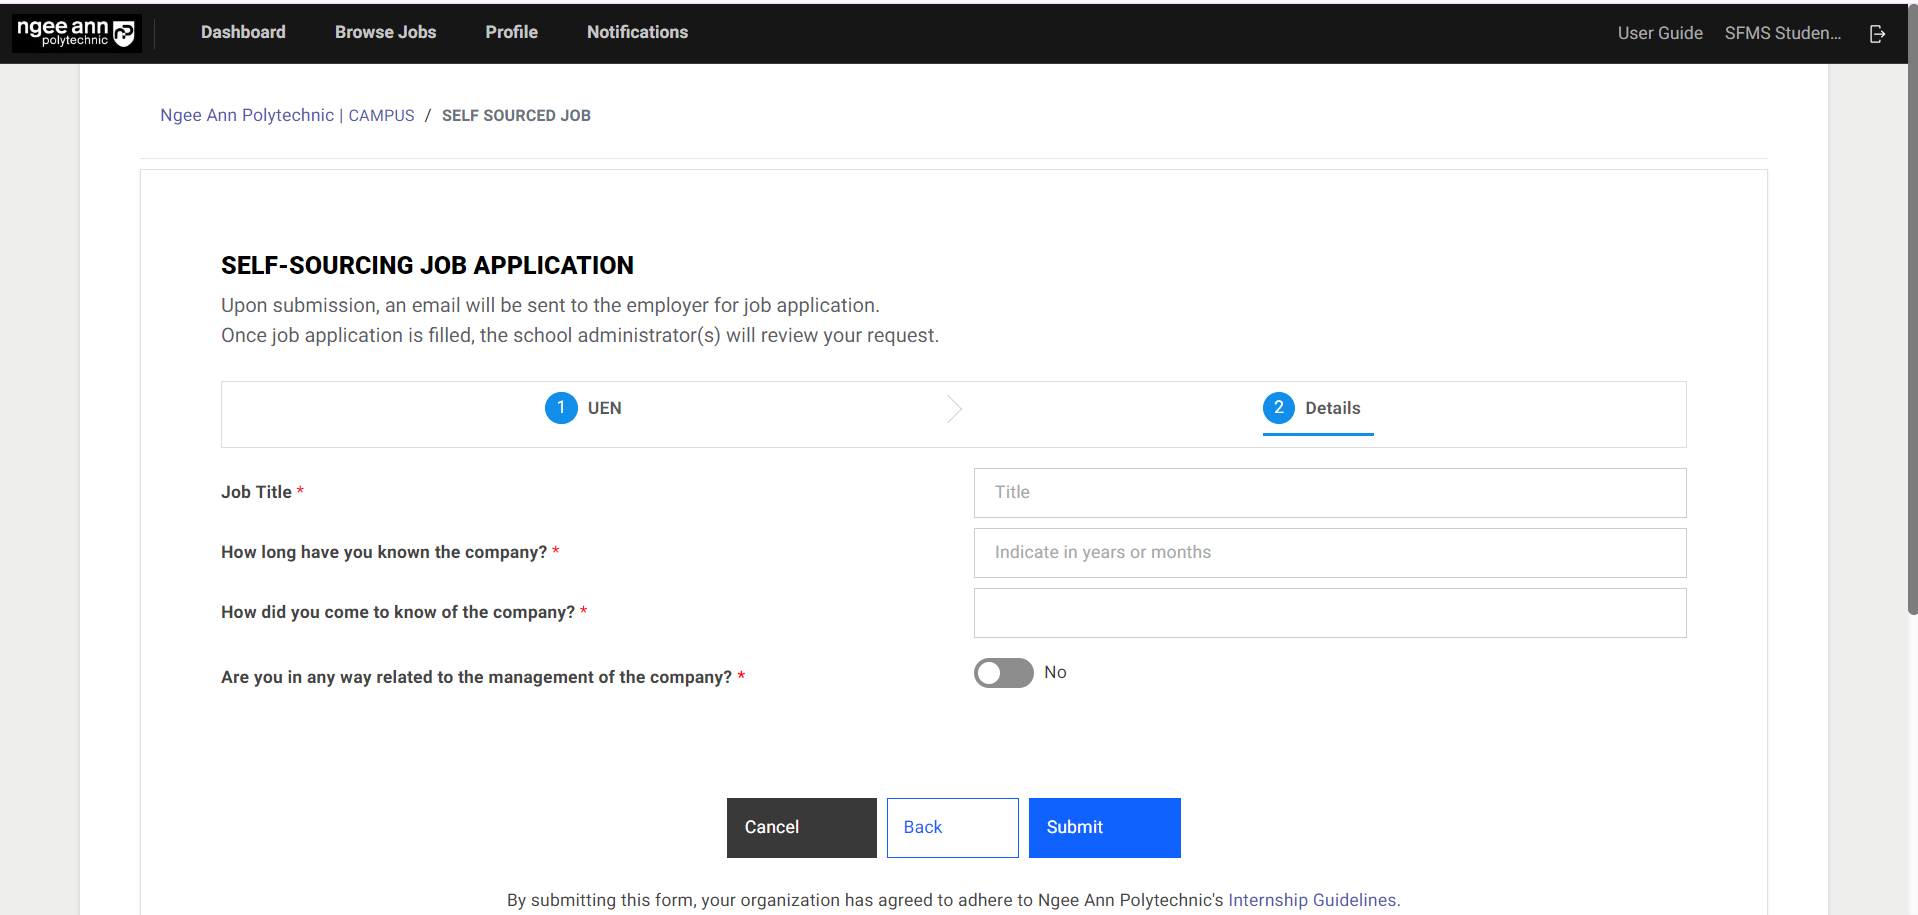
Self-Sourced Jobs
Step 1:
Click on the "Self-Sourced Job" button

Step 2:
Navigate to the self-sourced job page when you click on the "Self-Sourced Job" button.
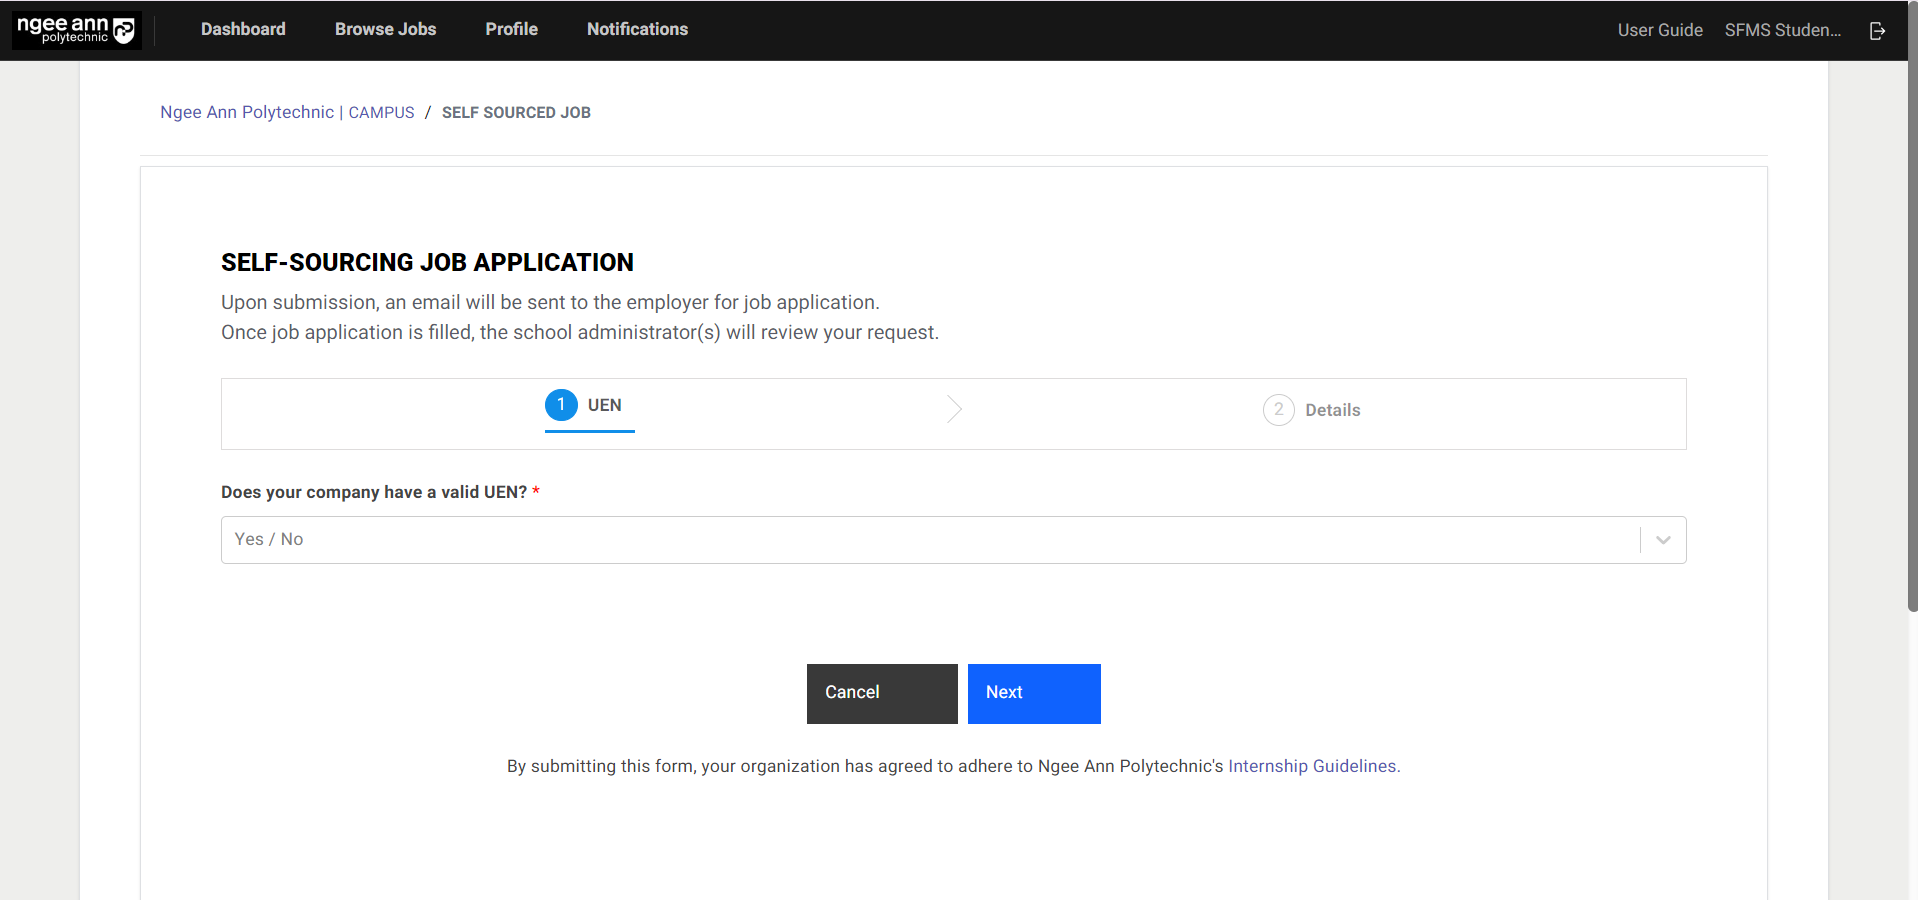
Create a self-sourced job with a valid UEN number.
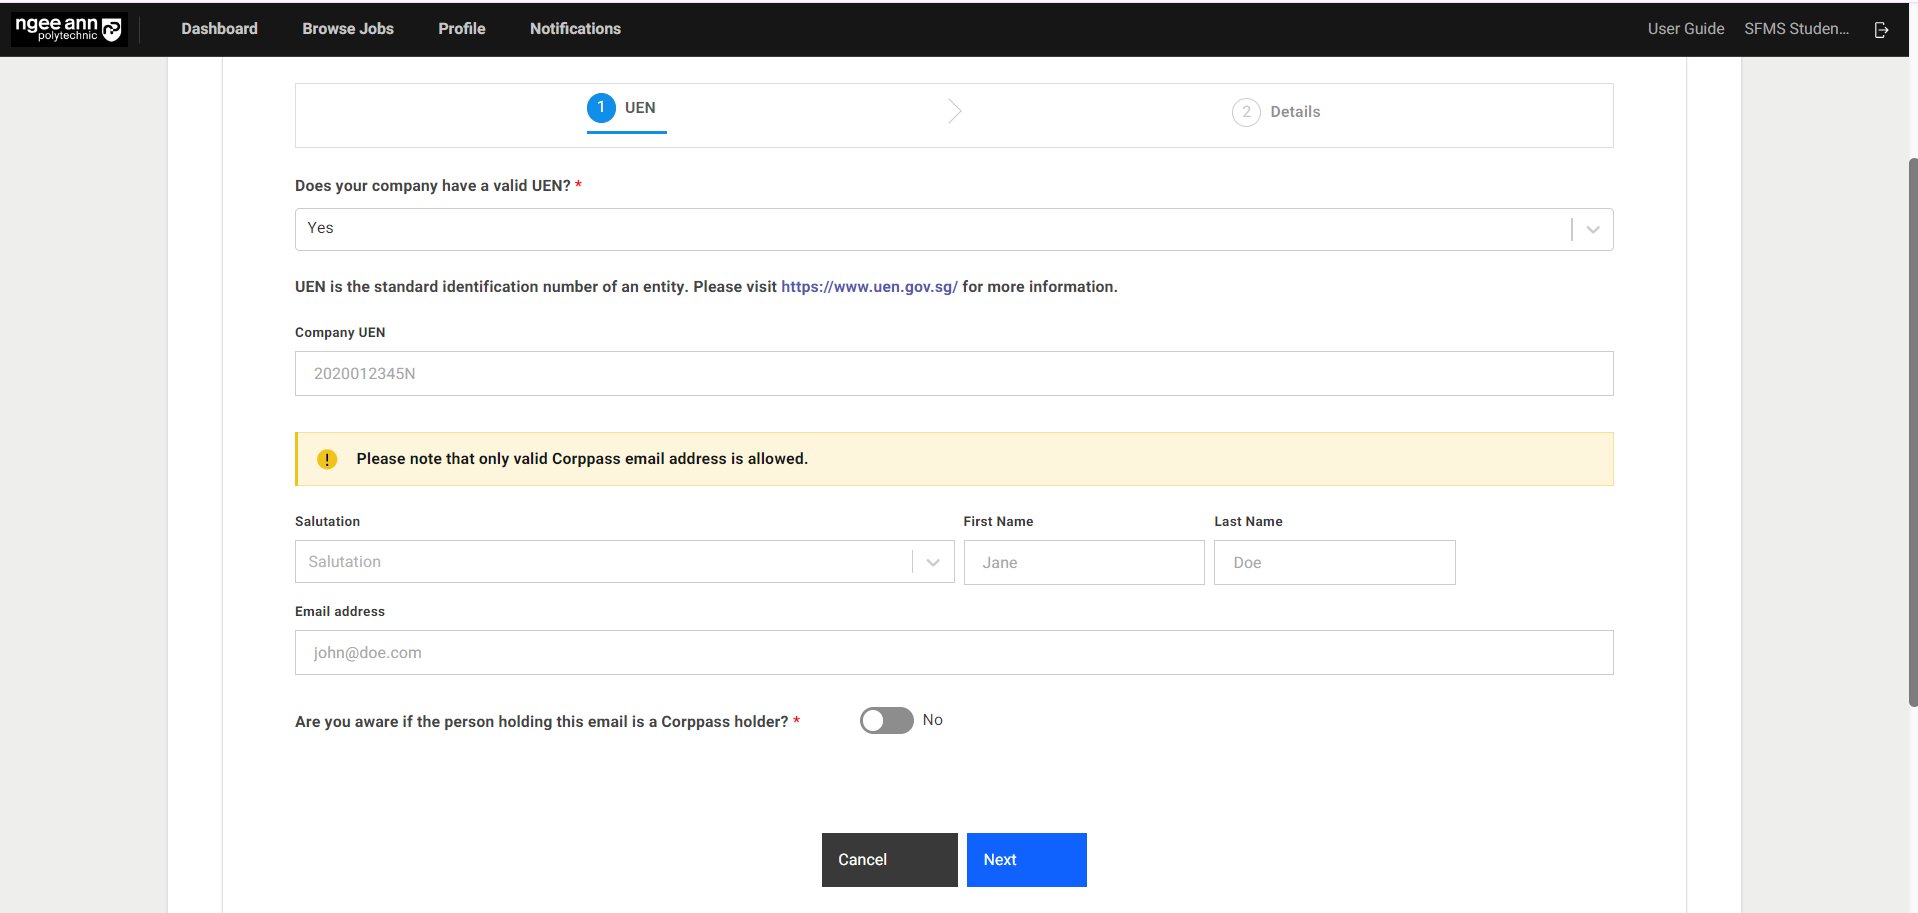
Create a self-sourced job without UEN (manually).
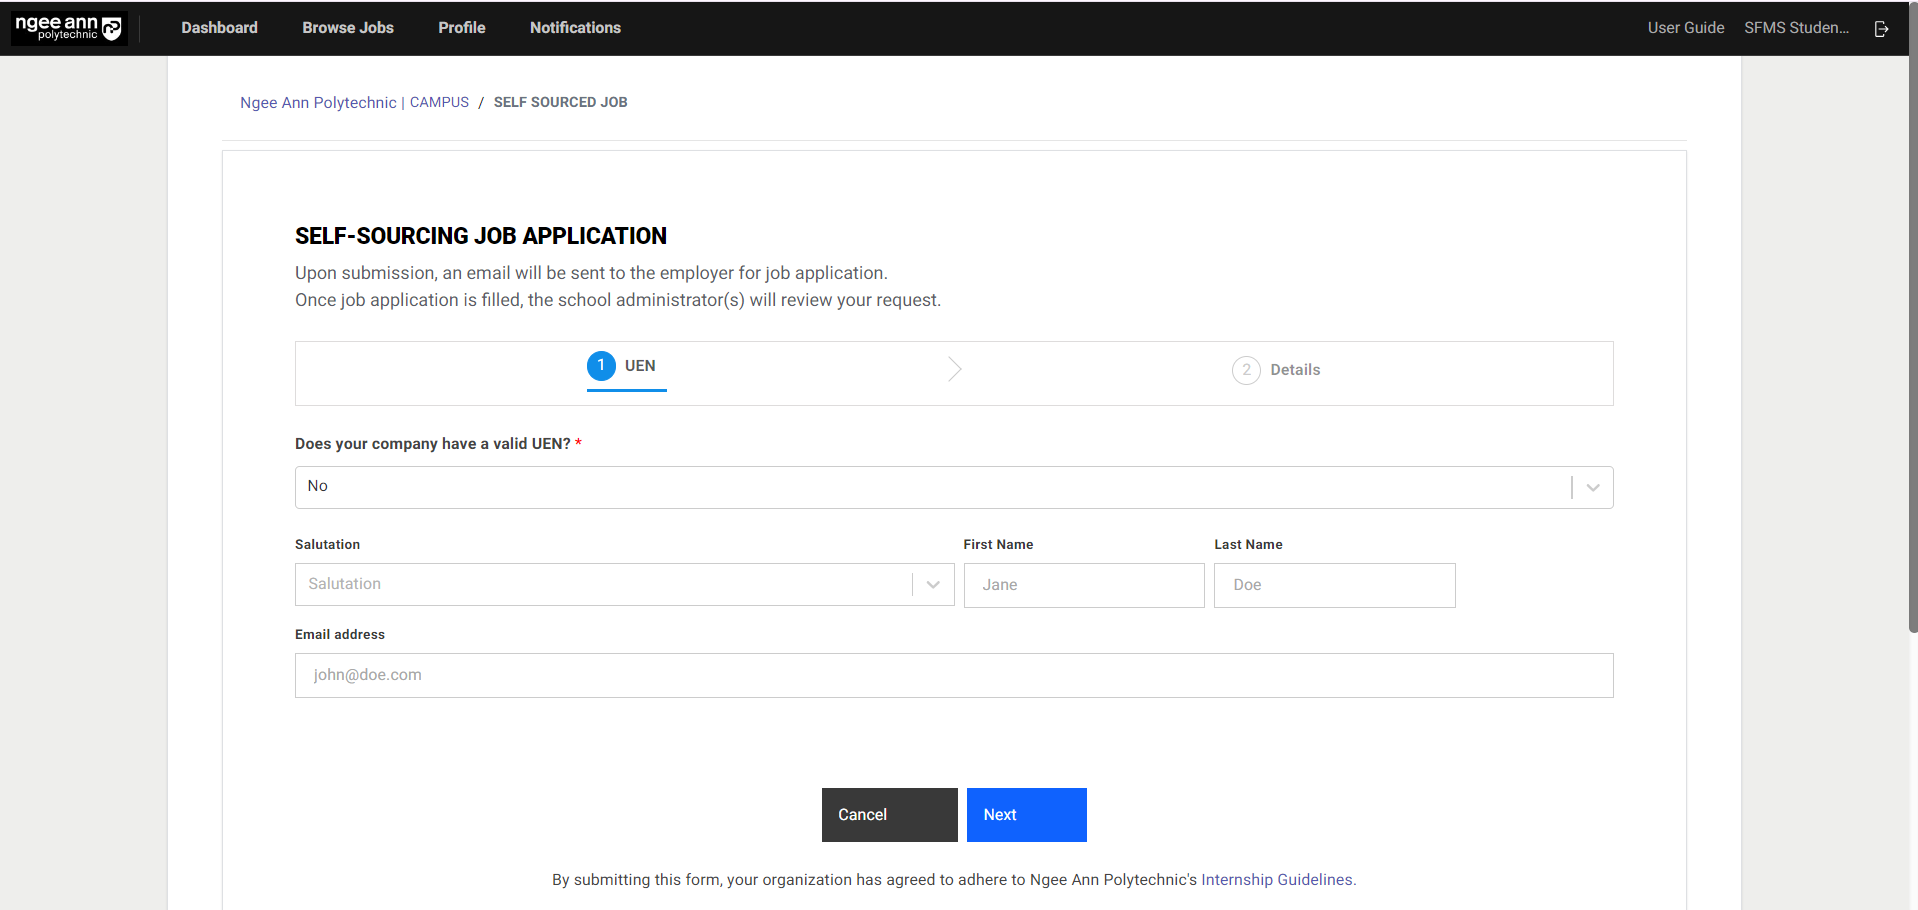
Step 3:
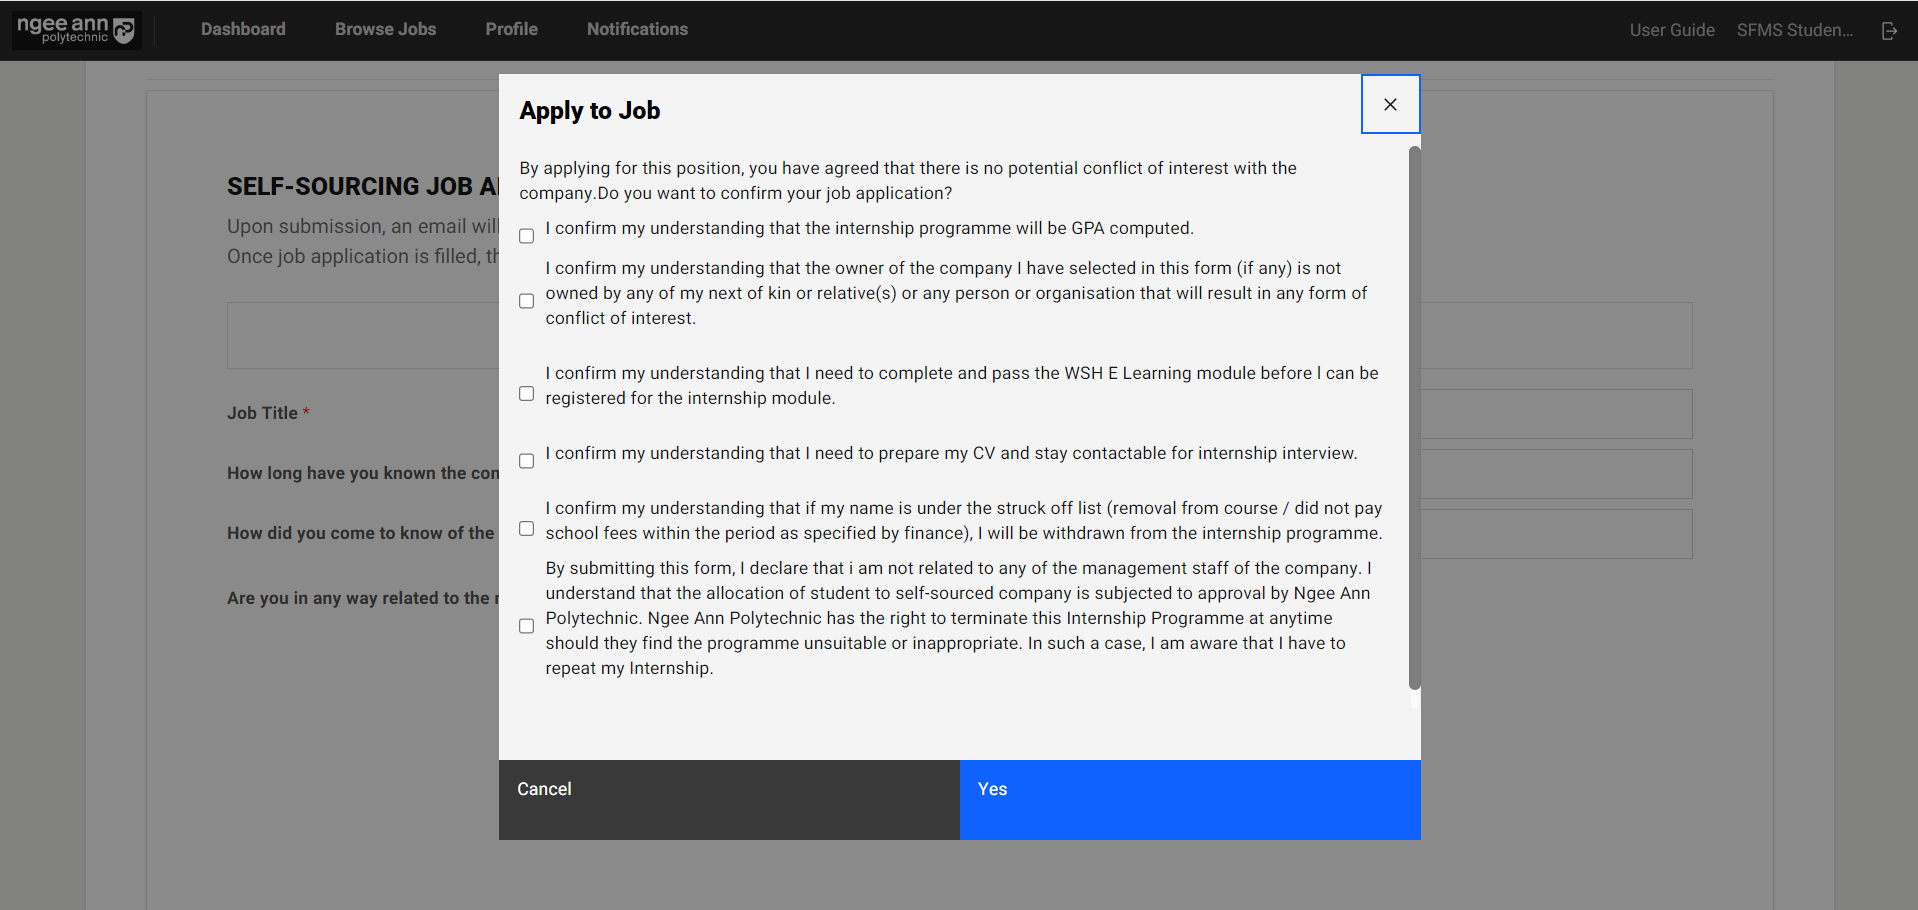
When you click on the “Next” button, it will take you to the “Details” page. To request a Self-Sourced job provide details in the fields on the details page and click on the “Submit” button
Step 4:
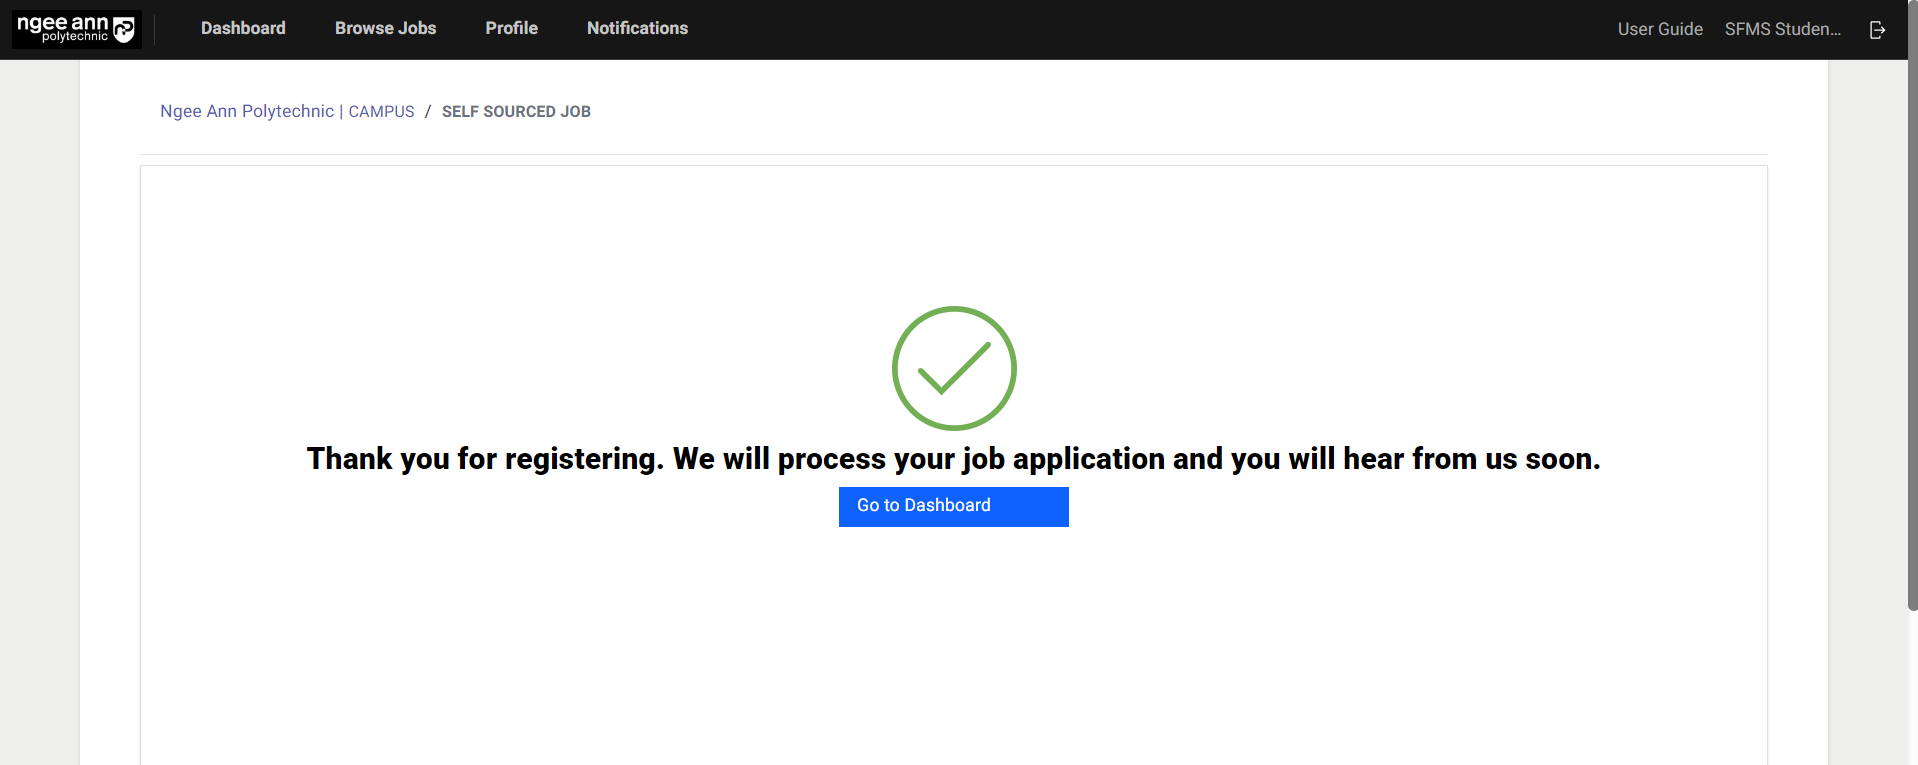
A self-sourced job will be requested or created successfully. And the self-sourced job will be shown to companies.
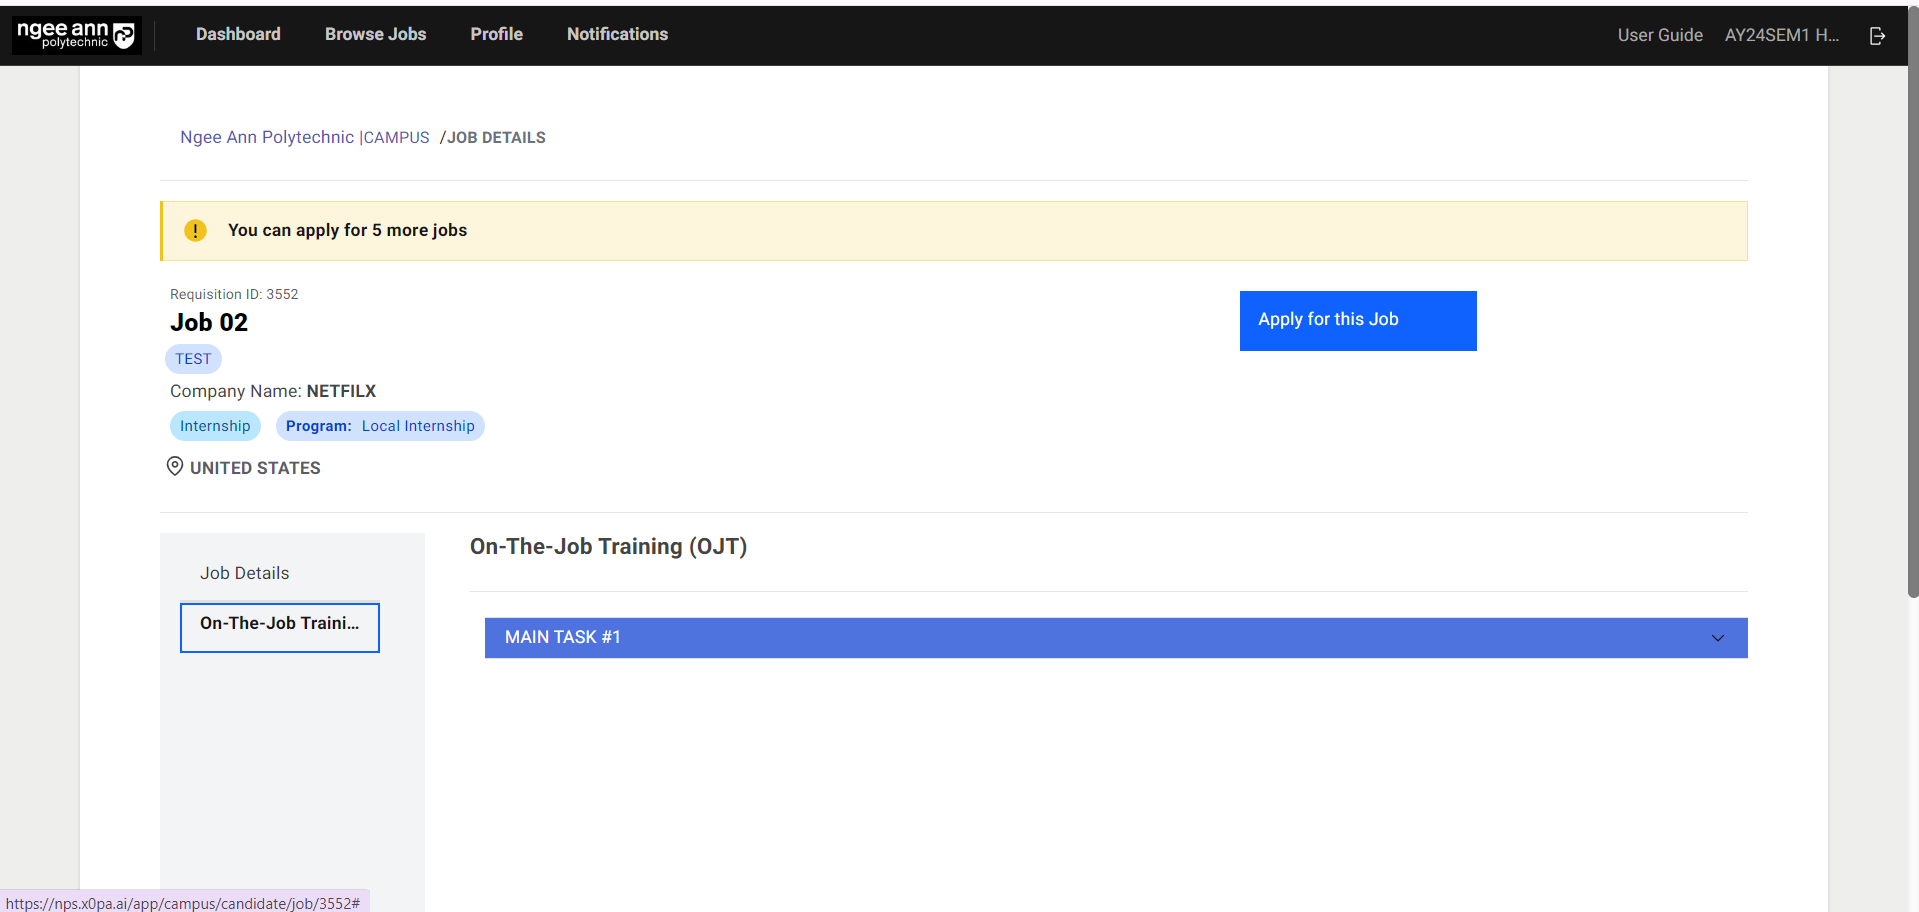
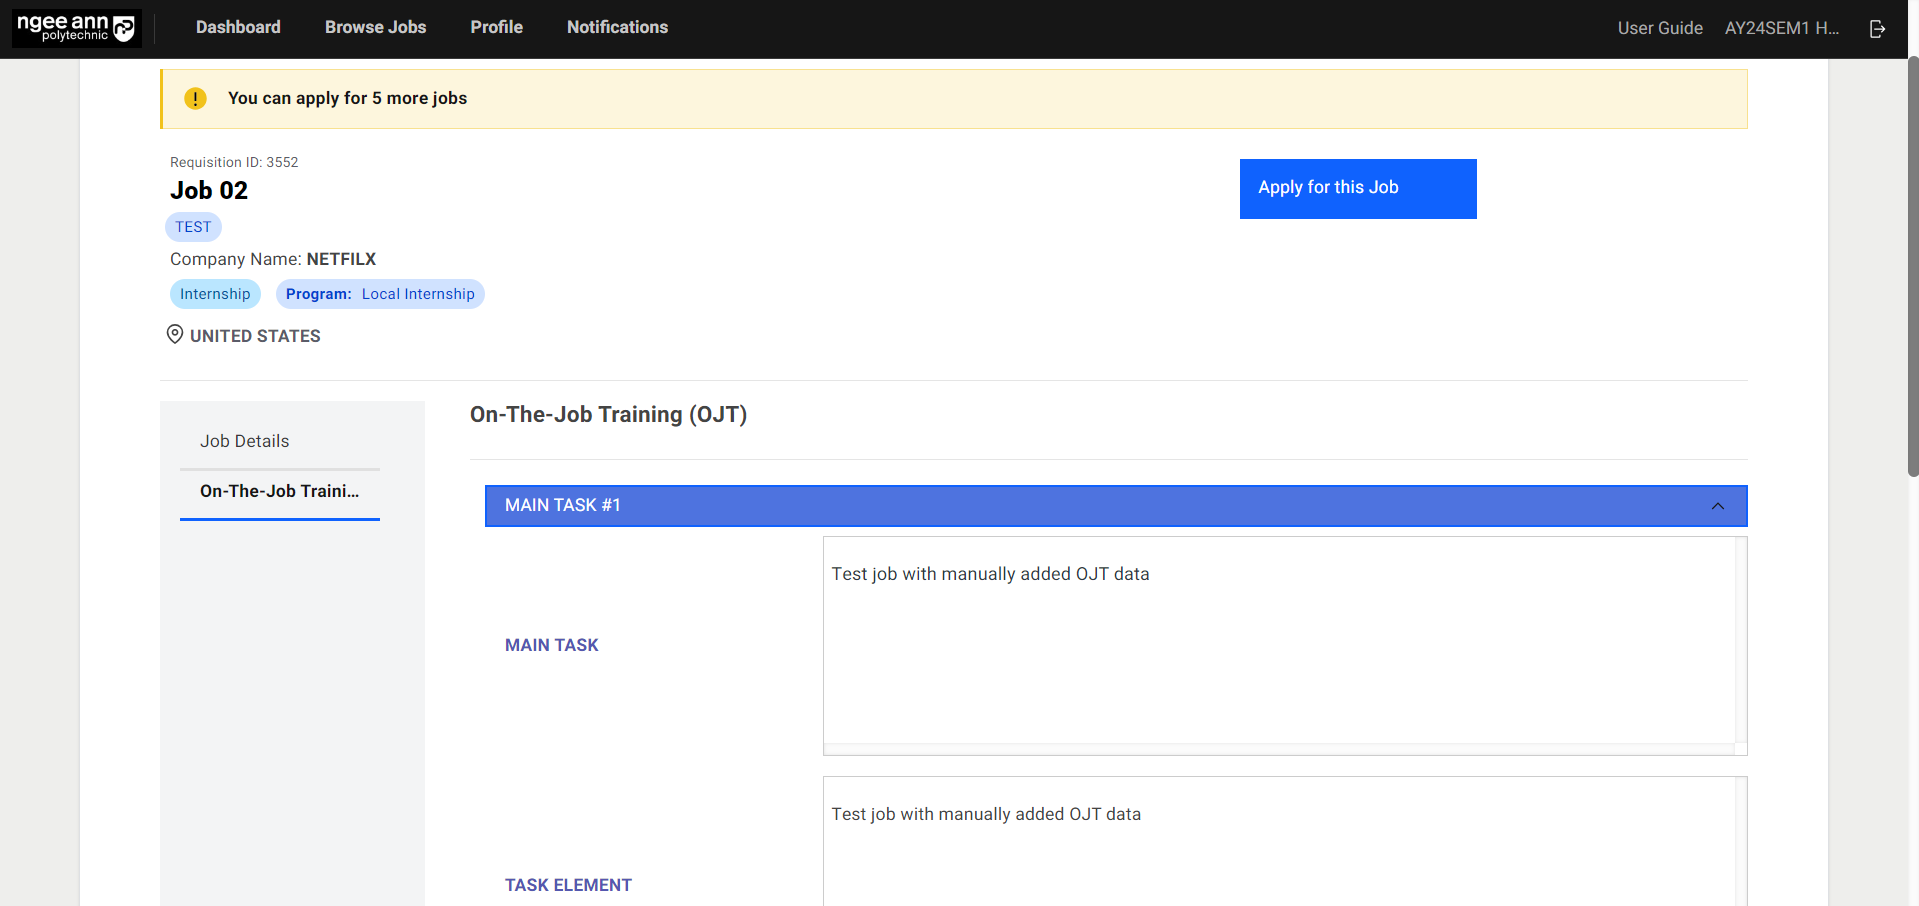
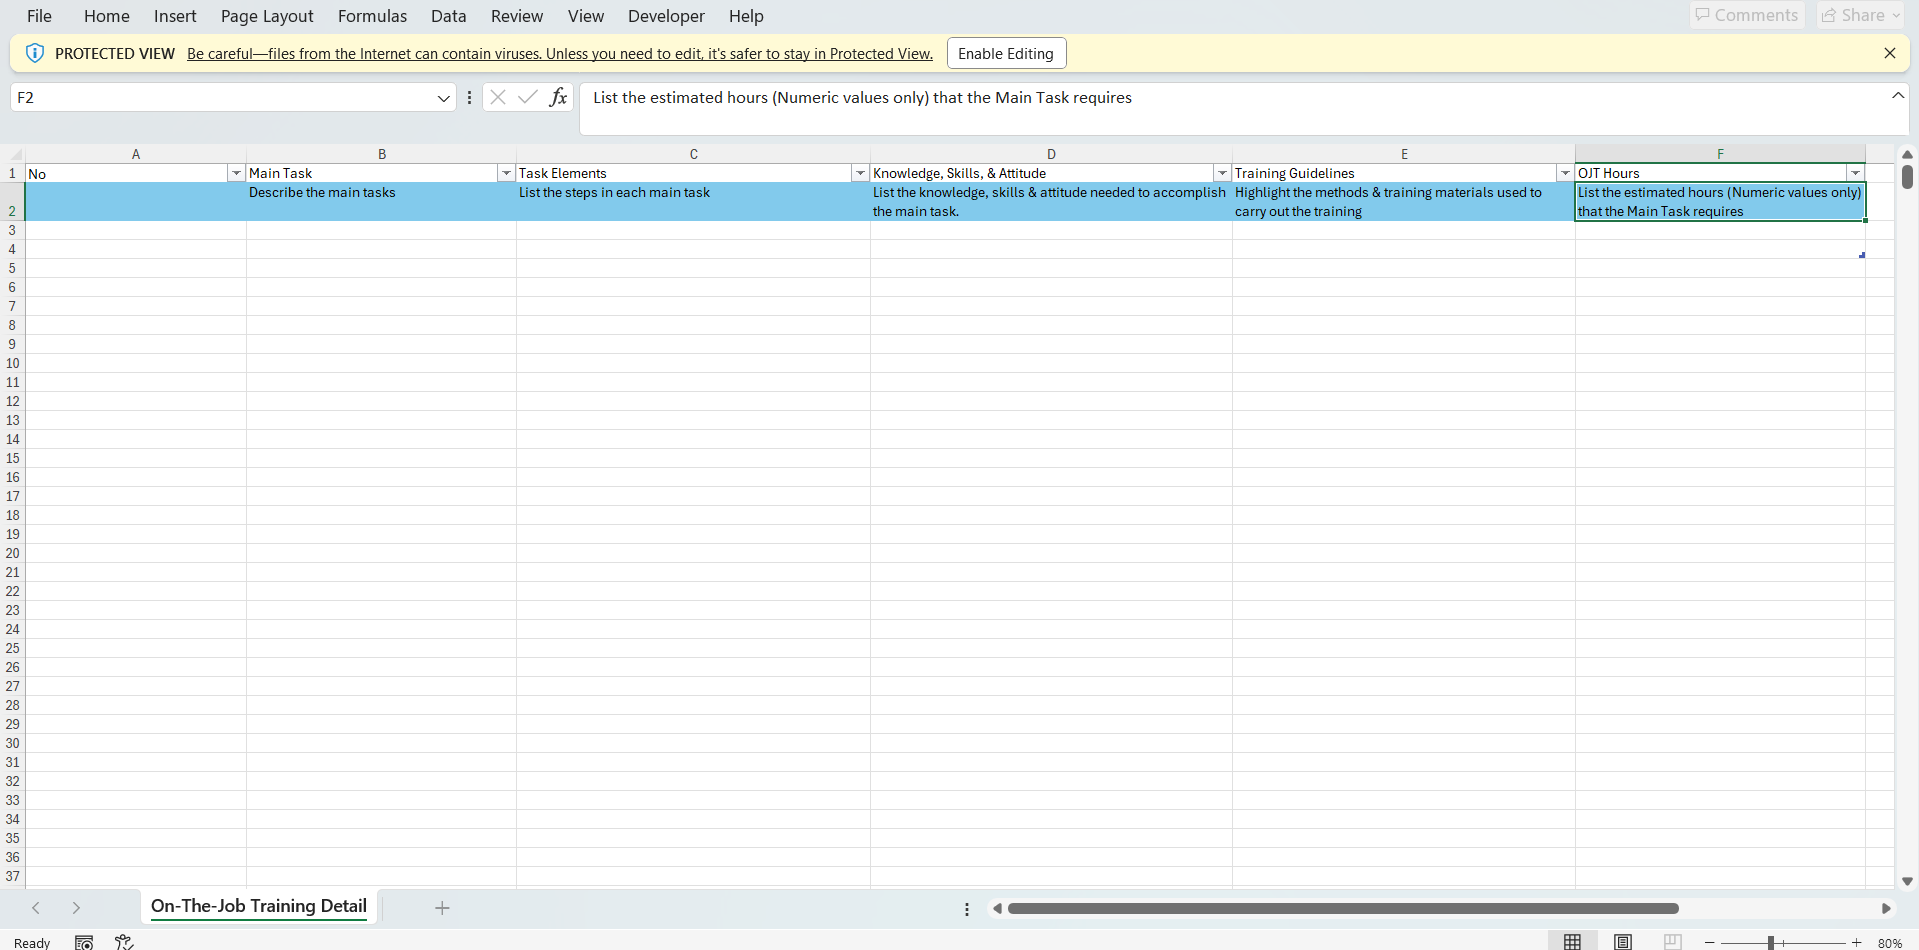
On-The-Job Training (OJT)
Apply OJT Job
Job Level OJT Details to Students
Step 1:
- Click on “Browse Jobs” to view the OJT Job available.
- Click on the OJT Job to apply.
Step 2:
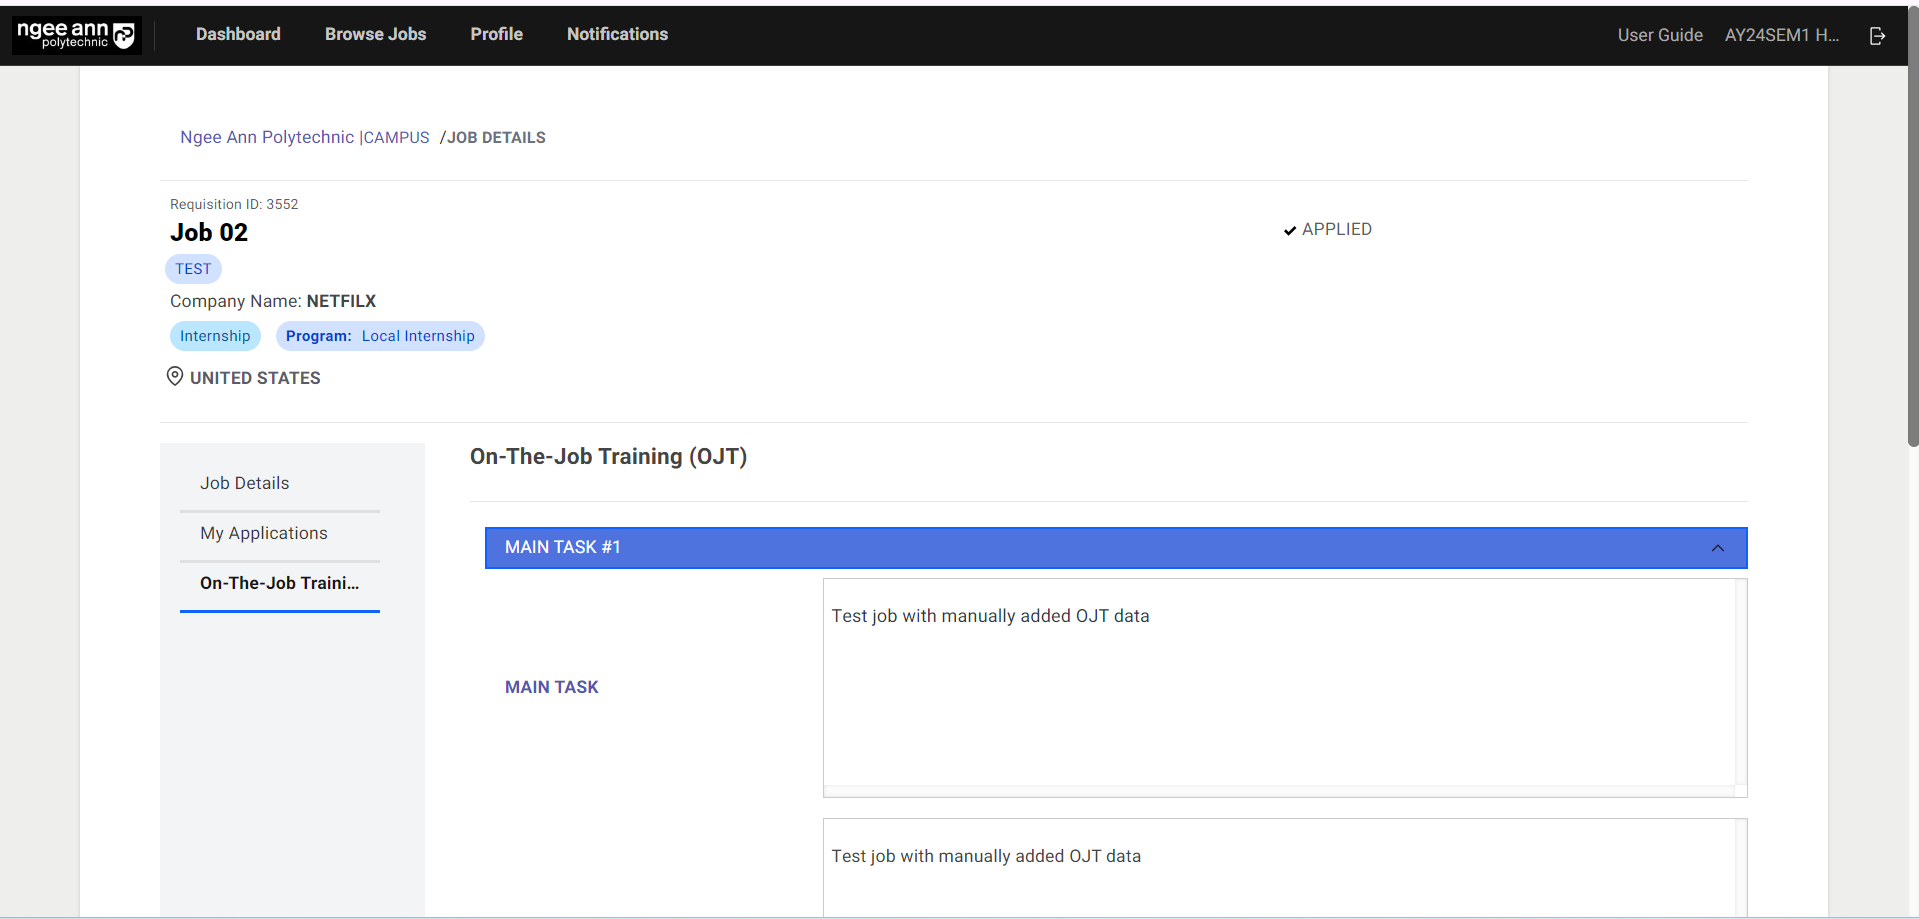
- Click on the “On-The-Job Training” section tab to view Job level OJT details visible to students during application.
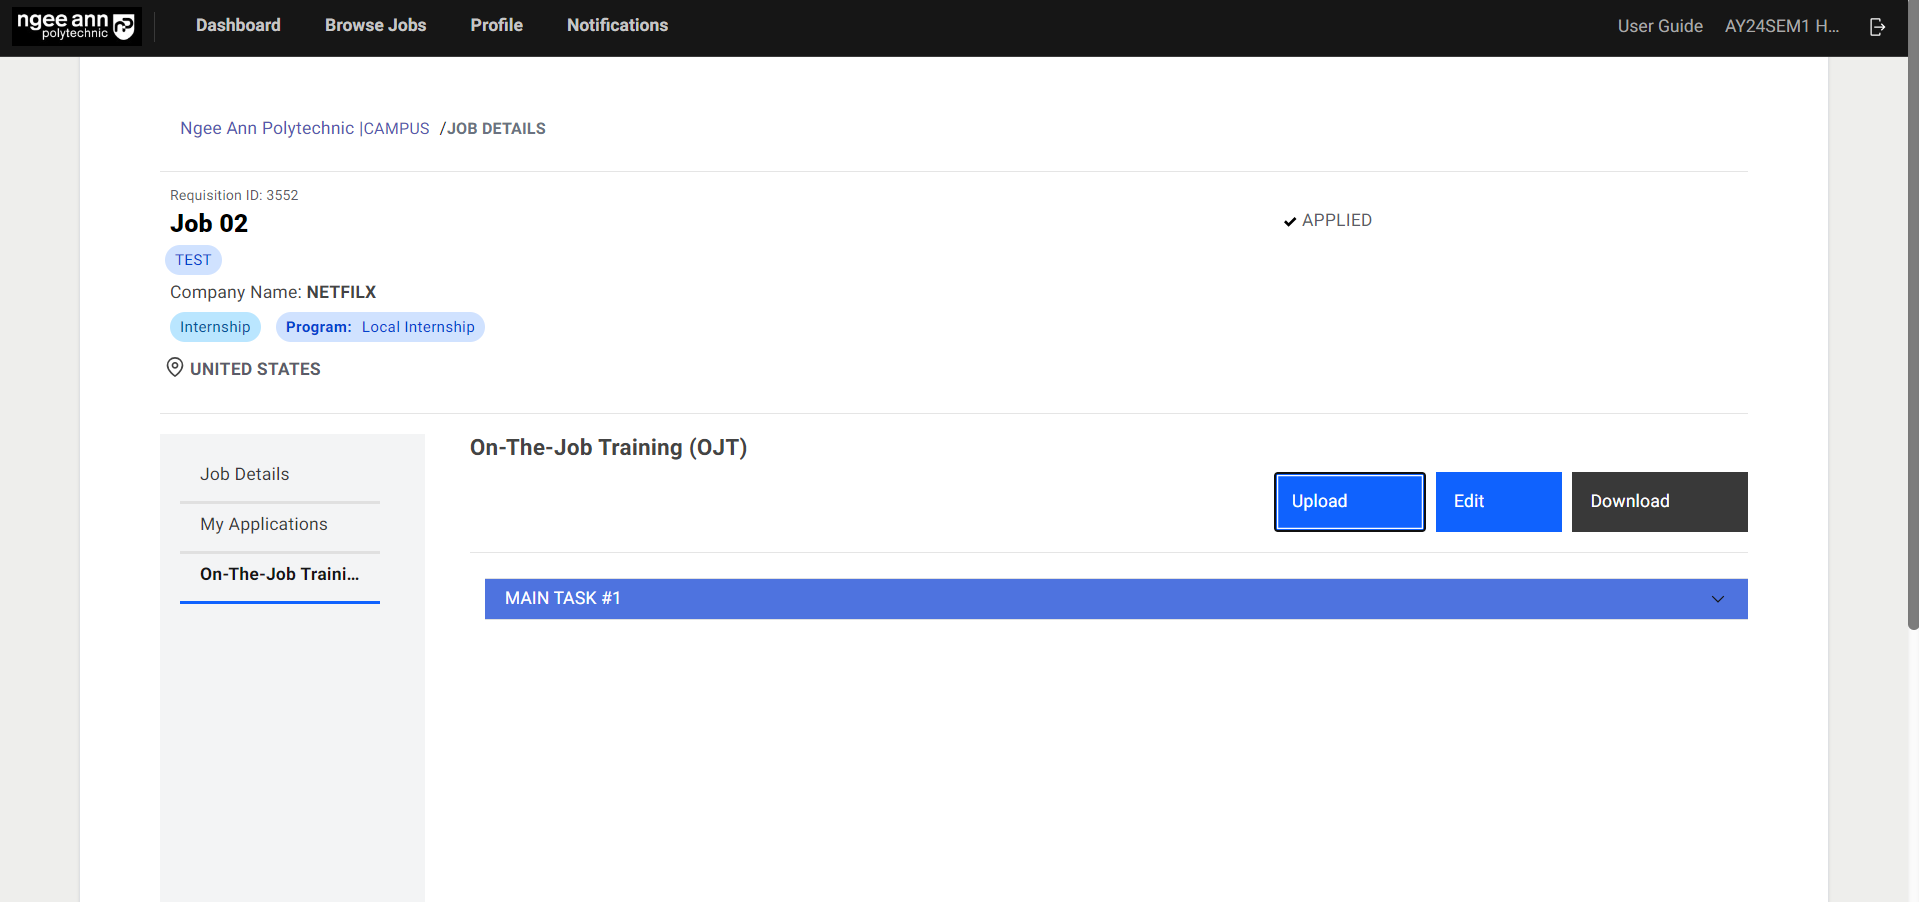
- Expand the “Main Task X number” accordion to view OJT data present in the fields.
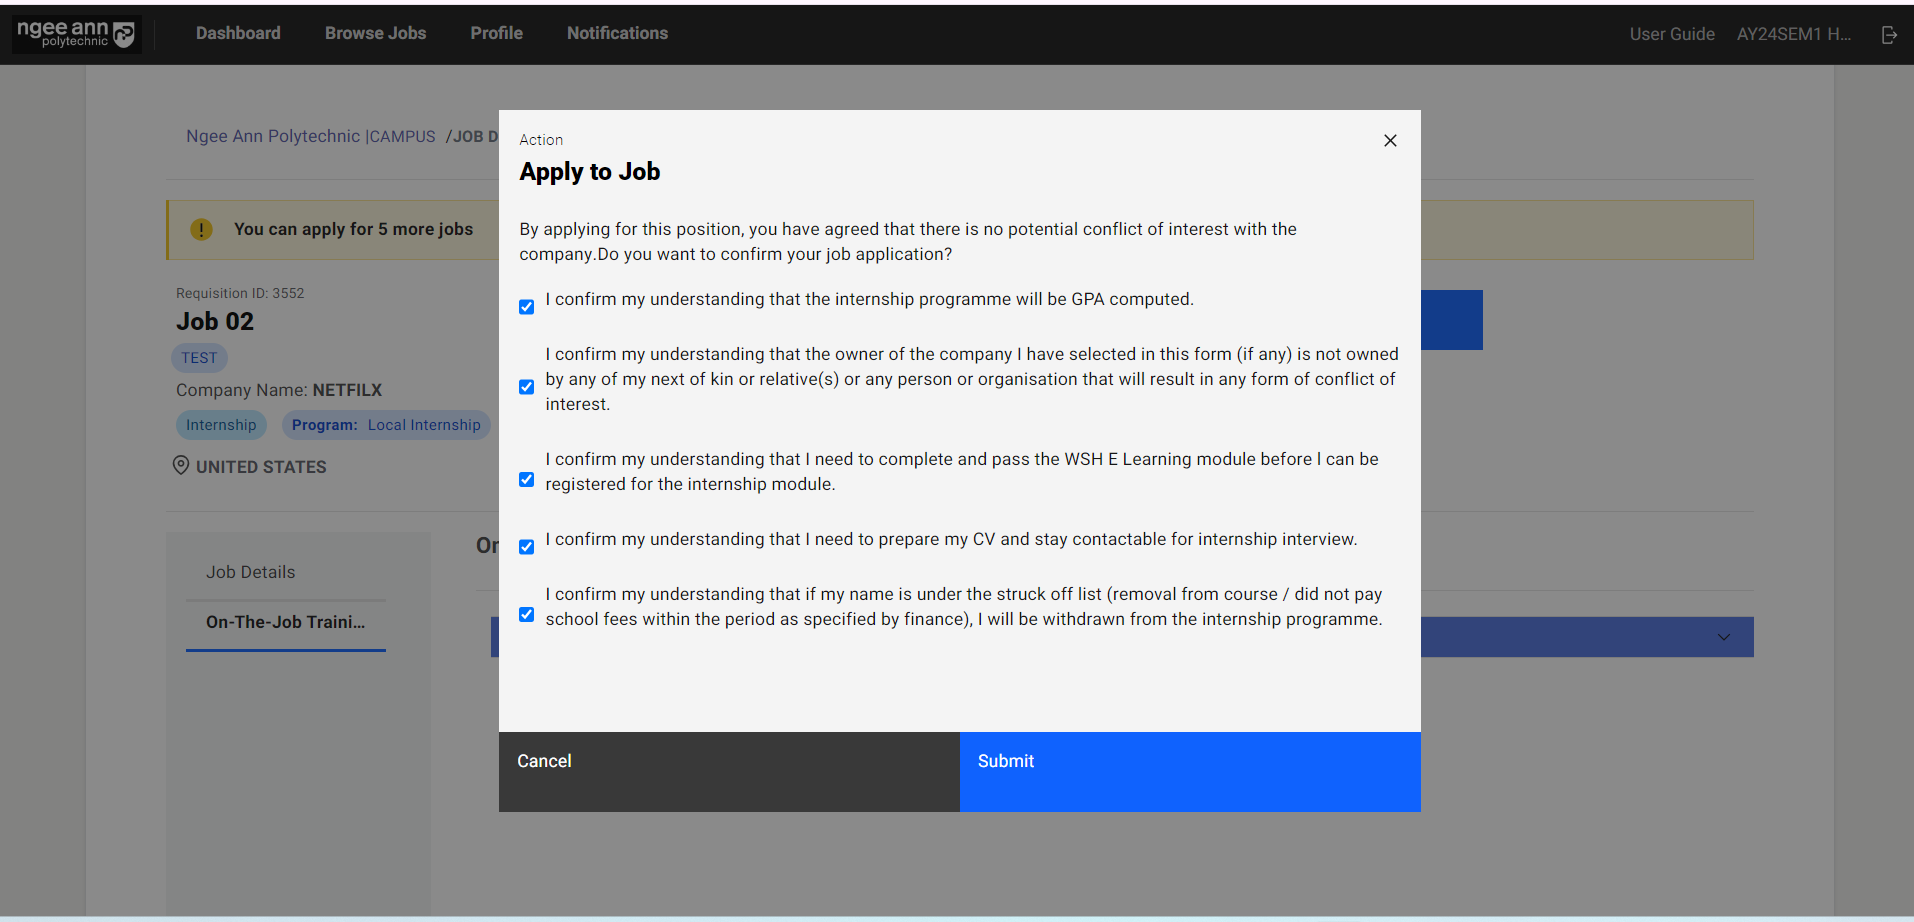
Step 3:
- Click on “Apply for this job”.
- Check all checkboxes in the pop-up window.
- Click on the “Submit” button.
- An “Applied” status will be shown in the job once the application is submitted.
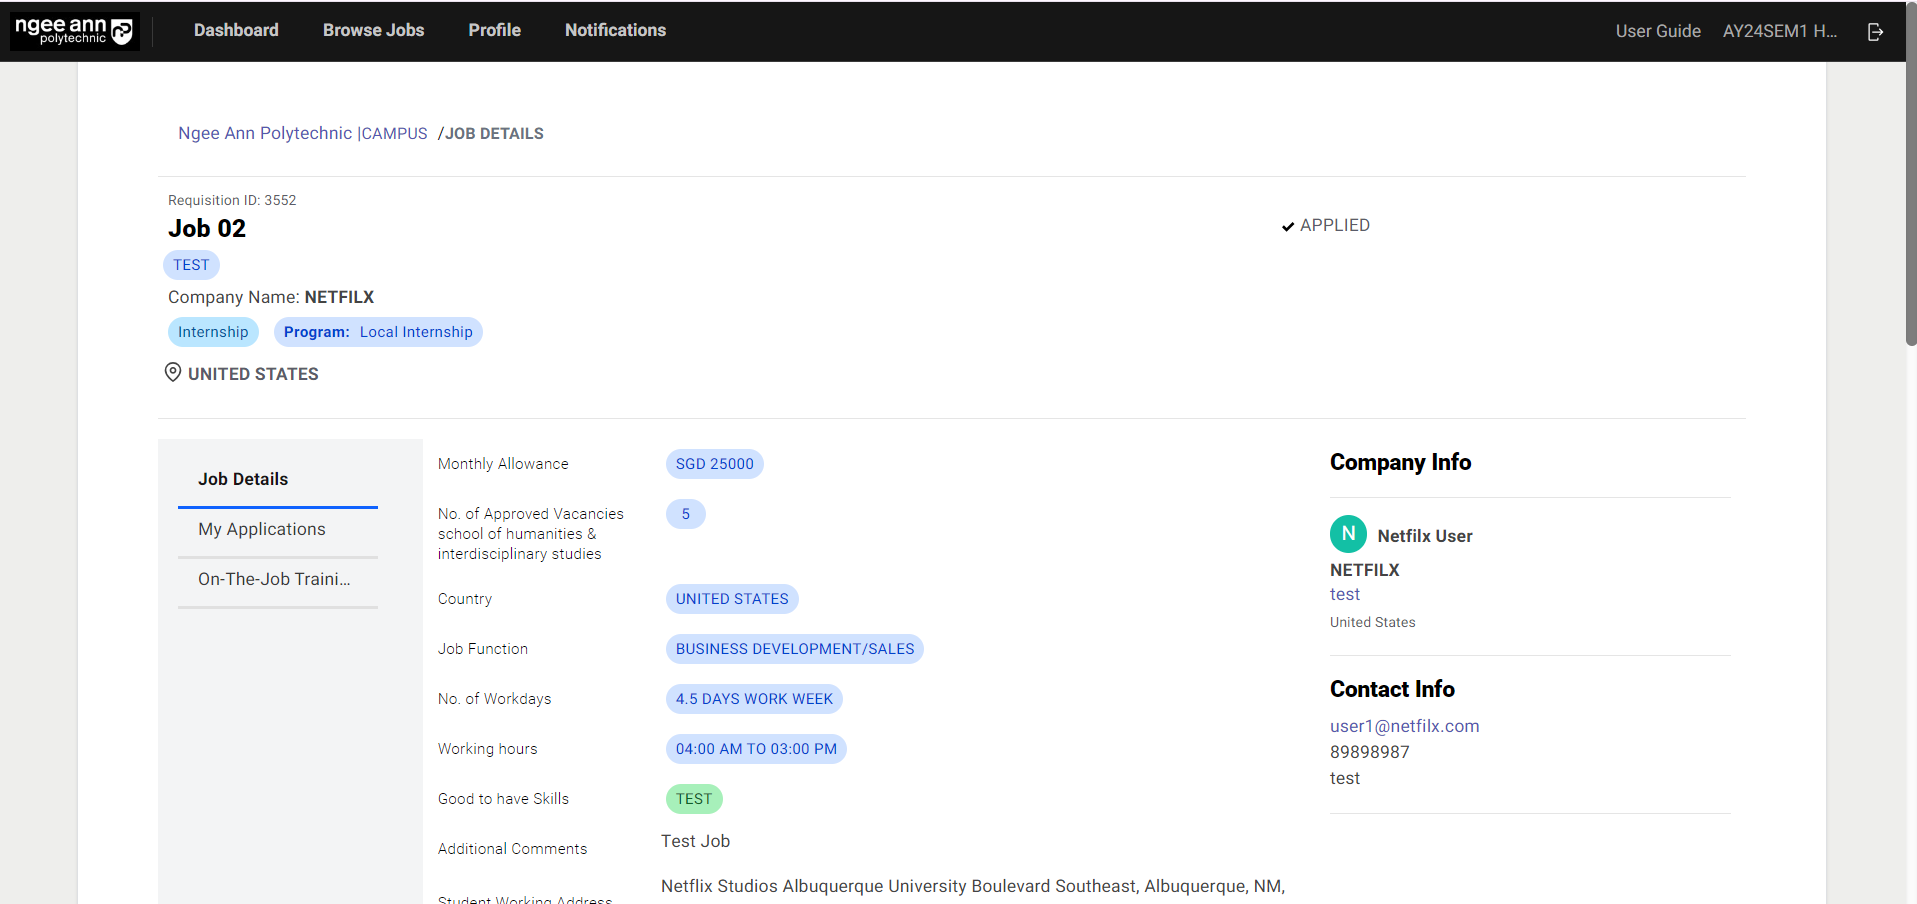
Note: When students navigate to the “Job Details” page through “Browse jobs”, the Job level OJT Details will be visible.

View OJT Details
Student Level OJT Details to Students
OJT Details Before Student Hired
Step 1:
- Click on the job name under “My Applications” from the dashboard page
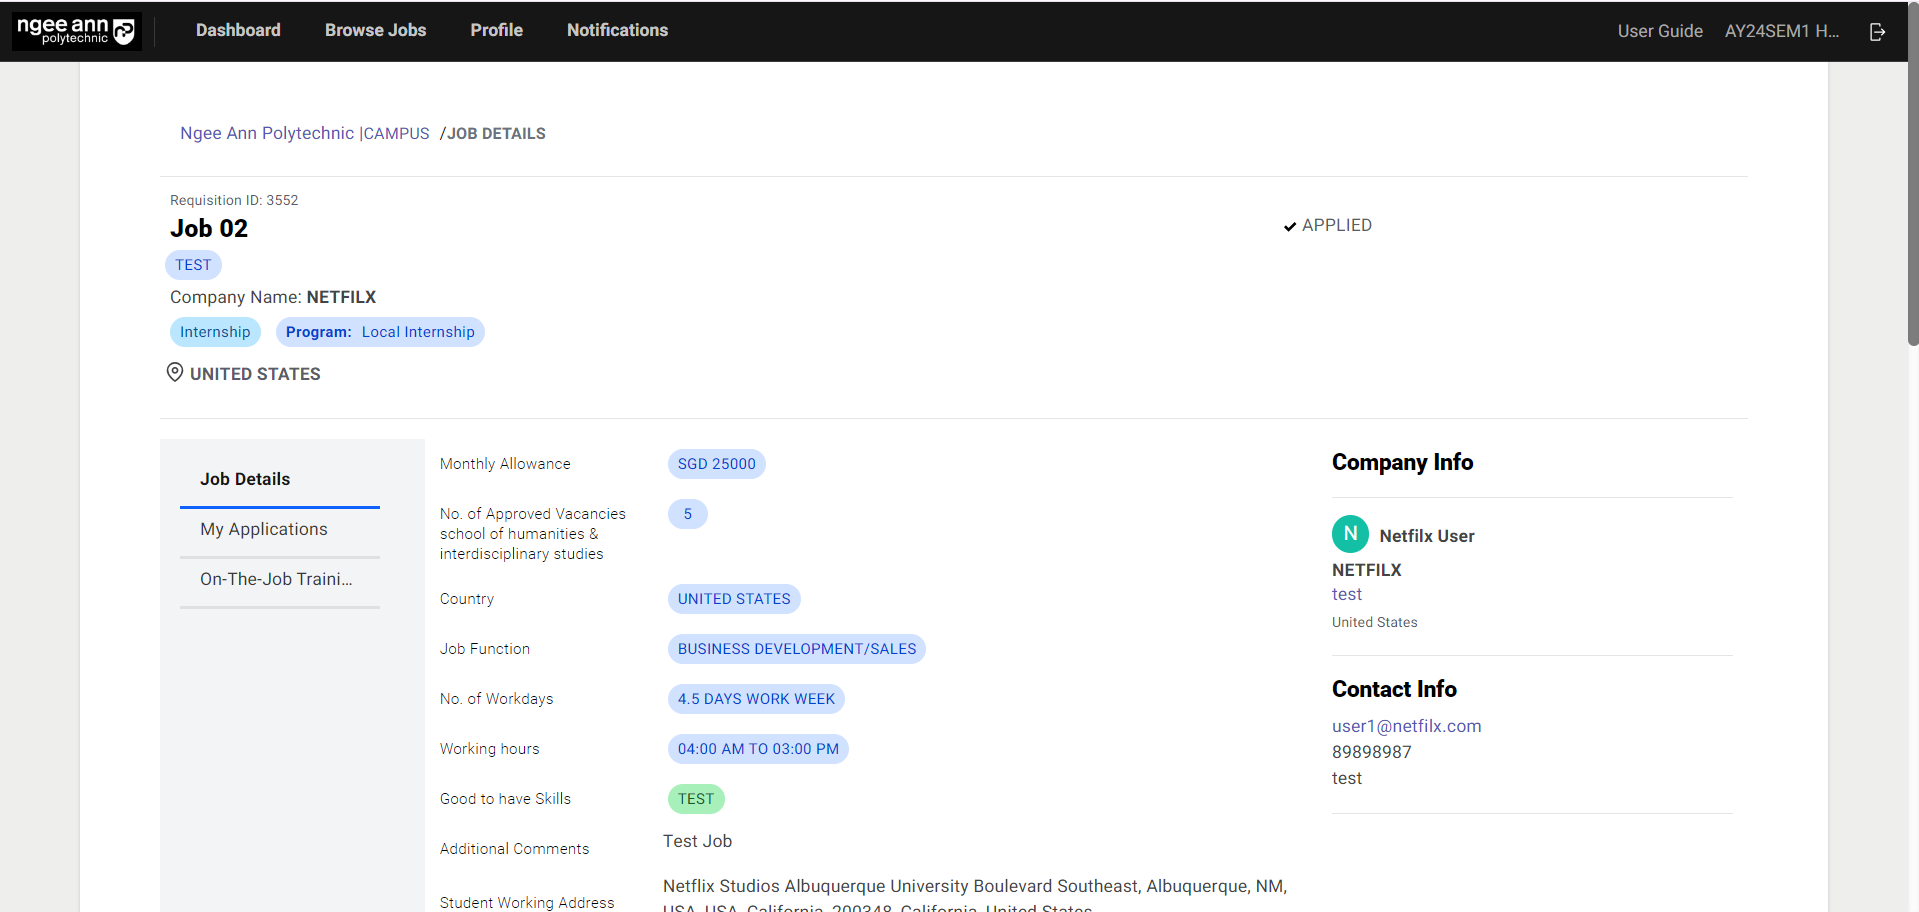
- Click on the “On-The-Job Training” section tab from the job details page
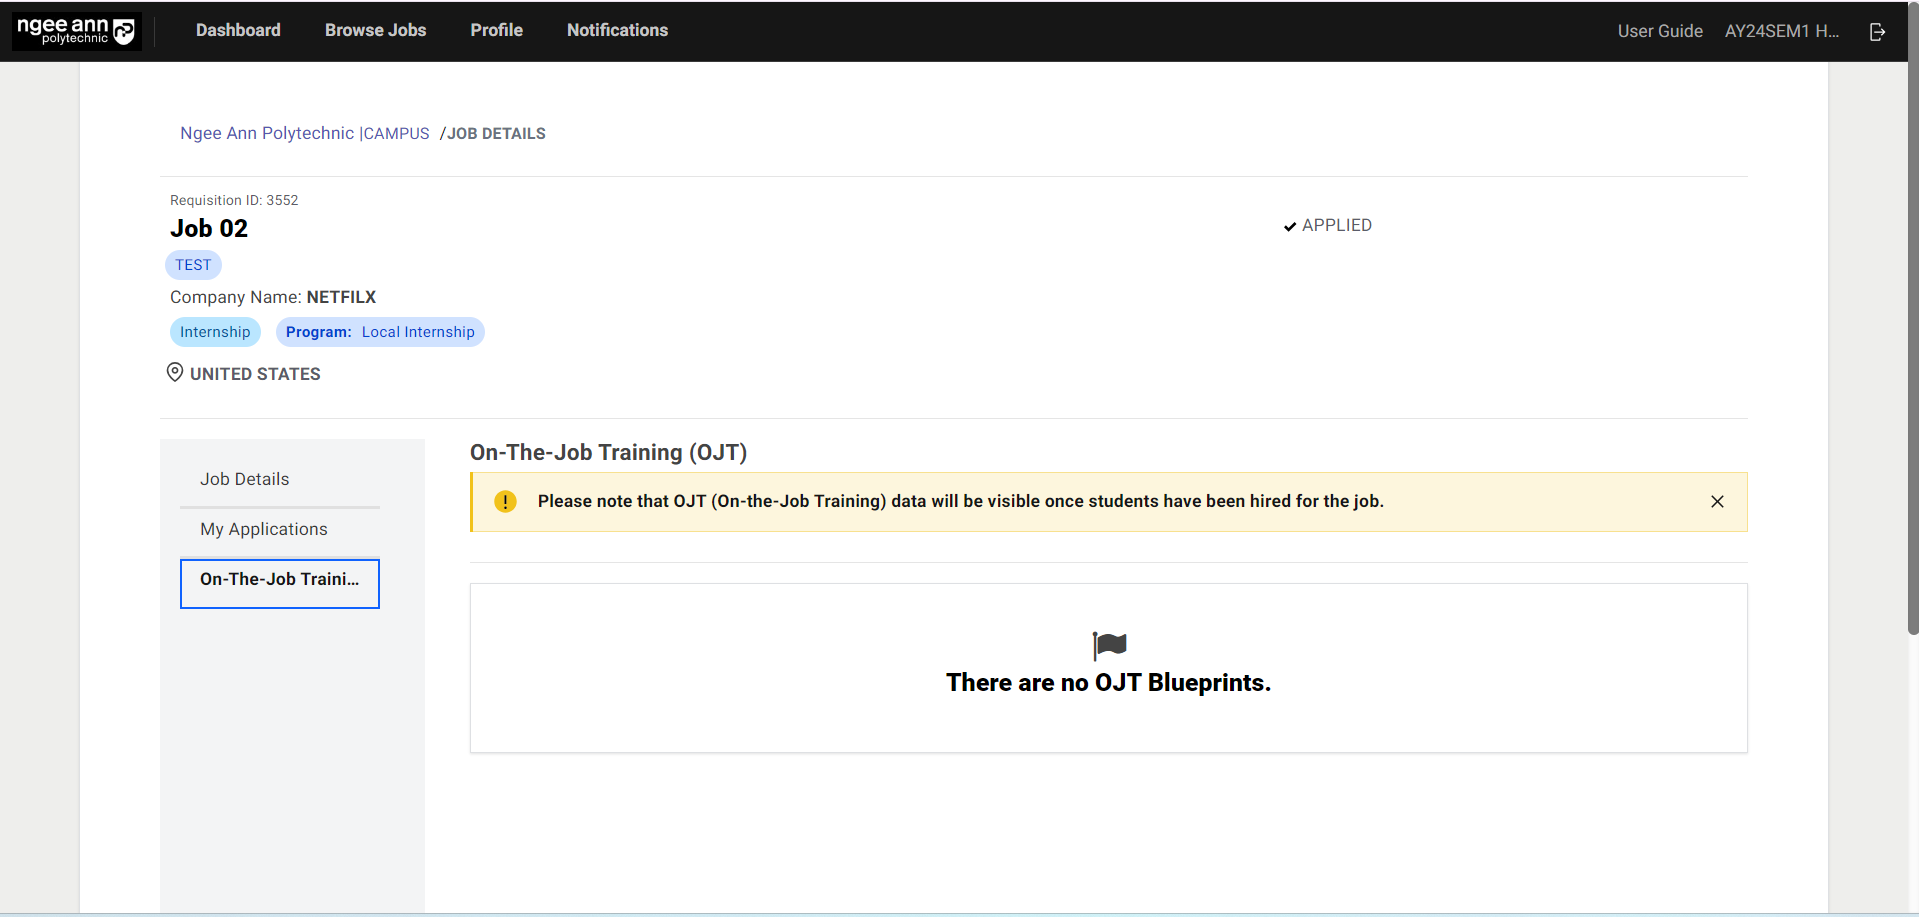
- “Please note that OJT (On-the-Job Training) data will be visible once students have been hired for the job.” message banner will be shown under the OJT section.
Note: Student/Application level OJT data will only be visible to the students once students are hired for the job
OJT Details once student Hired for the job
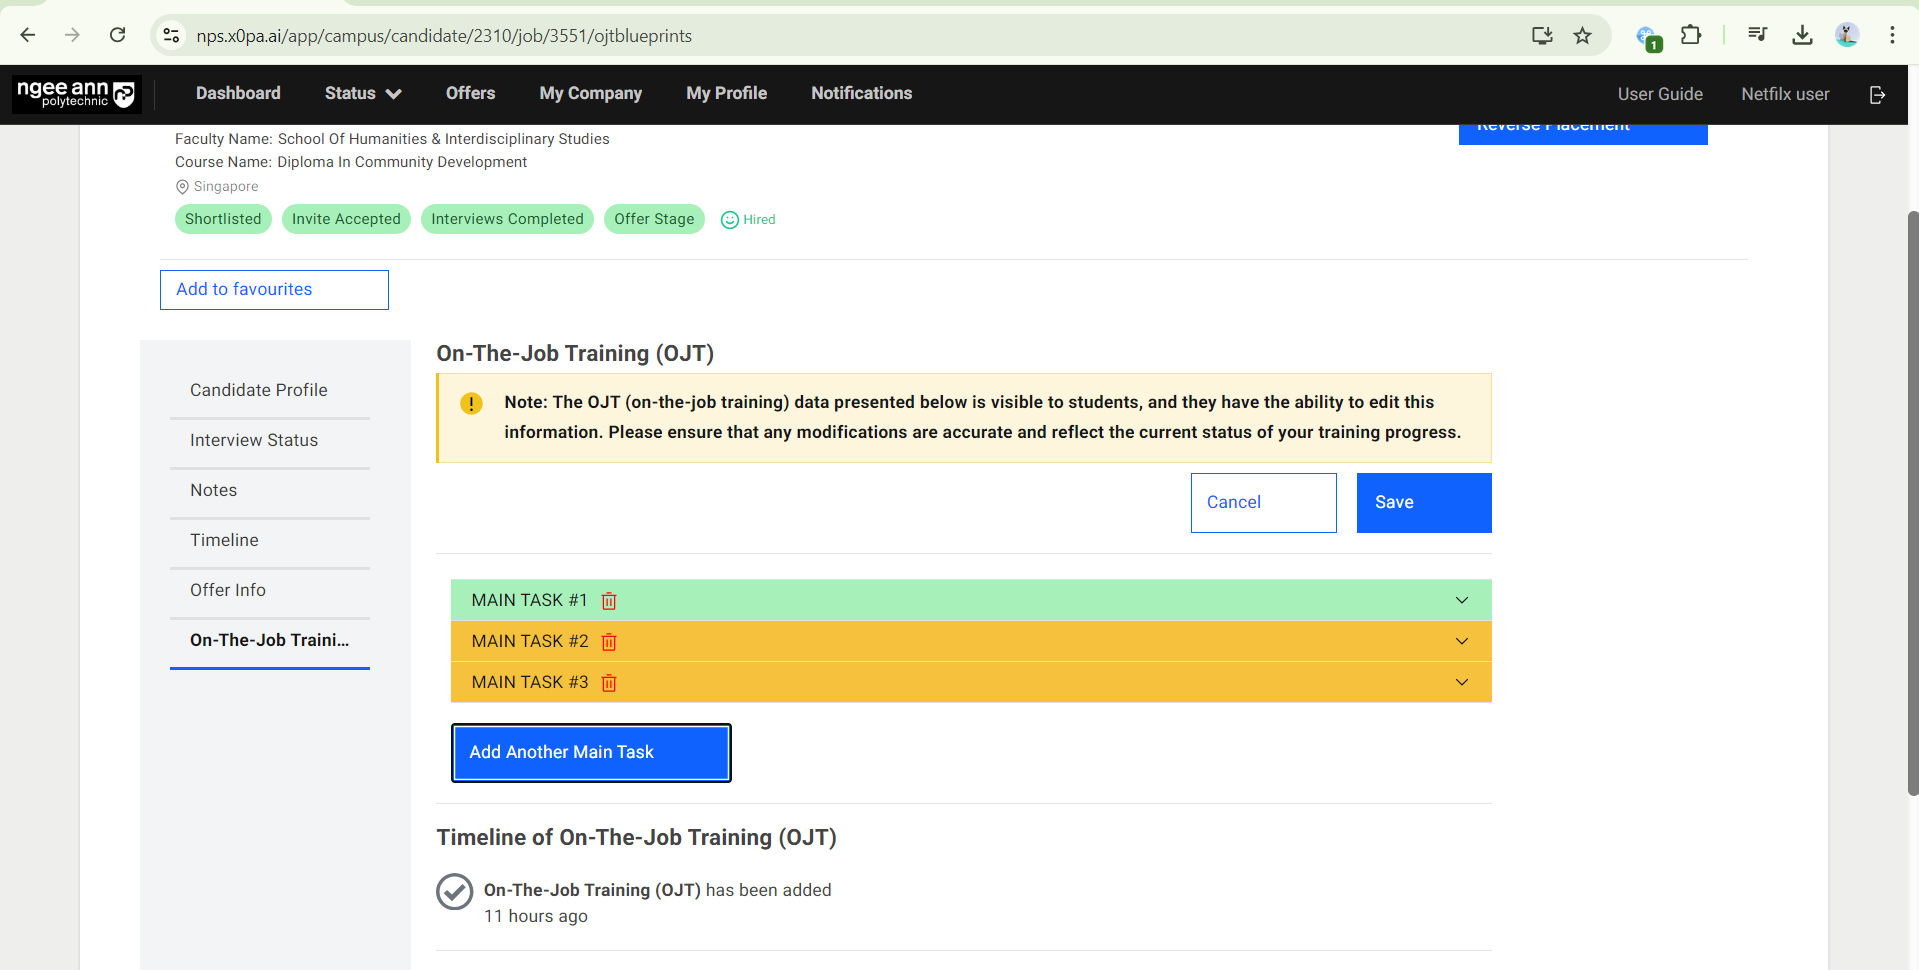
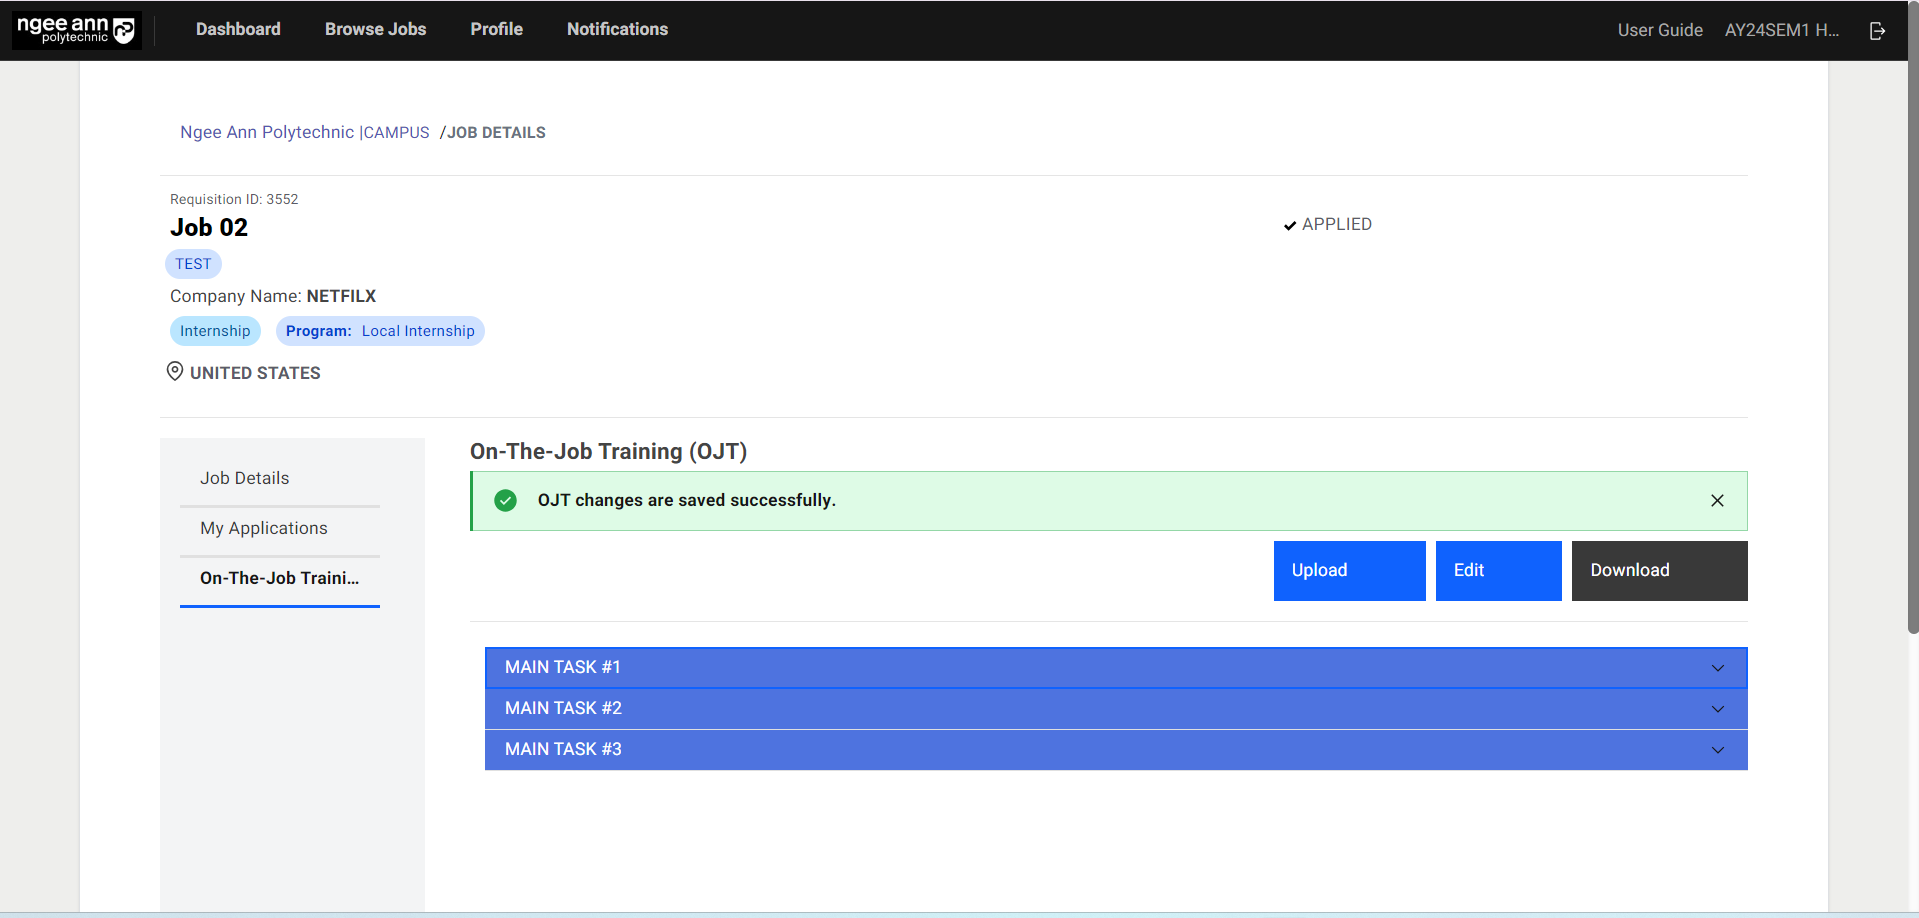
Step 1:
Once the student Accepts the Offer/is Hired for the job, the Student/Application level OJT details will be shown under the “On-The-Job Training” section tab on the job details page.

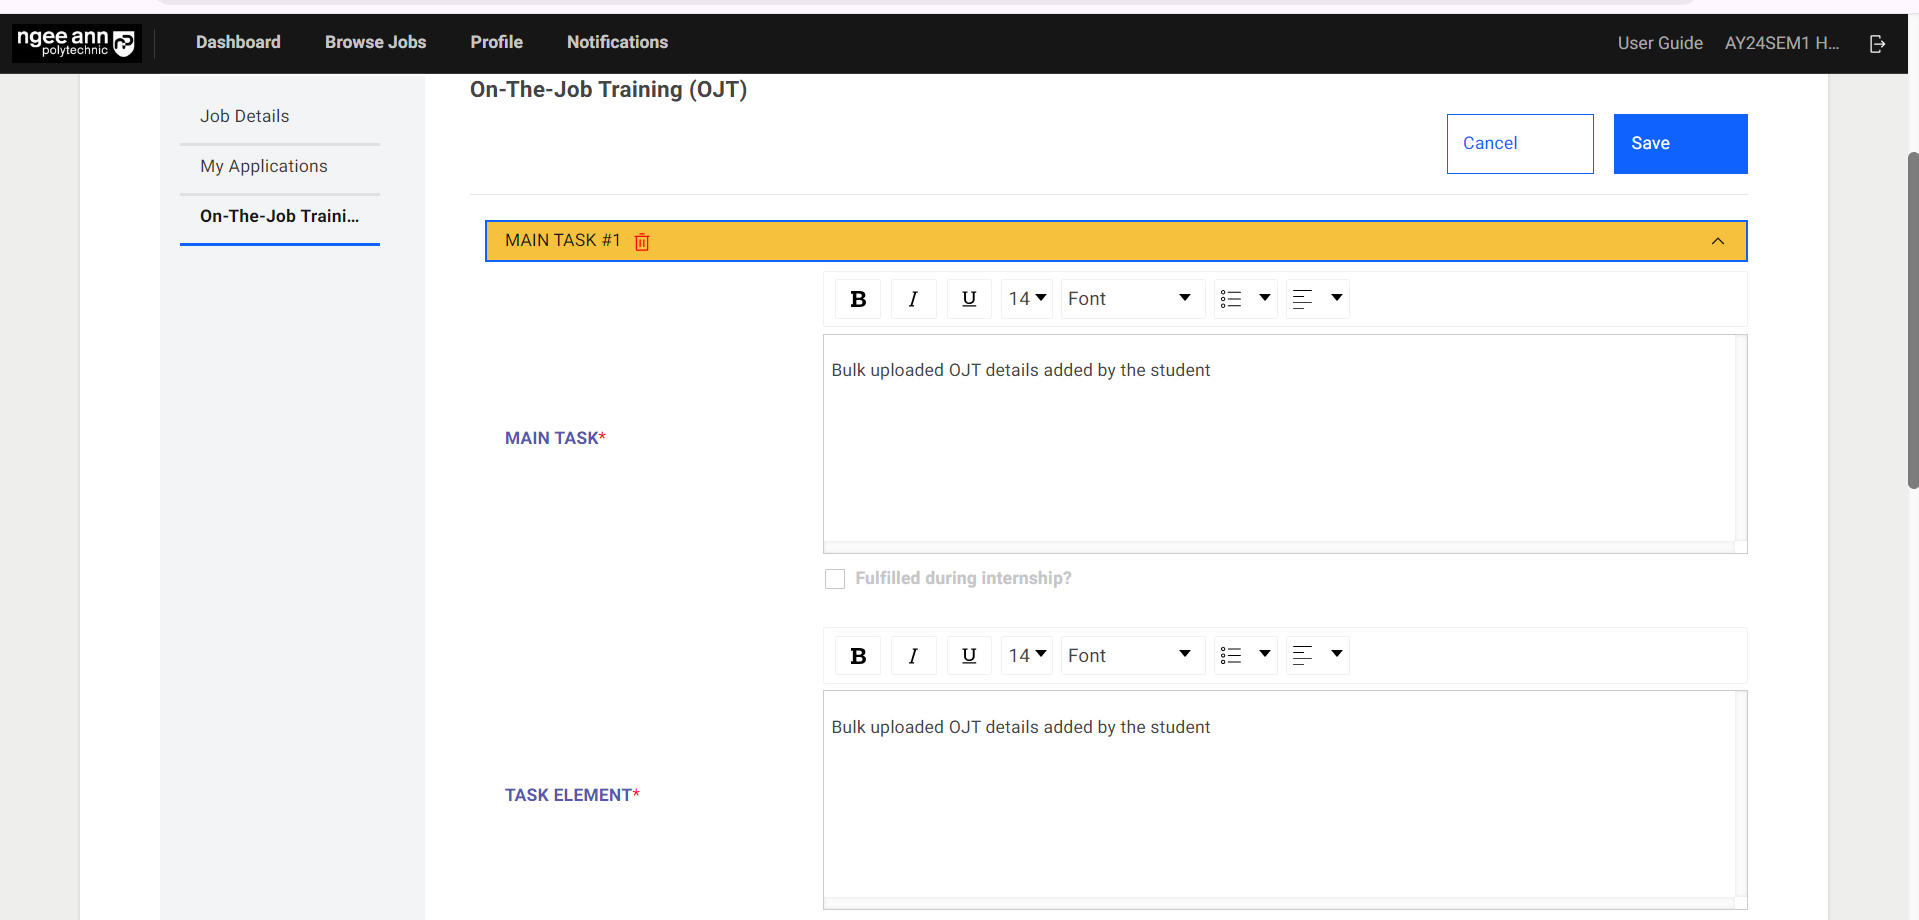
Edit OJT Details
Edit Student/Application level OJT Details (Manually)
Step 1:
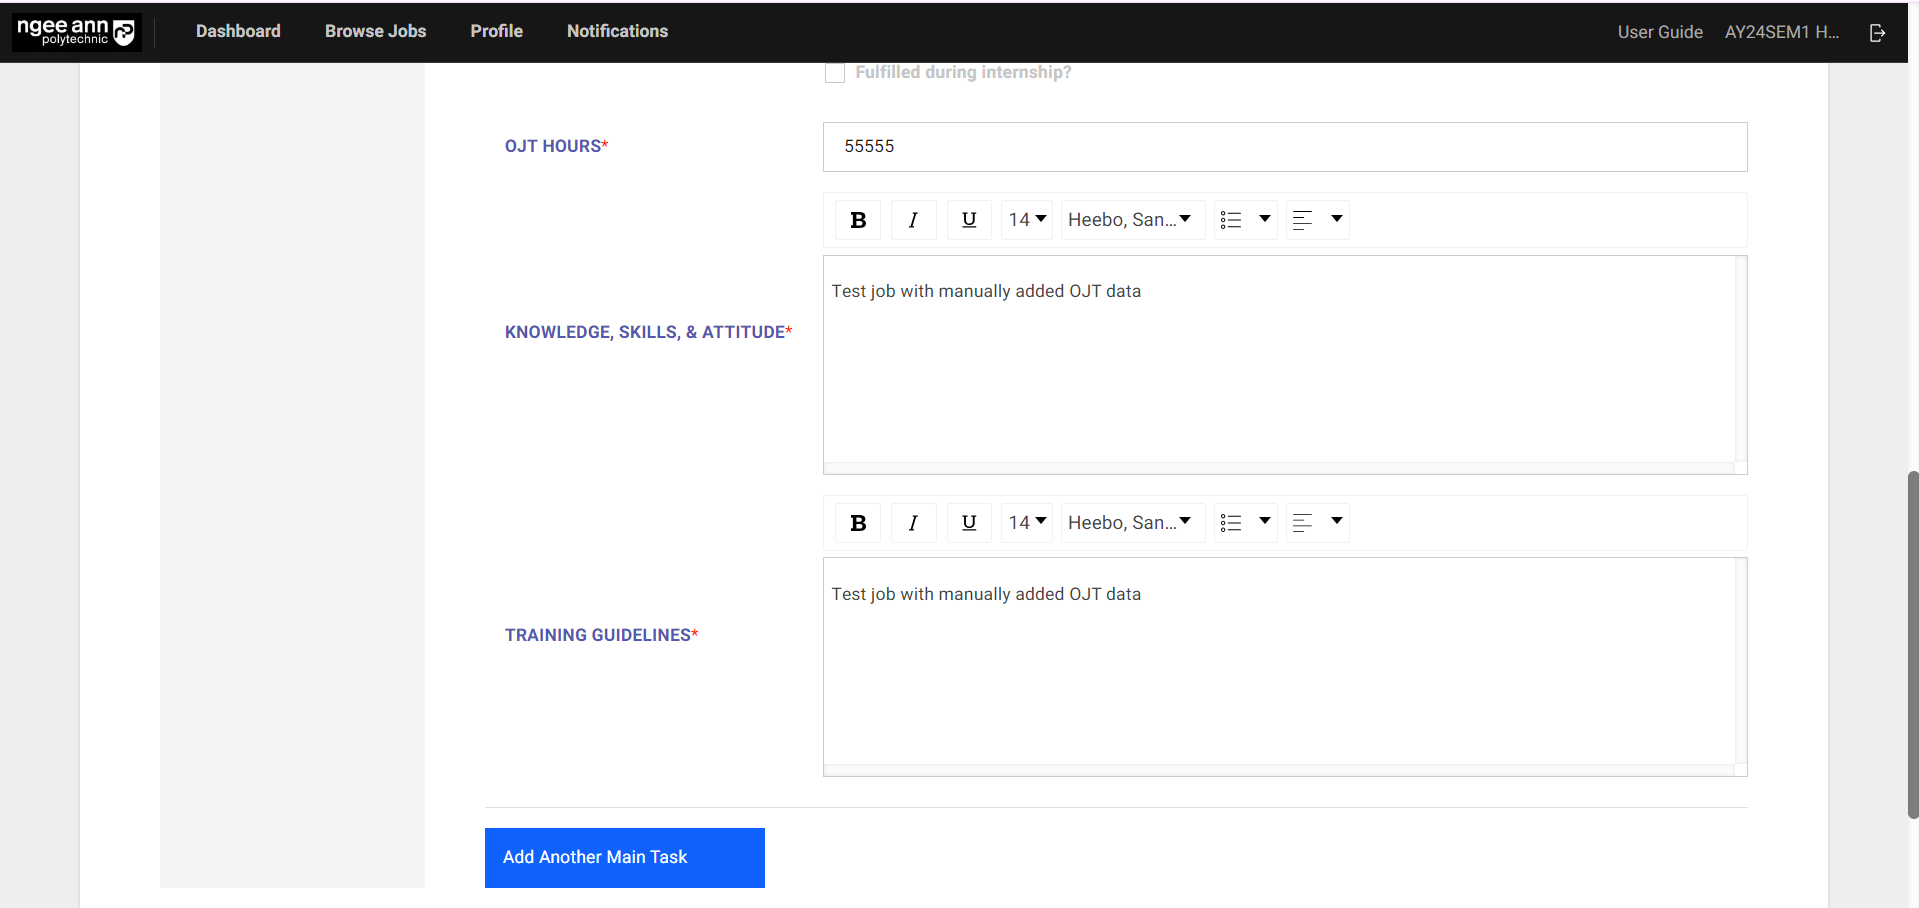
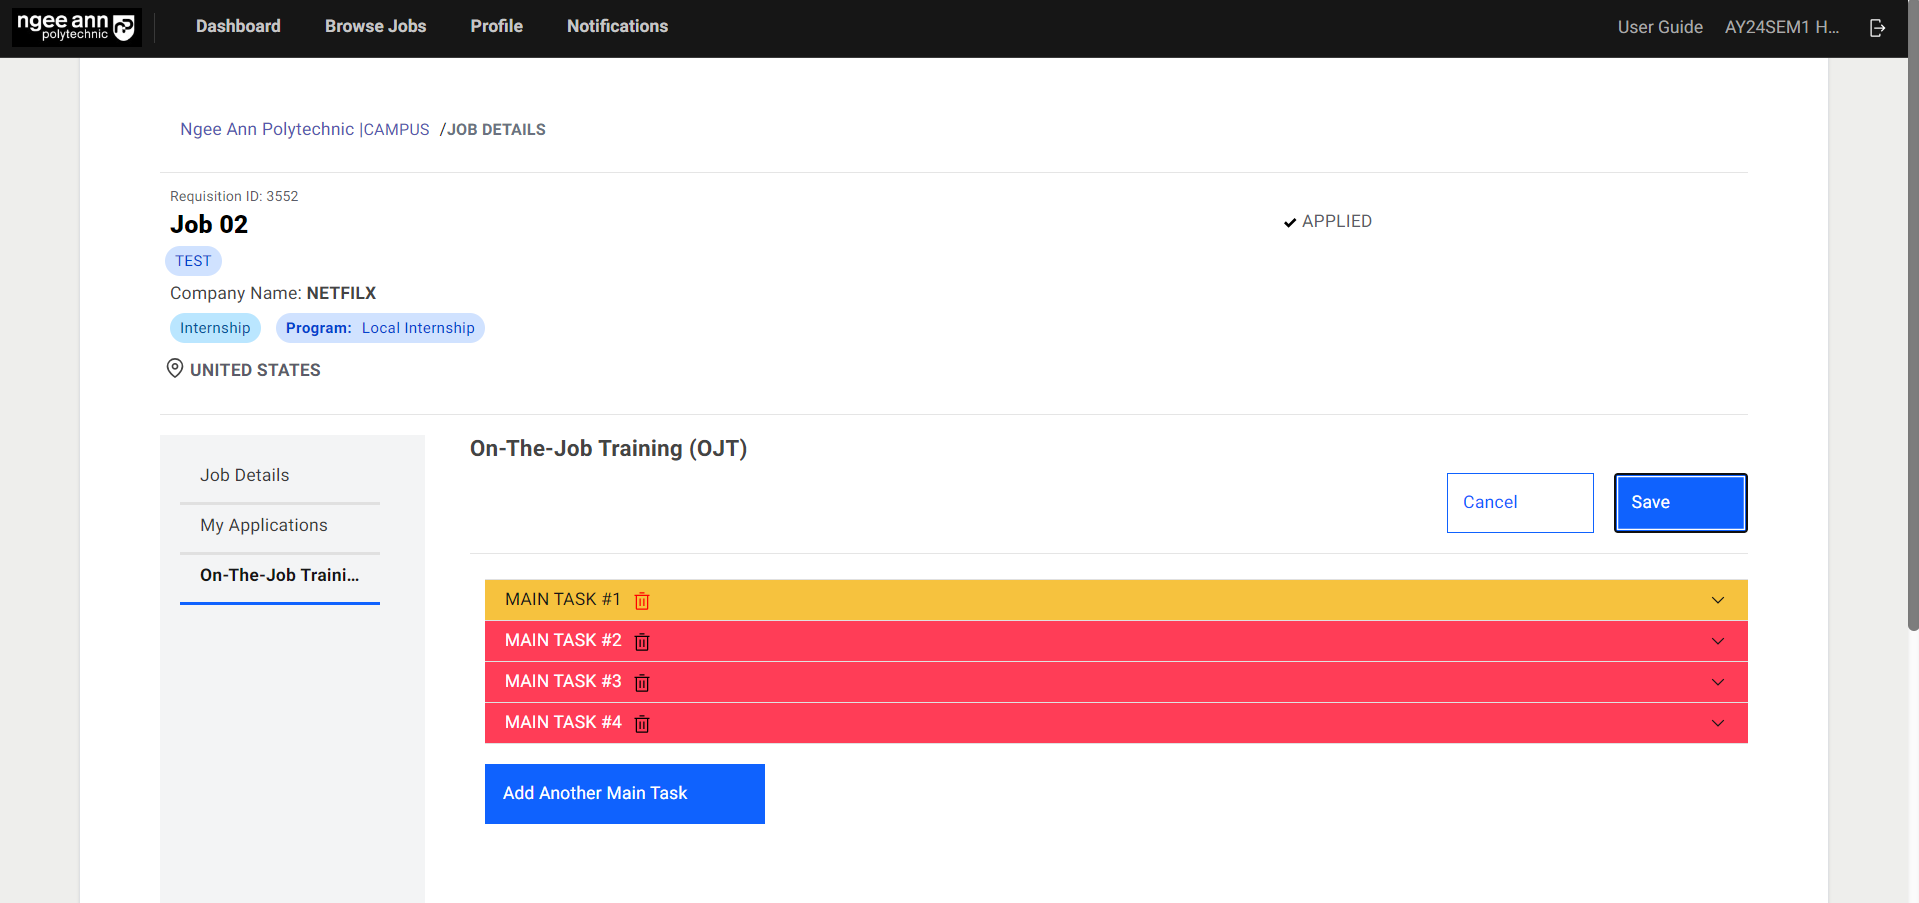
- Click on the “Edit” button.
- Edit the Job/OJT Details from the fields.


Step 2:
- If additional main task needs to be added, click on the “Add Another Main Task” button. Fill in details of the additional main task.
- The main task can be deleted by clicking on the “Trashcan” icon.
- Once all necessary details are updated, click on the “Save” button to save the details.
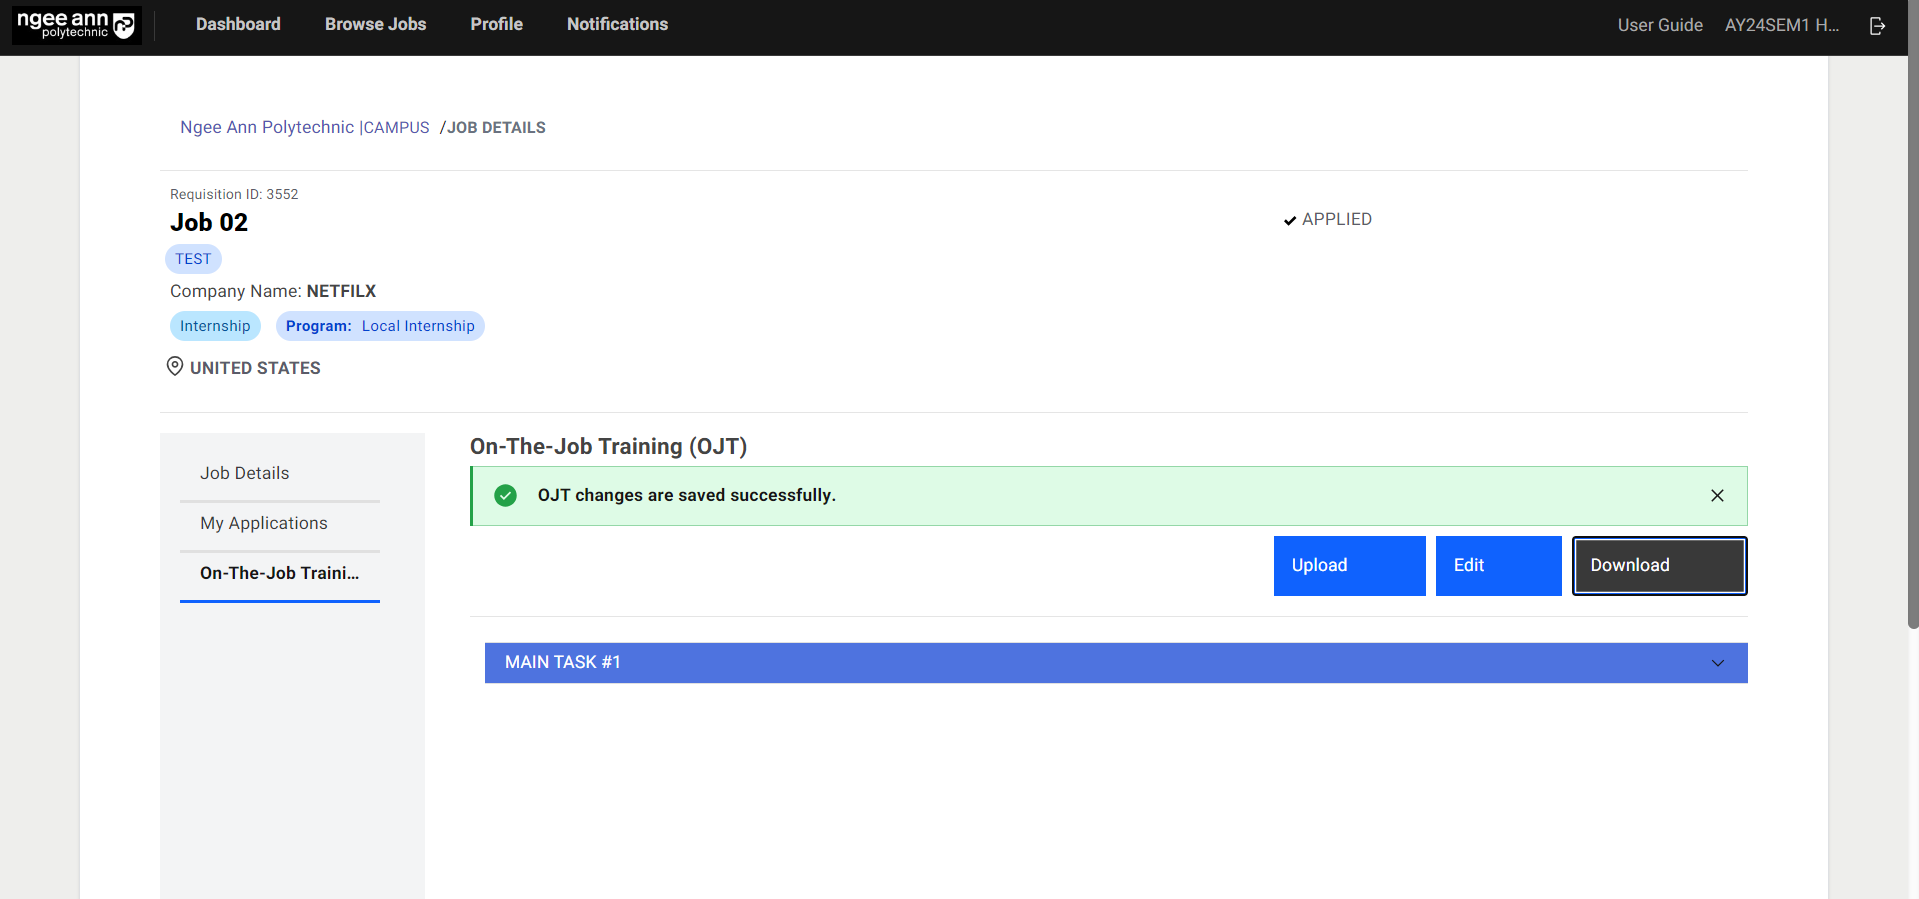
- “OJT changes are saved successfully.” message banner will be shown once OJT details are saved.

Step 3:
- The “Main Task X number” accordion will change to red colour and a validation error will be shown on the field when any OJT field is filled with an invalid or empty field during submission.
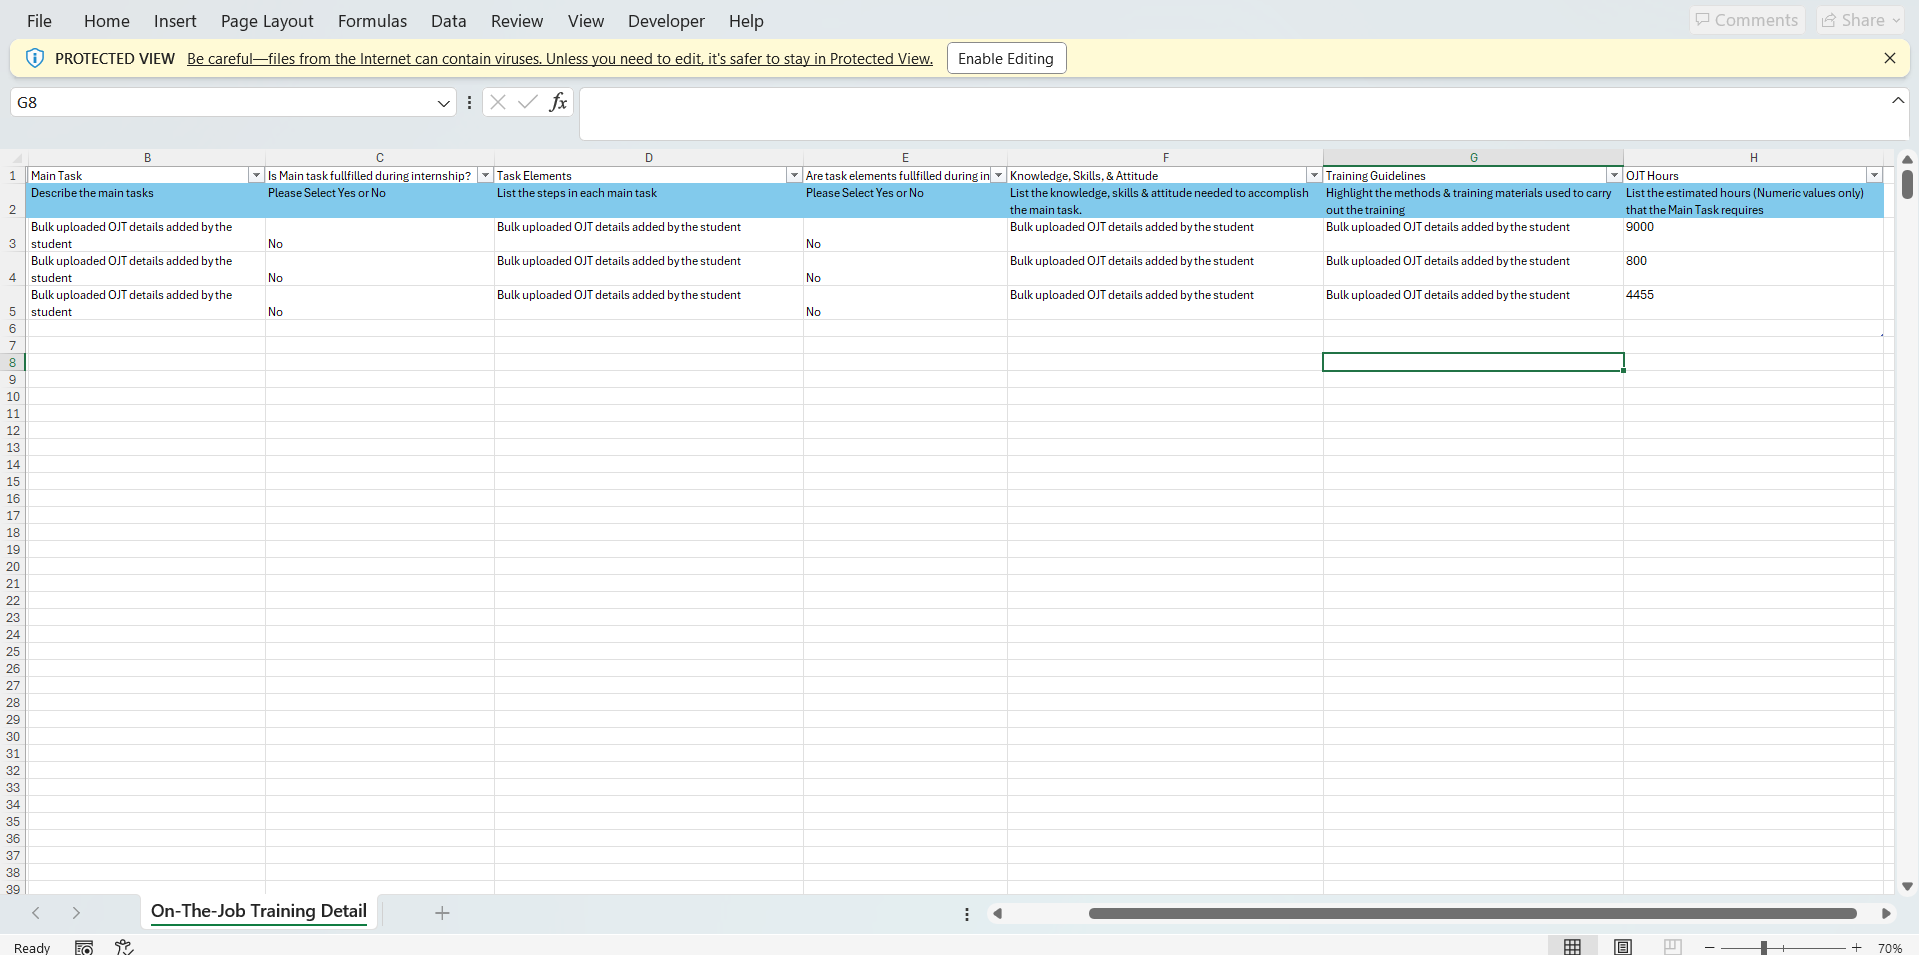
Bulk Upload OJT Details at Student/Application level OJT
Step 1:
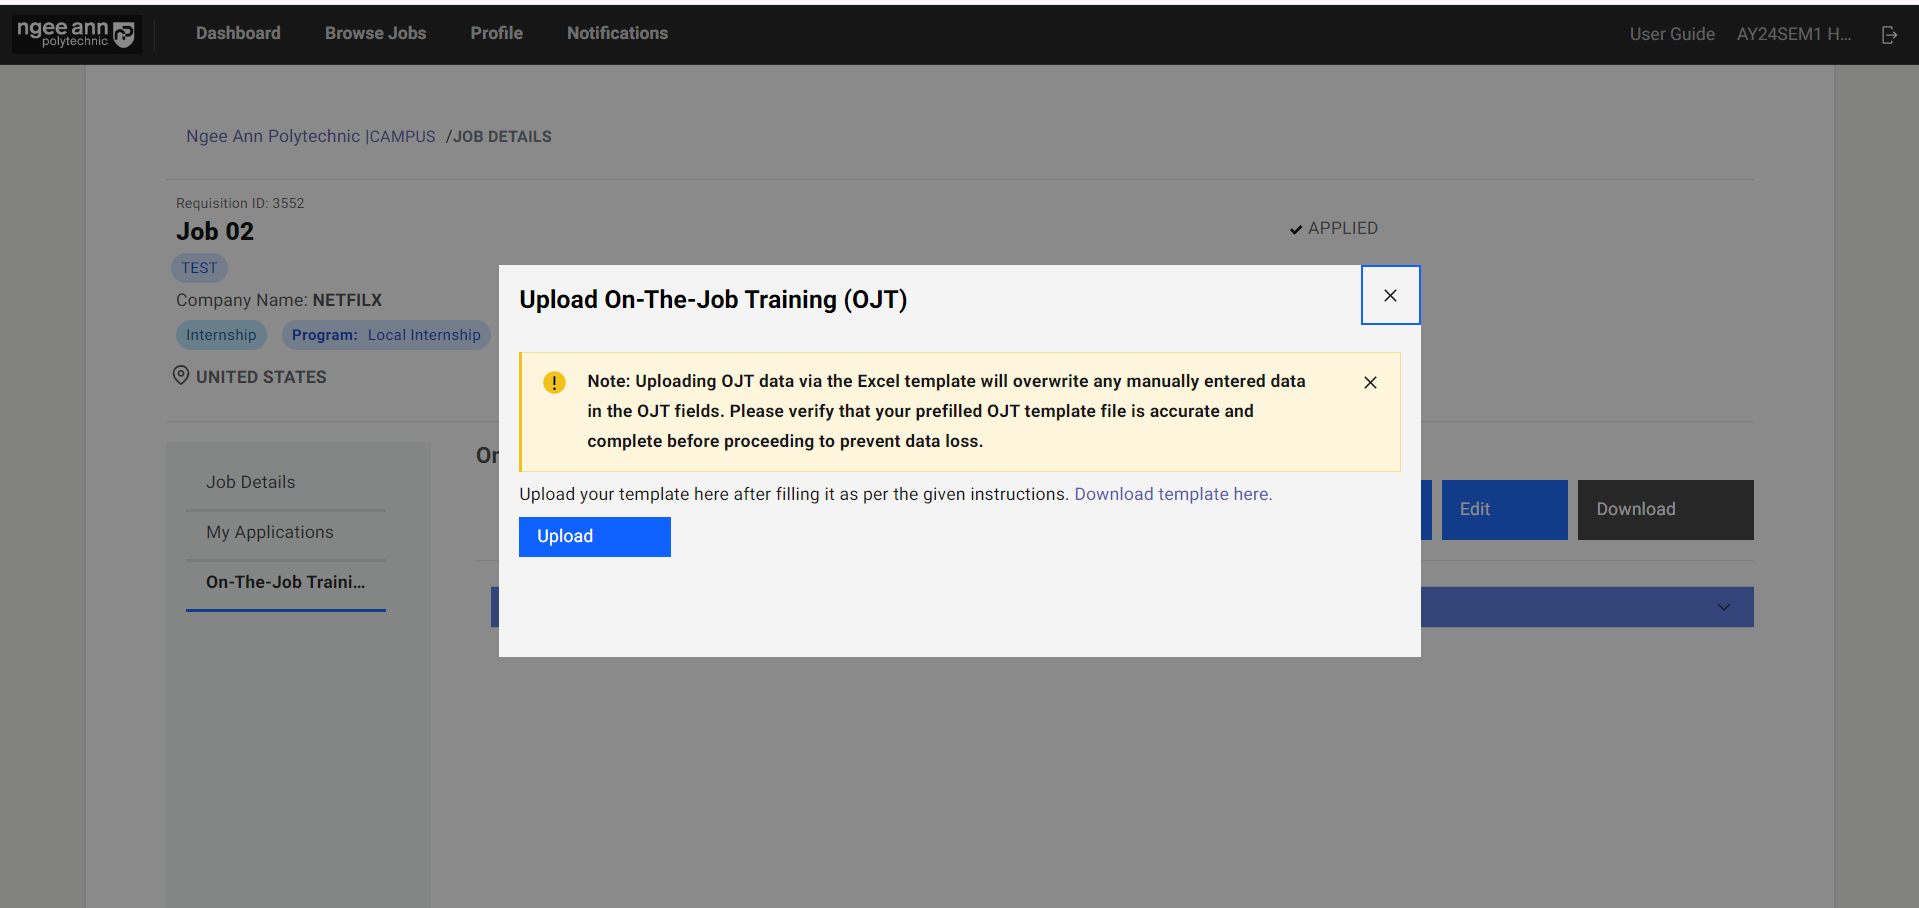
- Student/Application-level OJT data can be uploaded in bulk. Click on “Upload”.
- In the pop-up window, click on “Download template here”.
- Open the downloaded template. Fill in OJT details. Save the template.
- Click on the “Upload” button. Select the pre-filled OJT template and upload the file.
- OJT details will be filled automatically based on the uploaded template.
- Click on the “Save” button to save the OJT data.
- “OJT changes are saved successfully.” message banner will be shown once OJT data is saved successfully.
Note: The uploaded template will overwrite any previous details that have been filled.
Download OJT Details
Download/Export Student/Applicant level OJT
Step 1:
- To export OJT details, click on the “Download” button.
- Open the downloaded file to view the OJT details.
Assessment
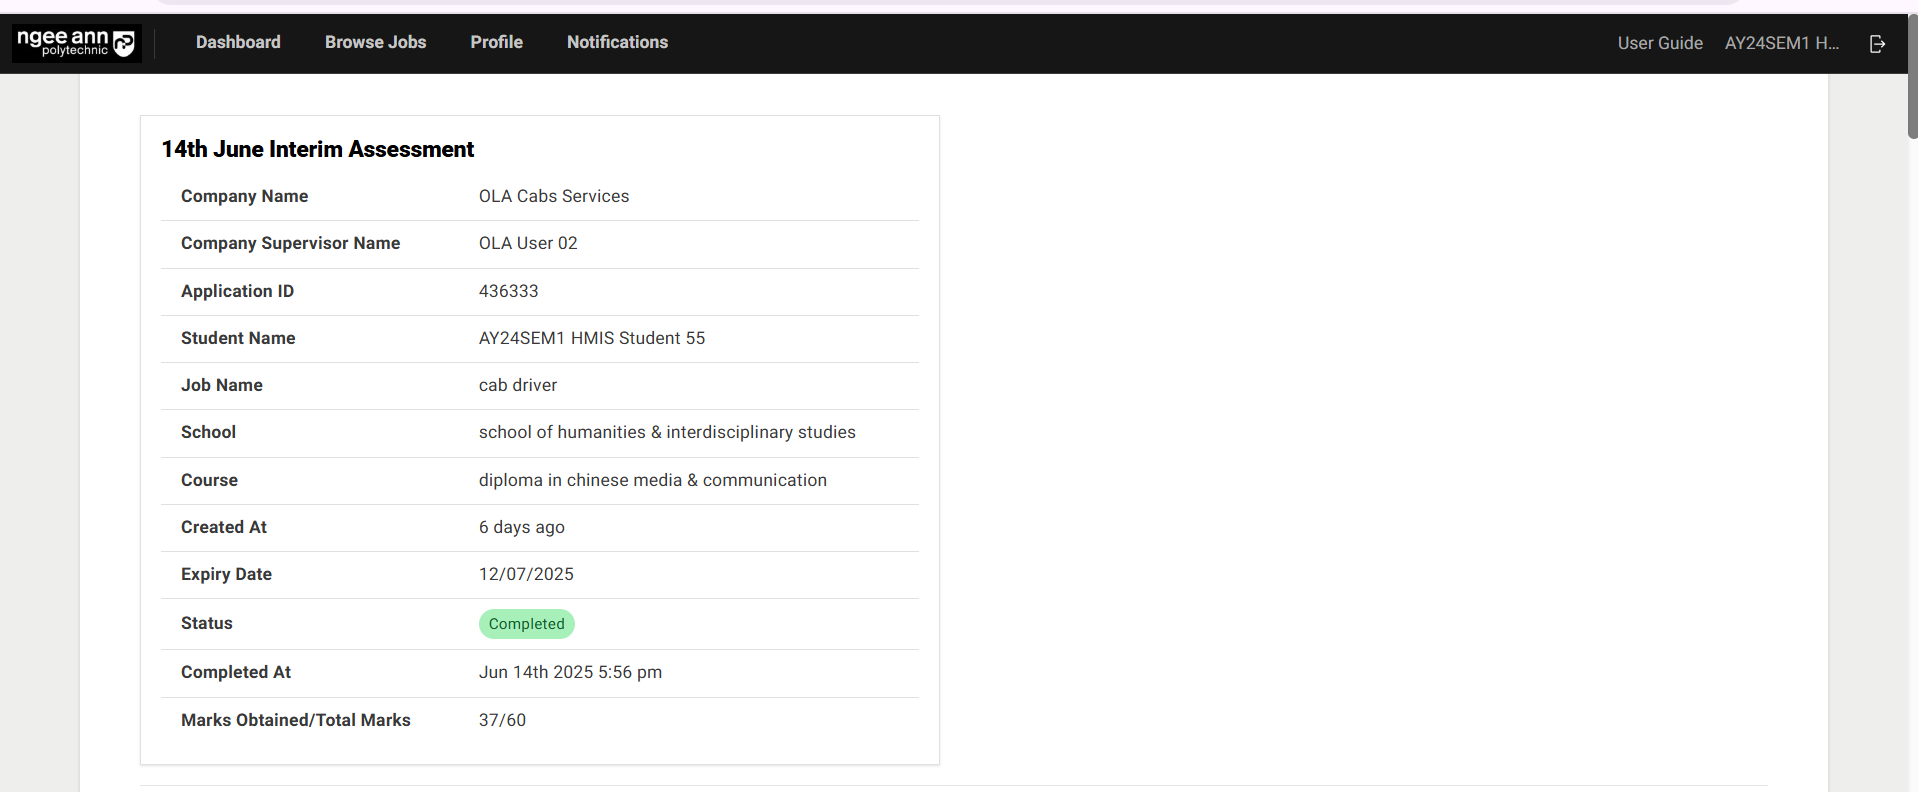
Offers Details Page:
Step 1:
- Click on the “Hired count” under “Applications” section from dashboard page
- Click on the job name under “Completed” section tab under “Offers” section from dashboard page

Step 2:
- Make sure to navigate to “Offer Details” page

Assessment Section Tab (Offer Details Page):
Step 1:
- See the “Assessment” section with “Interim & Final Assessment” accordions in the “Offer Details” page
- Click on the accordions make sure respective accordions expands/collapse
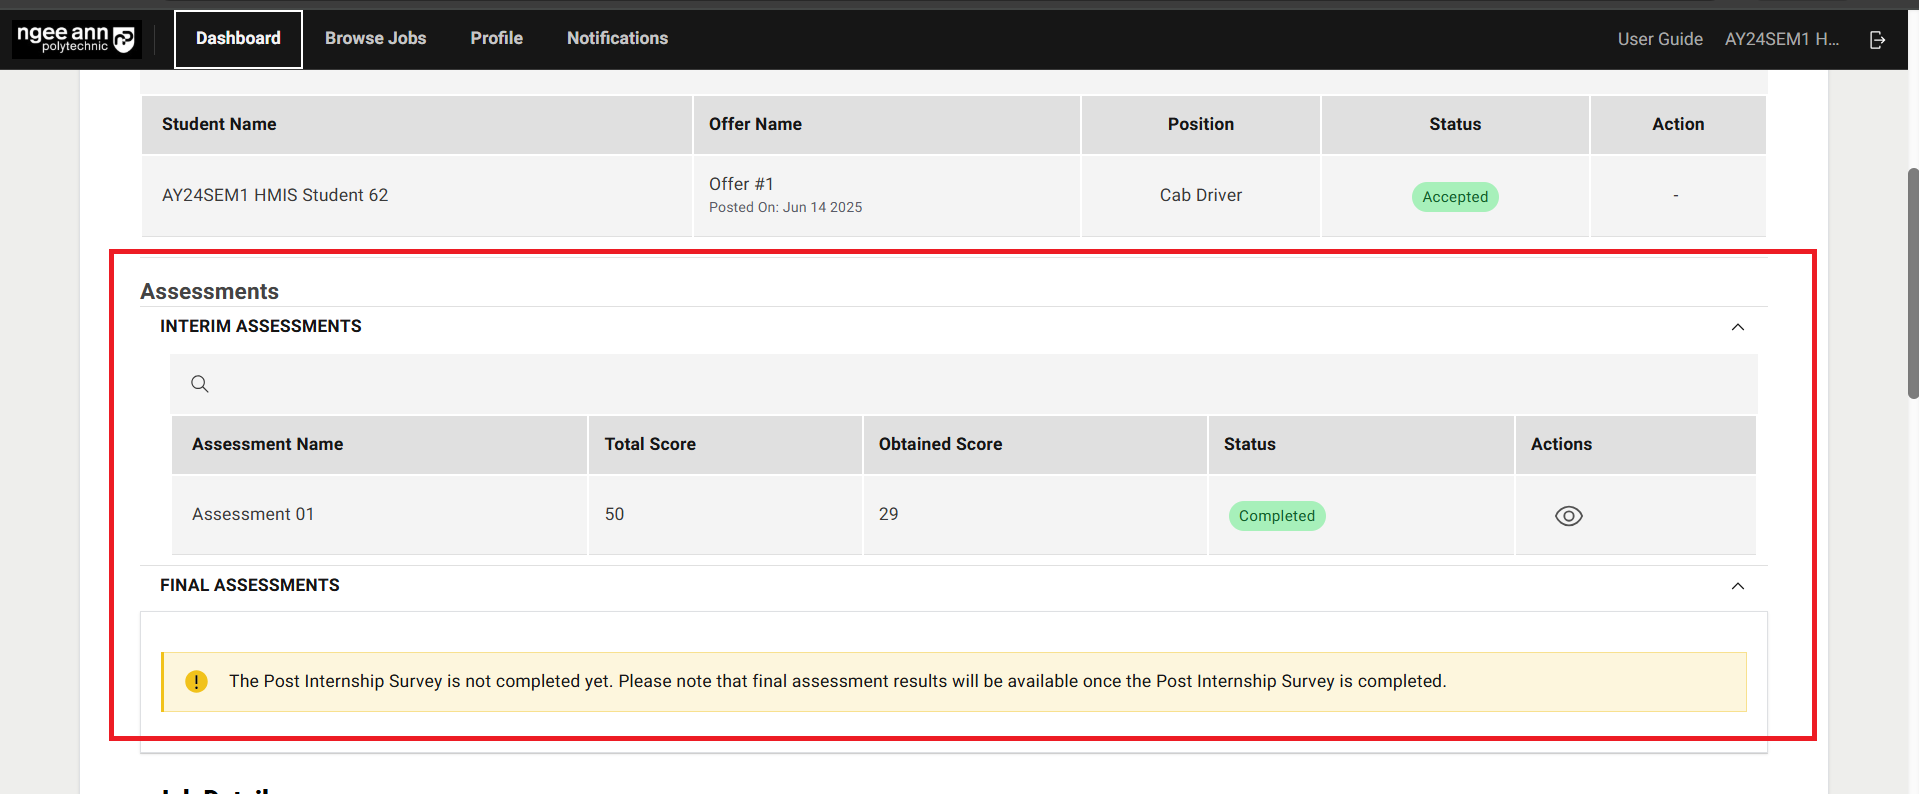
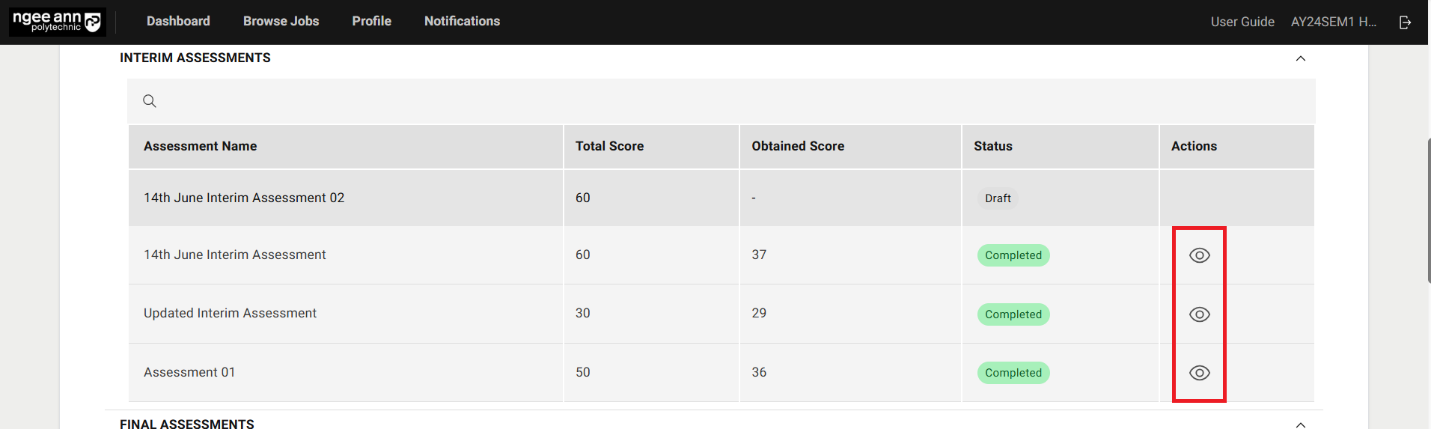
Assessment Table (Interim/Final):
- See the assessment score will be shown in the table.
| Column Name | Description |
|---|---|
| Assessment Name | Displays the name of the assessment assigned to the applicant. |
| Total Score | Represents the maximum possible score for all graded questions in the applicant's tagged assessment. Each graded question carries a maximum of 10 marks. Only graded questions contribute to this total. |
| Obtained Score | Indicates the total score achieved by the applicant, calculated based on the scores assigned by the Company Supervisor to the selected options for each graded question. |
| Status | 1. Draft: The assessment has been assigned, but the Company Supervisor has not yet started responding. 2. In Progress: The Company Supervisor has started responding to the assessment. 3. Completed: The Company Supervisor has finished and submitted the assessment. |
| Actions | This column provides action buttons to interact with the assessment, including “View” button |
- Ensure that the Interim & Final Assessments assigned to the student are displayed within their respective accordions.
Note: A message banner stating “The Post Internship Survey is not completed yet. Please note that final assessment results will be available once the Post Internship Survey is completed.” will appear under “Final Assessment” section if the student has not completed the assigned survey or is not associated with at least one survey.
To access the final assessment results, the student must complete the assigned survey.
View Assessment (Interim/Final):
Step 1:
Click the “View (Eye)” button located in the Actions column of the table.
Ensure that you are redirected to the Assessment page.
Note: The “View (Eye)” icon is only visible when the assessment status is marked as “Completed.”
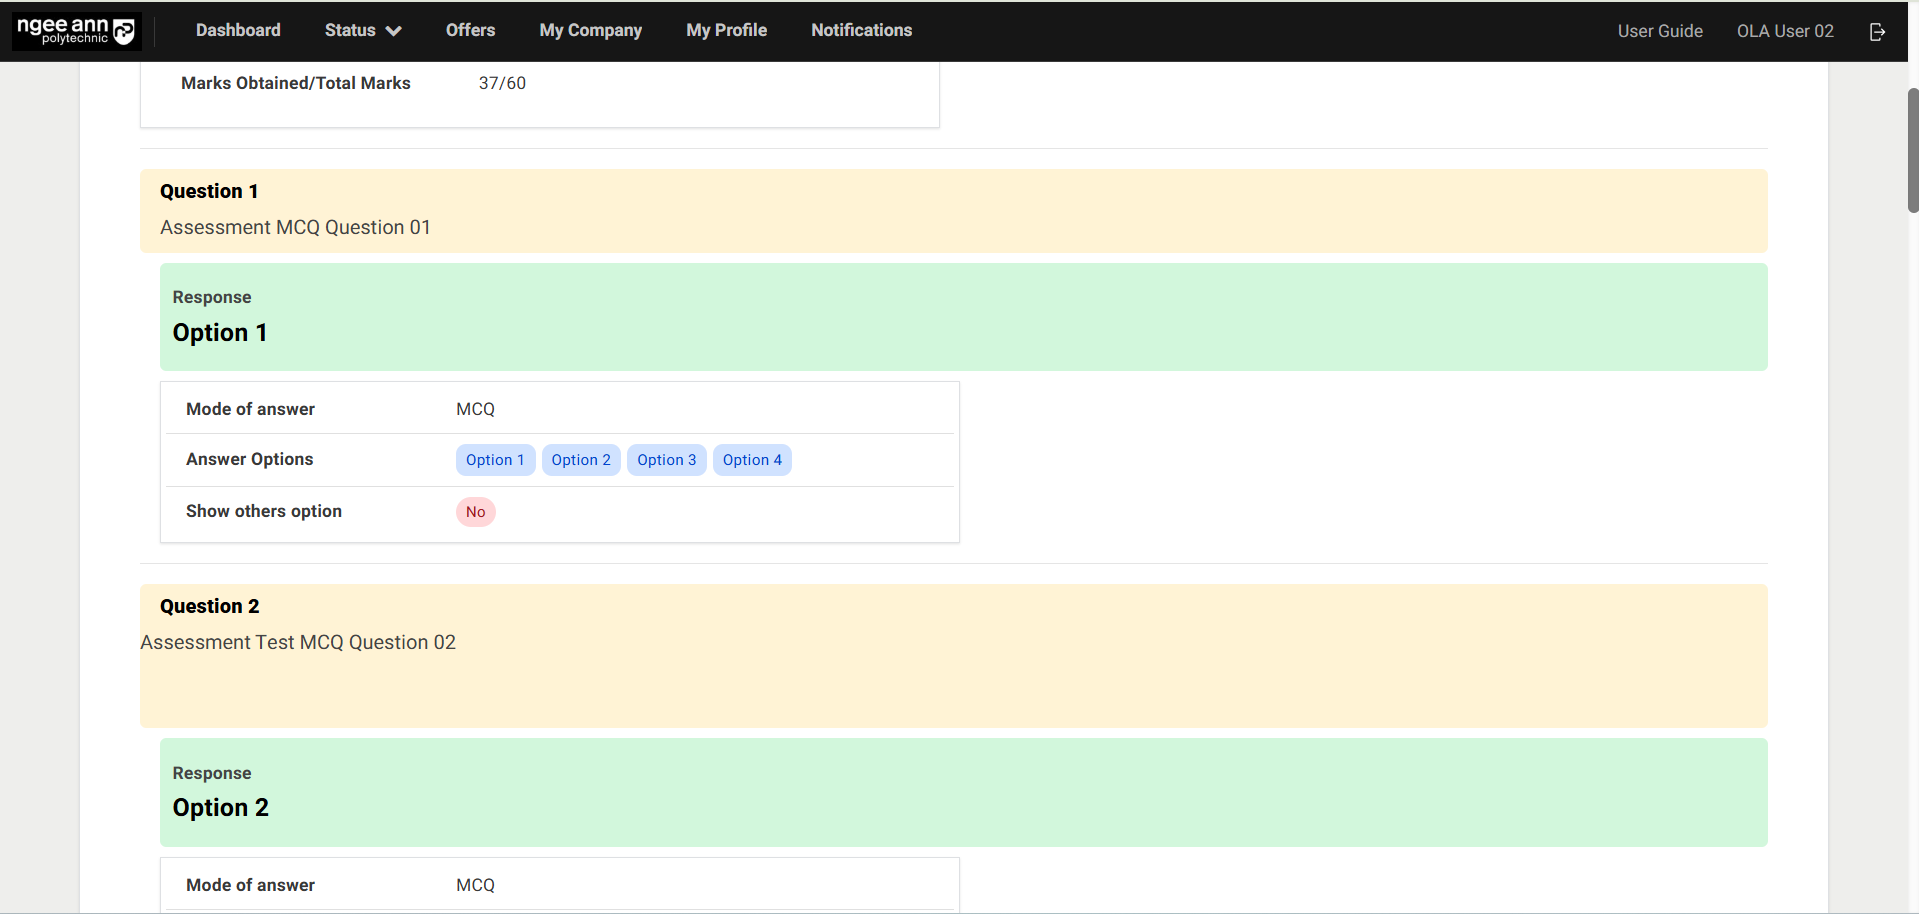
Step 2:
-
Ensure the student navigates to the respective Assessment page.
-
Review the saved responses for each assessment question, along with the corresponding answer details.
Internship Visitation Logs
Internship Visitation Logs Table:
Step 1:
- Click on the Dashboard
- See the "Internship Visitation Logs" section with table will be shown
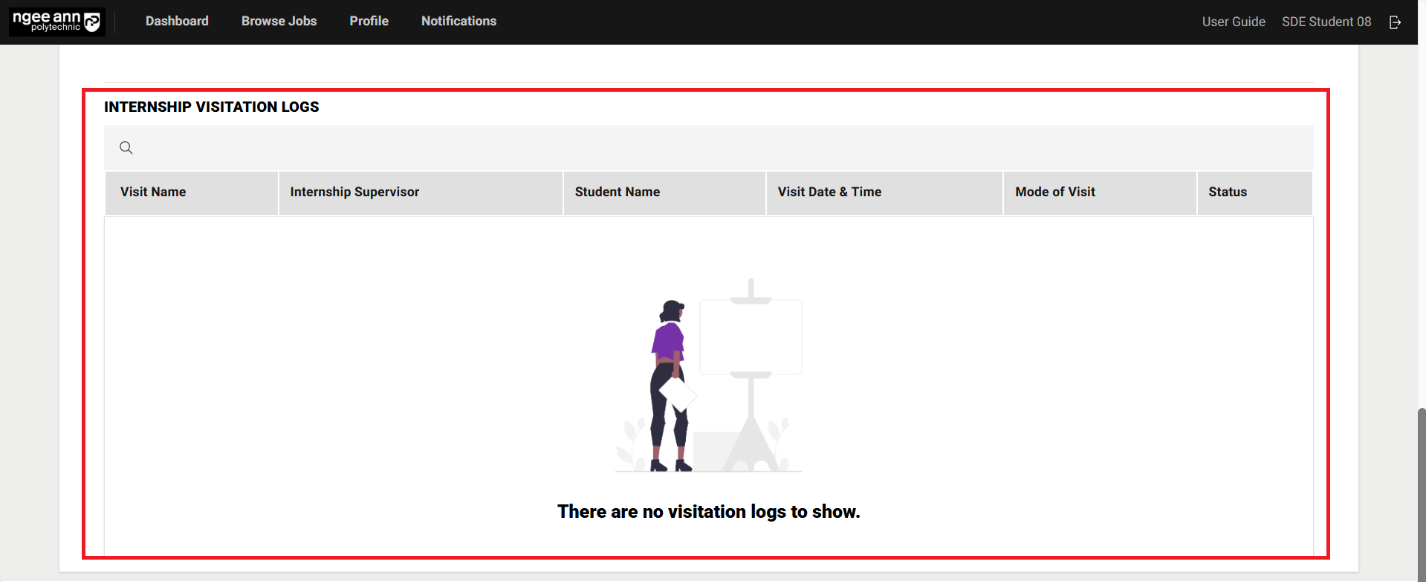
Scheduled Visit Records in the Table:
Step 1:
- Admins scheduled visit records for respective hired applicant will be shown in the table
- Visit records data will be shown under respective columns in the table

Survey (Respondent)
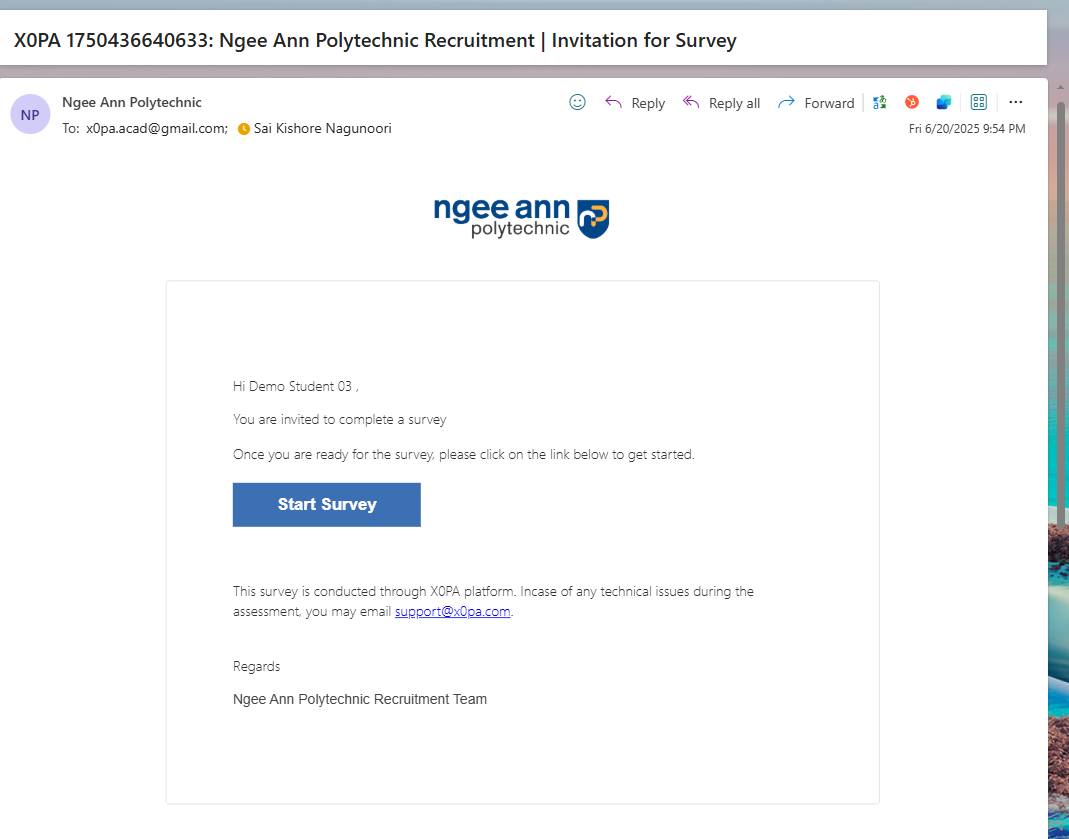
Survey Invitation Mail
Step 1:
- Make sure once NP Staff Admins send survey invitation then respective respondent will receive and email notification.
- Click the "Start Survey" button in the notification email to begin the survey.
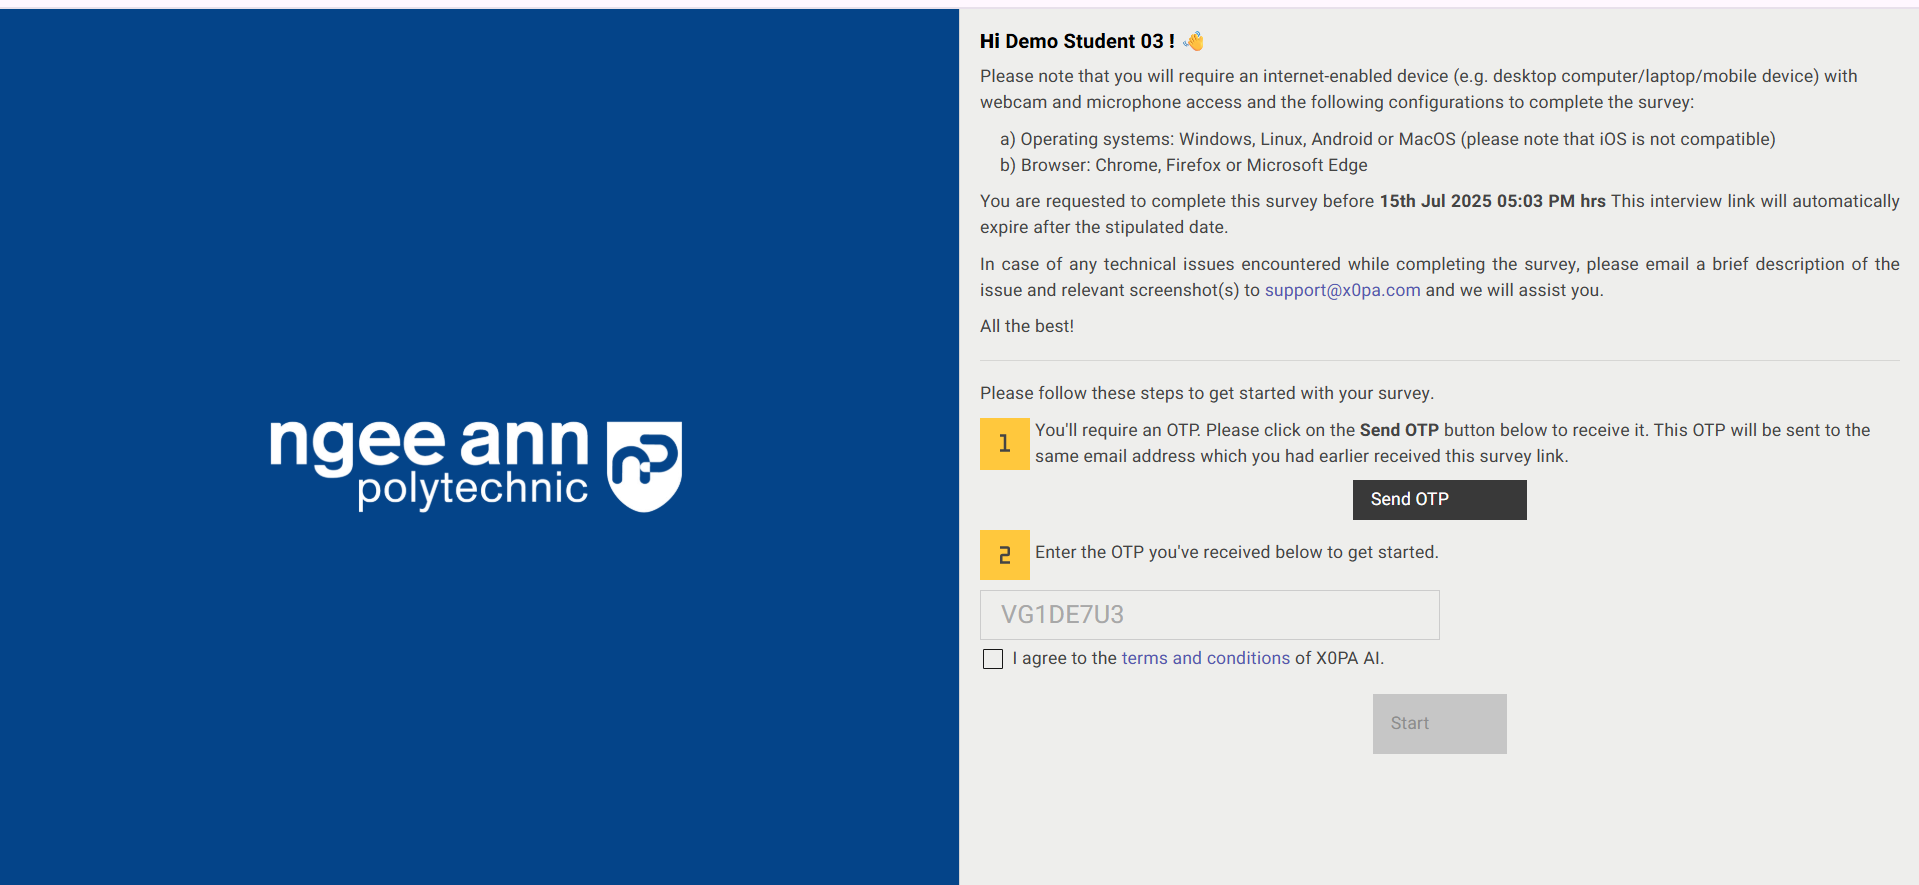
Survey Welcome Page
Step 1:
- Navigate to the Survey Welcome page.
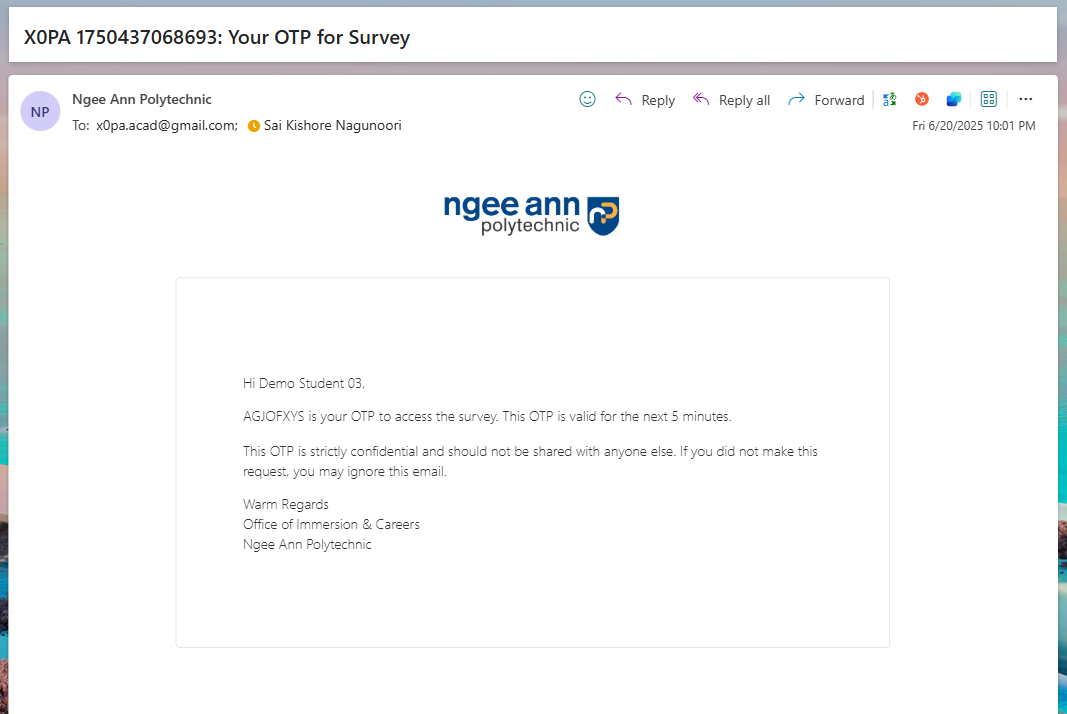
- Click the "Send OTP" button to request a One-Time Password (OTP).
- Once you receive the OTP via notification email, copy and paste it into the provided field.
- Select the "I agree to the terms and conditions…" checkbox.
- Click the "Start" button to proceed to the survey questions page.
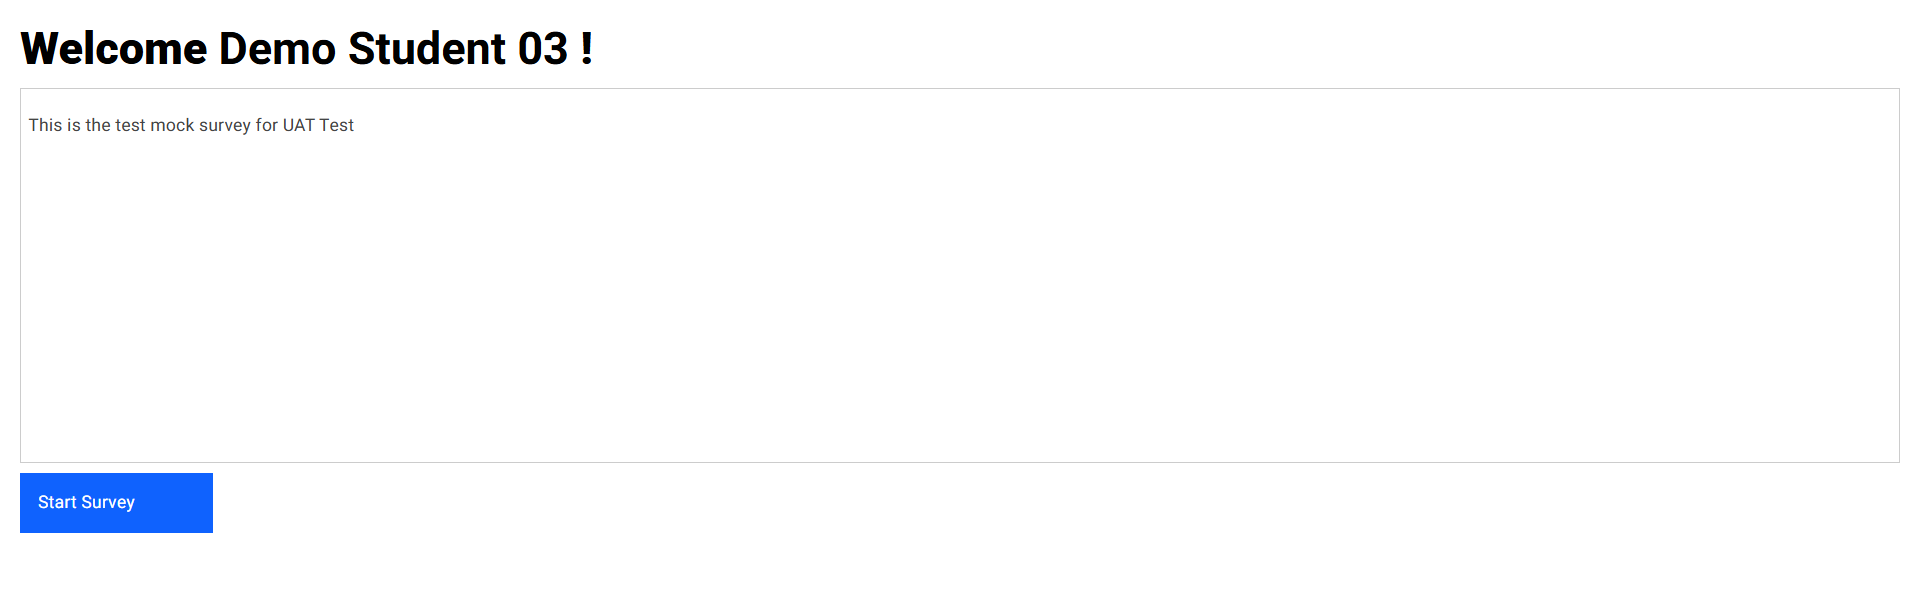
Survey Instructions Page
Step 1:
- Instructions added by the NP Staff admins for respondents will be displayed in the instruction box.
- Click the "Start Survey" button to begin the survey.
Survey Questions Page
Step 1:
- A banner displaying the expiration message — "The survey will close on [X Date, Y Time]. You can return and edit your response before the due date." — will appear at the top of the page.
- All questions assigned to the respective survey will be displayed on a single page.
- Respondents should provide answers to each question.
- Responses are automatically saved as soon as an answer option is selected.
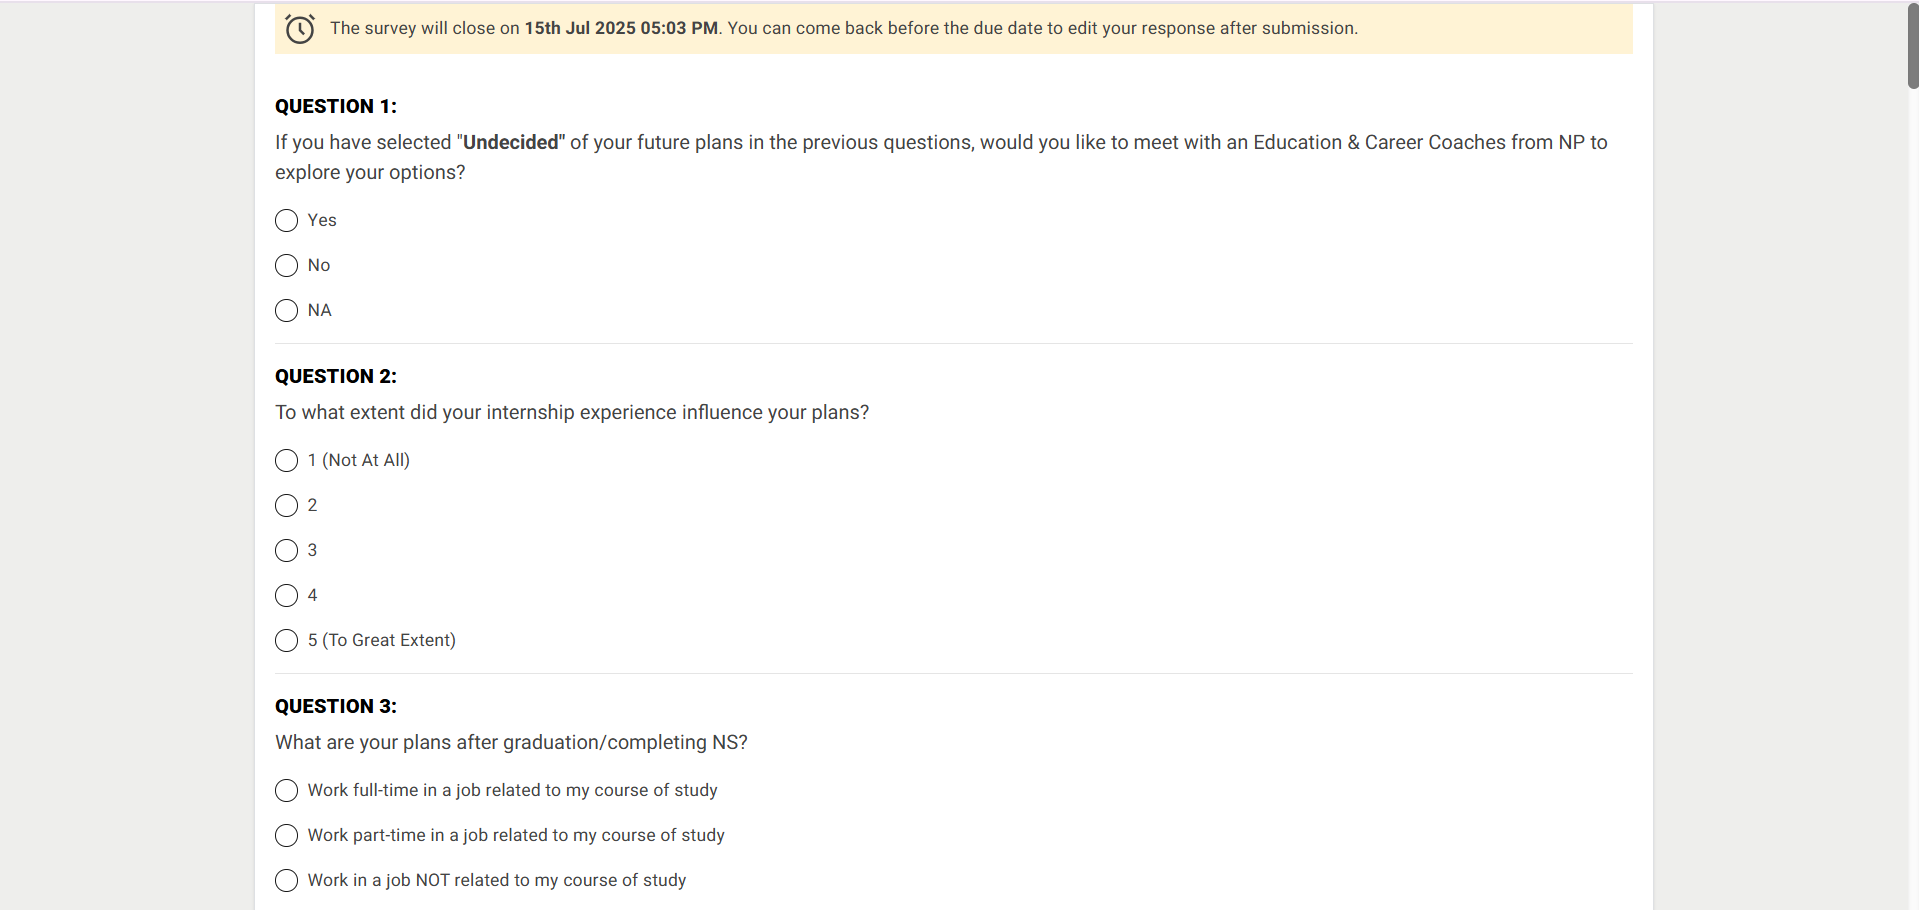

Step 2:
- A "Submit" button will be displayed at the bottom of the page.
- Click the "Submit" button to finalize and submit the survey responses.
Note: Each survey question must be answered by the respondent. If any question is left unanswered or contains invalid input, a validation error message will be displayed, and the survey cannot be submitted until all responses are completed correctly.
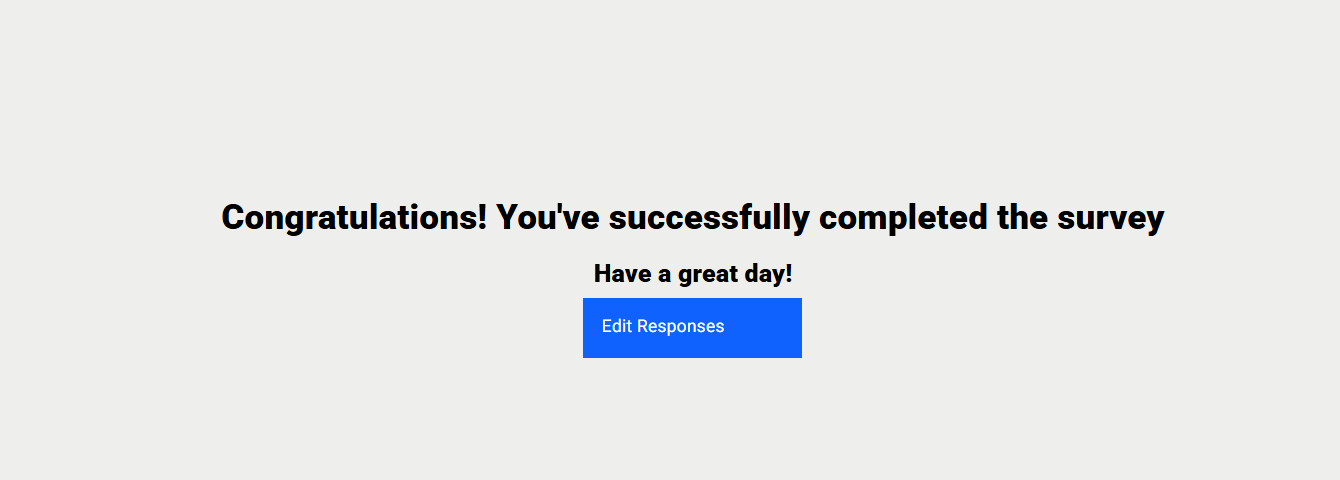
- "Congratulations! You've successfully completed the survey." Successes message with "Edit Responses" button will be shown when respondent submitted survey responses.
- Respondents can edit their survey responses until the survey reaches its expiration time.


Step 3:
- After submitting the survey responses, a greeting page will be displayed with an "Edit Responses" button.
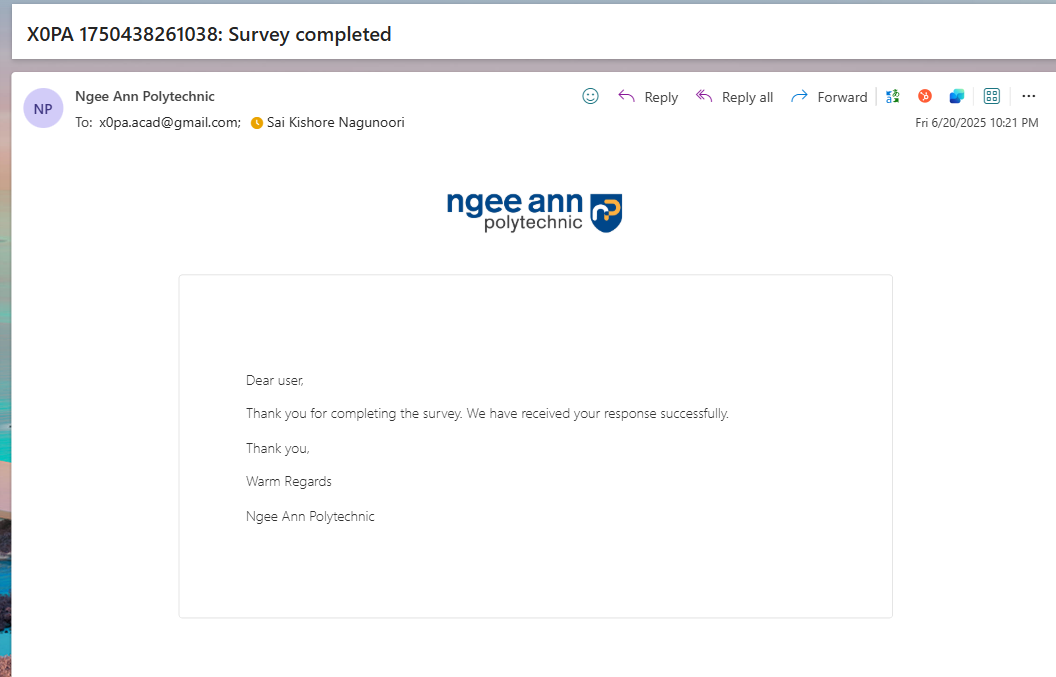
- Once submitted, the respondent will receive a confirmation email notification.
Note:
- From the Greeting page, respondents can edit their responses immediately after submission. Respondent will be redirected to OTP page
- If a respondent wants to edit the survey later, they can use the same survey invitation email to access and update their responses.